UiPath Maestro Public Preview
Overview
We’re excited to announce the public preview of UiPath Maestro.
UiPath Maestro enables organizations to orchestrate long running complex enterprise processes across people, robots and AI agents, and operate them at scale across systems of engagement and systems of records. Using UiPath Maestro, organizations can manage the entire lifecycle of their long-running business processes including modeling, implementation, operations, monitoring, and optimization.
With Process Modeling, process owners (typically in business teams) can model their business processes in industry standard notations such as BPMN, and business rules using notations such as DMN. Process owners will also be able to fully manage and govern the lifecycle of their process and business rules models - version manage them, create, update, retire etc.
With Process implementation, automation developers (typically in IT/Automation COE) can implement the business process and make them executable using the native capabilities of the UiPath platform including RPA and Agents. These Agents could be those natively built using the UiPath Agent builder platform, or could be those built using other platforms.
With Process Operations and Monitoring, process operations team and admins can monitor the live instances of running processes, view execution heat-maps, debug instance failures and exceptions and mitigate them, fixing variables, pausing / skipping / rewinding / restarting instances as the case may be.
With Process Optimization, process excellence / analysis teams can analyze the efficacy of their as-is processes, perform deep analysis such as process simulation, root cause analysis, bottleneck detection etc. and identify opportunities to improve process design for increased efficiency. Process admins can update eligible instances of processes to new versions published by process owners.
Demonstration
Safe Harbor - Please read
UiPath Maestro is a product that is in Public Preview.
This means that:
There may be certain product limitations and prerequisites - see Pre-requisites and Considerations
Product features and experiences are subject to change
We are so excited for you to try out and provide feedback for our product!
Introduction
Introduction
Businesses are drowning in complexity. Enterprise workflows have become more complex, and include deterministic and non-deterministic workflows. On average large enterprises use over 175 systems. Complex processes, mix of legacy and modern apps, fragmented tech stack, siloed data spread across disparate systems, co-ordination across many internal teams and external stakeholders — it’s a maze that gets more complicated by the day. Given this complexity, organizations have limited visibility on how their processes are working end to end, how their process and business KPIs are trending over time, and opportunities for making their processes more efficient! While AI is advancing at a rapid pace, without a learning loop built in across the entire process lifecycle, organizations are struggling to understand how best to generate real ROI from their AI investments in a governable way! All of this complexity leads to disjointed processes, increases total cost of ownership and keeps organizations from achieving the business outcomes they care most about.
In the Agentic AI era, the future of automation is both Robotic and Agentic. RPA and Agentic workflows are complementary, and when orchestrated thoughtfully alongside humans, can enable organizations to run their processes more efficiently than before. The sweet spot for RPA is to automate rule-based tasks that span multiple business systems and require high reliability and efficiency, such as data gathering, entry, and migration. Agents excel in handling the unstructured parts of a business process that require high adaptability, such as forecasting, comparison, innovation, and problem-solving. In cases where enterprise knowledge might be difficult to express in rules, an agent aids with creative and dynamic decisions and is goal-based. The key to automating, modeling, and monitoring complex business processes is UiPath Maestro. It connects robots, agents, and humans under the same framework and is necessary for the successful scaling of agentic automation.
Maestro key capabilities and target personas
UiPath Maestro enables organizations to orchestrate long running complex enterprise processes across humans, robots and AI agents, and operate them at scale across systems of engagement and systems of records. Using UiPath Maestro, organizations can manage the entire lifecycle of their long-running business processes including modeling, implementation, monitoring, operations and optimization.
With Process Modeling, process owners (typically in business teams) can model their business processes in industry standard notations such as BPMN, and business rules using notations such as DMN. Process owners will also be able to fully manage and govern the lifecycle of their process and business rules models - version manage them, create, update, retire etc.
With Process Implementation, automation developers (typically in IT/Automation COE) can implement the business process and make them executable using the native capabilities of the UiPath platform including RPA and Agents. These Agents could be those natively built using the UiPath Agent builder platform, or could be those built using other platforms.
With Process Operations and Monitoring, process operations team and admins can monitor the live instances of running processes, view execution heat-maps, debug instance failures and exceptions and mitigate them, fixing variables, pausing / skipping / rewinding / restarting instances as the case may be.
With Process Optimization, process excellence / analysis teams can analyze the efficacy of their as-is processes, perform deep analysis such as process simulation, root cause analysis, bottleneck detection etc. and identify opportunities to improve process design for increased efficiency. Process admins can update eligible instances of processes to new versions published by process owners.
Benefits of Maestro
With Maestro, organizations can:
Orchestrate work across systems, by modeling and implementing complex, long running workflows across multiple systems and ecosystems to achieve business outcomes.
Deliver agentic AI transformation, by deploying Agents, from UiPath or any provider, using a consistent framework, and orchestrating agentic actions in a well-defined process with humans in the loop for “controlled agency”.
Execute and manage processes at scale, by leveraging the new event-sourced engine to execute processes at scale with ability to fix, restart, modify, and manage versions.
Continuously improve processes and agents, by monitoring and learning from real-time process data to identify bottlenecks, opportunities, and proactively improve agents over time.
Operate with Trust & Governance built-in, by defining business rules and guardrails with standard BPMN notation and DMN rules, and allow full observability of actions performed by robots, agents and humans.
The importance of process modeling and BPMN in Maestro
Business Process Model and Notation (BPMN) is standard for modeling business processes. While BPMN has been in existence for over two decades and preferred by process excellence practitioners as an enabler for standards-based, model-driven collaboration between business groups and IT implementers, it will grow in importance in the Agentic AI era, as an enabler for controlled and governed Agentic automation deployment for the following reasons:
BPMN provides an intuitive way to model complex workflows involving multiple agents, allowing all stakeholders - business users, automation developers and AI experts to collaborate on design of dynamic processes, and deal with unpredictable agent behaviors using a specified set of rules.
BPMN provides a common language to facilitate effective collaboration among business users, automation developers and AI experts ensuring everyone is on the same page on intended process design and AI agent interactions.
With constructs such as error and exception handling support, BPMN provides a ready framework for achieving controlled agency while designing and operating AI agents at scale.
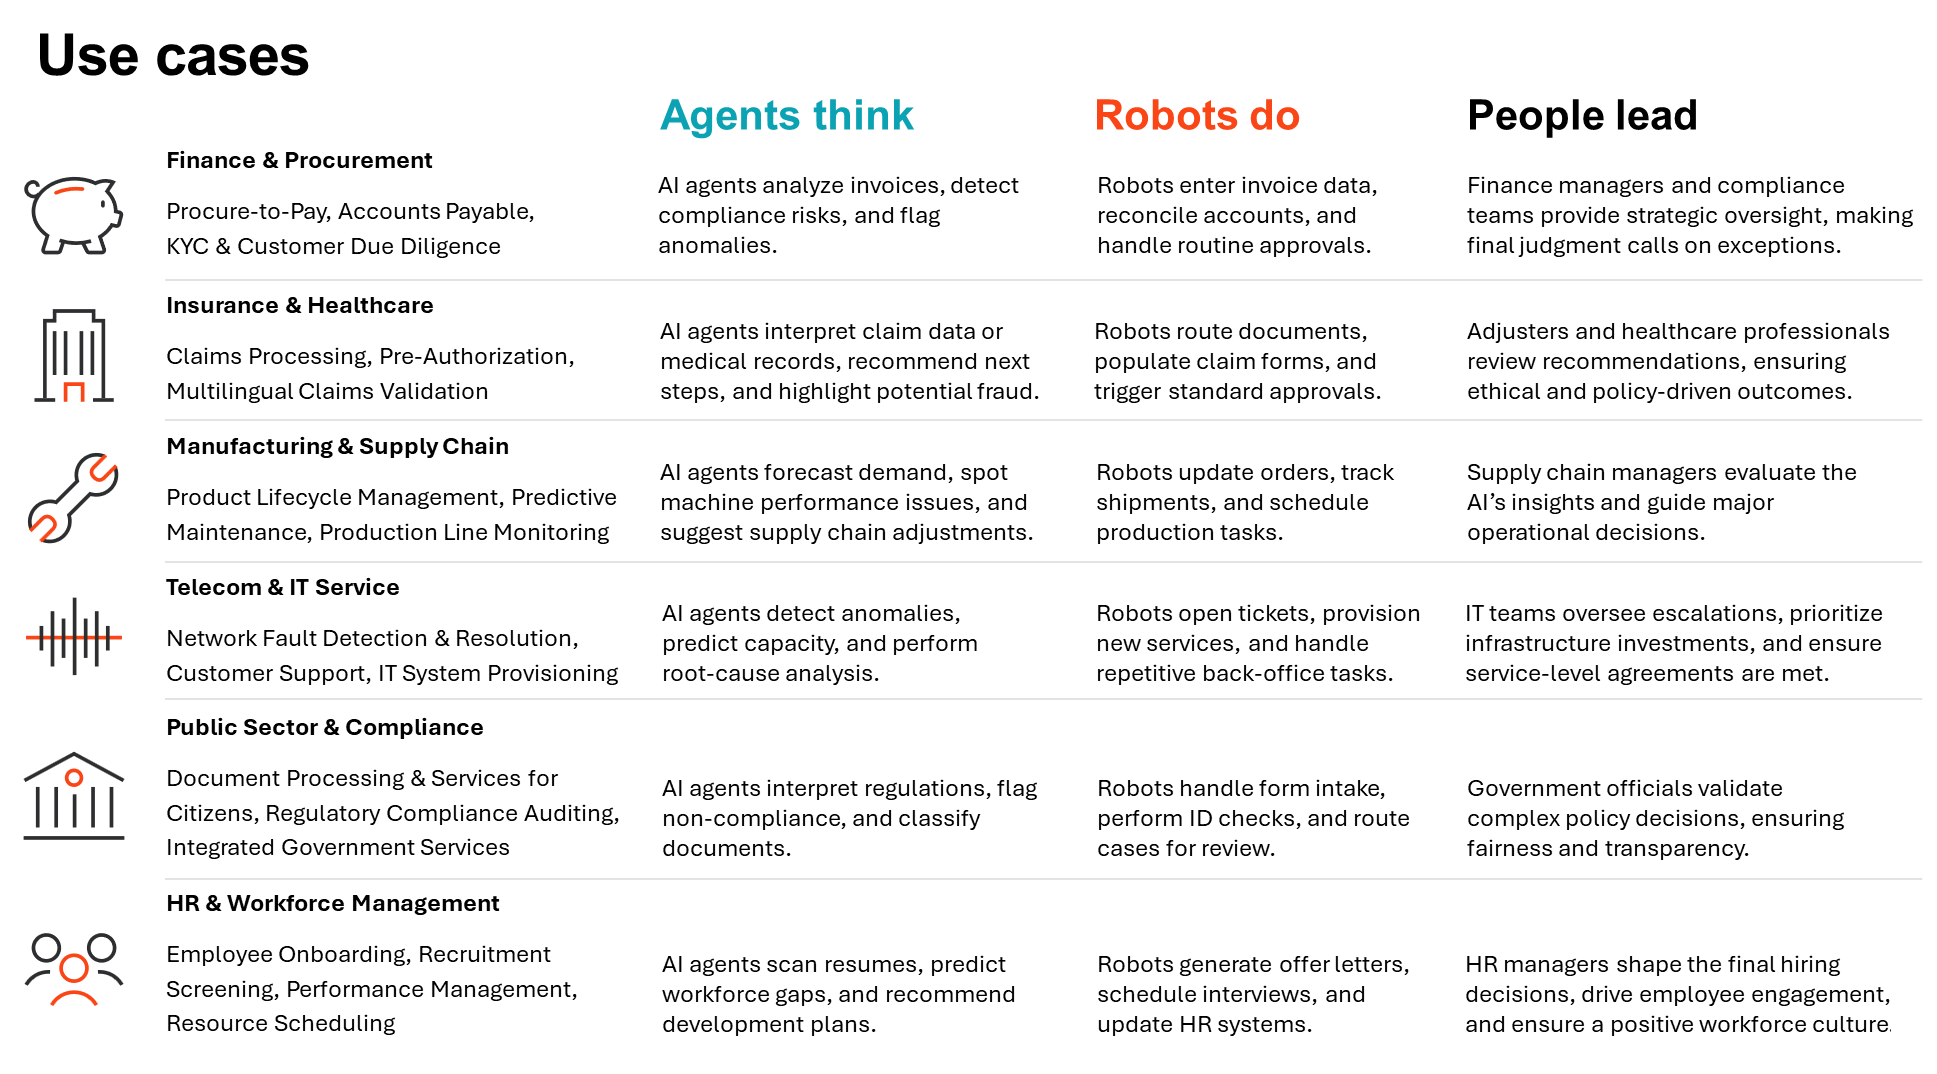
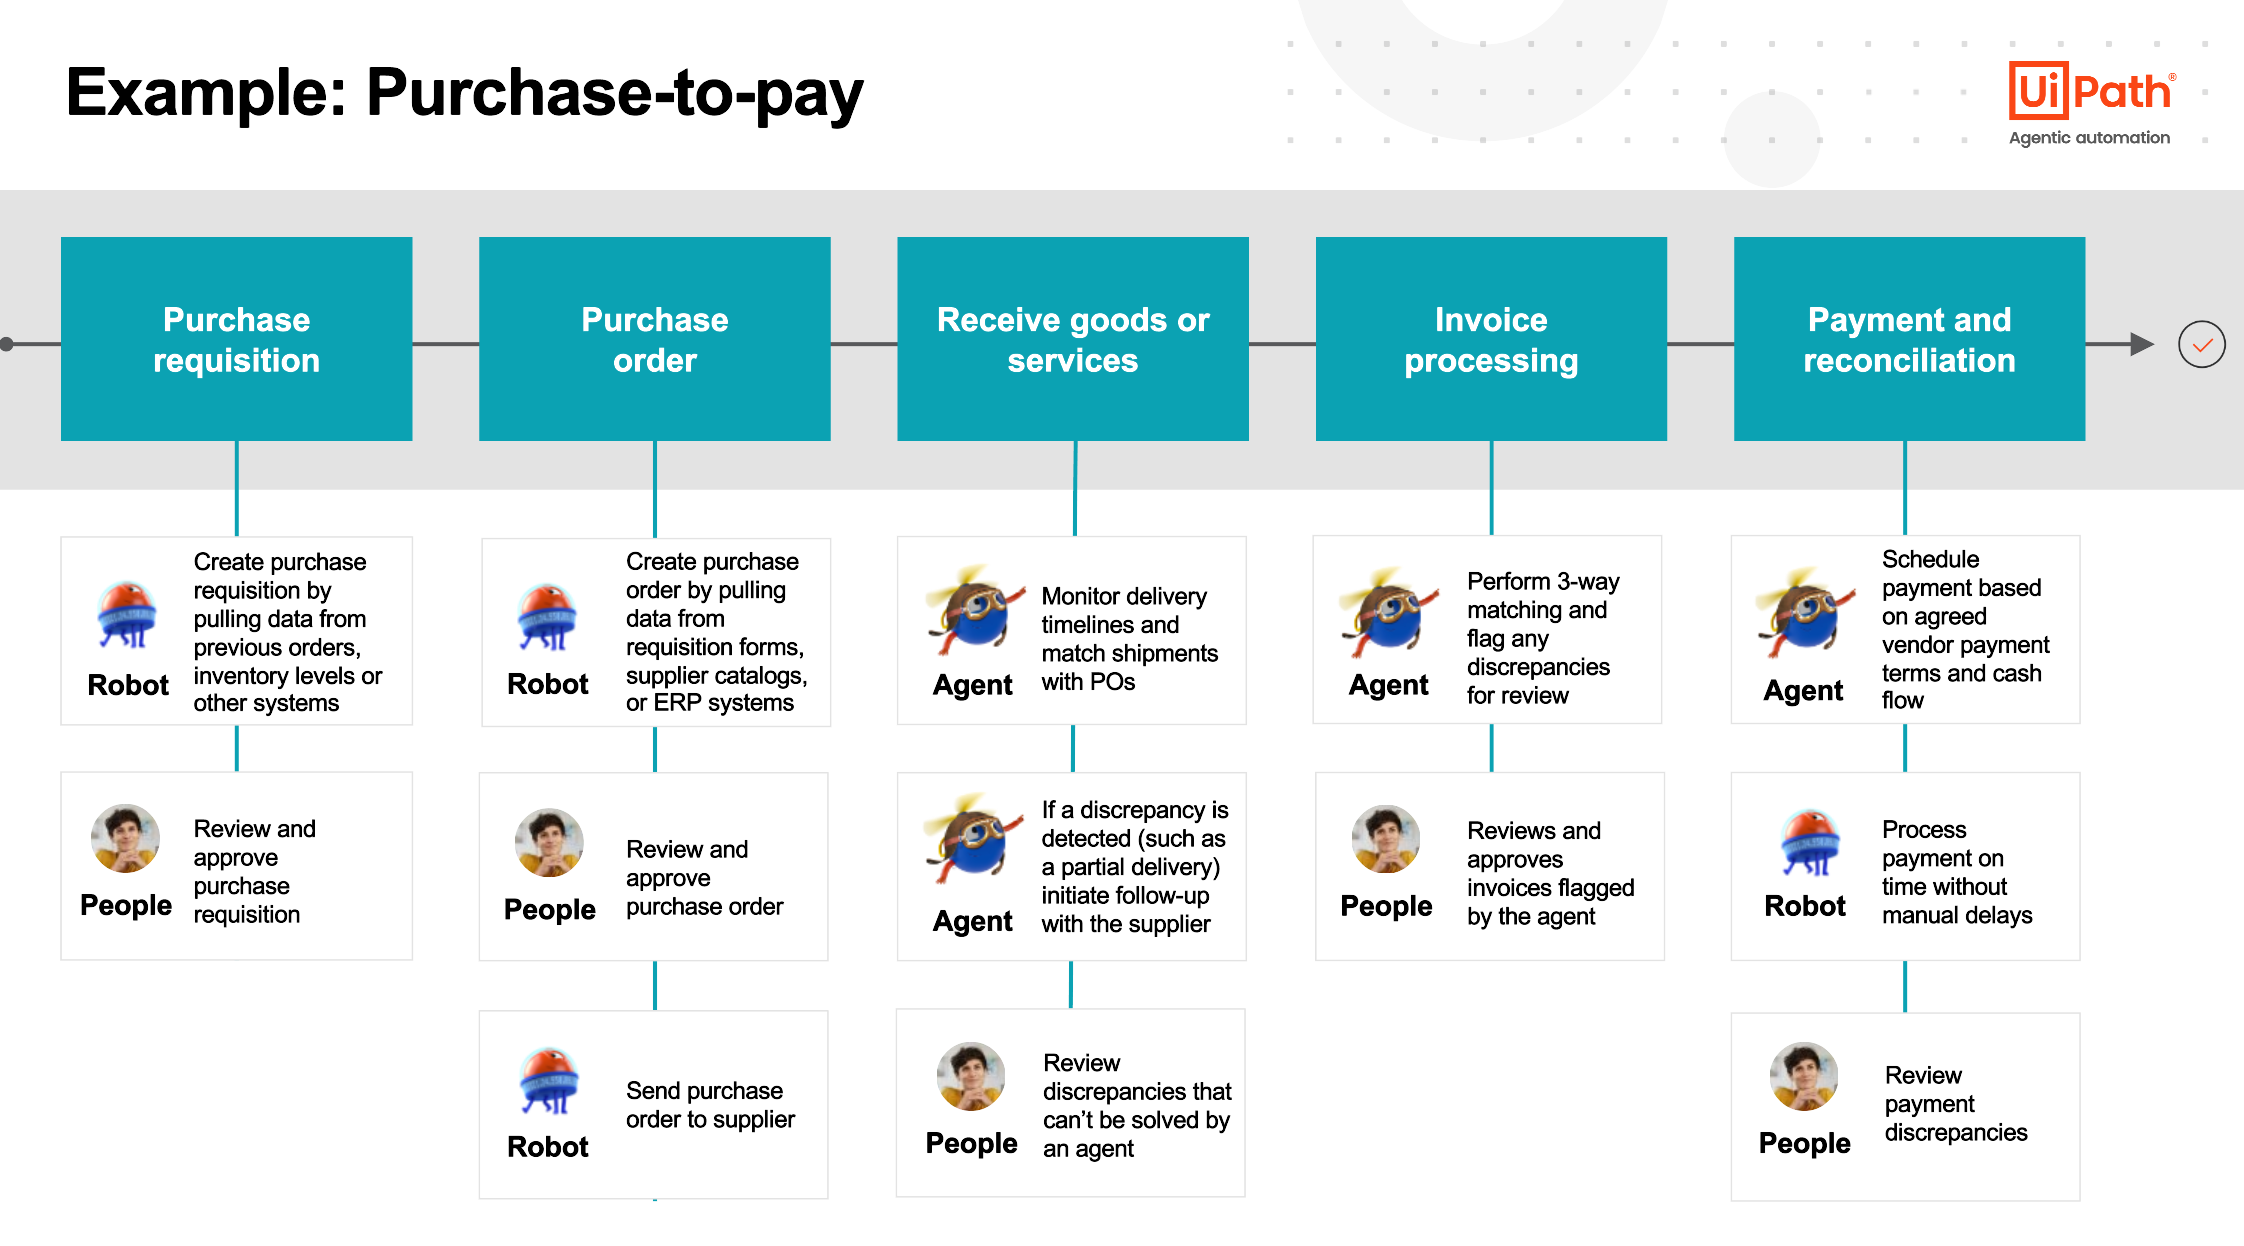
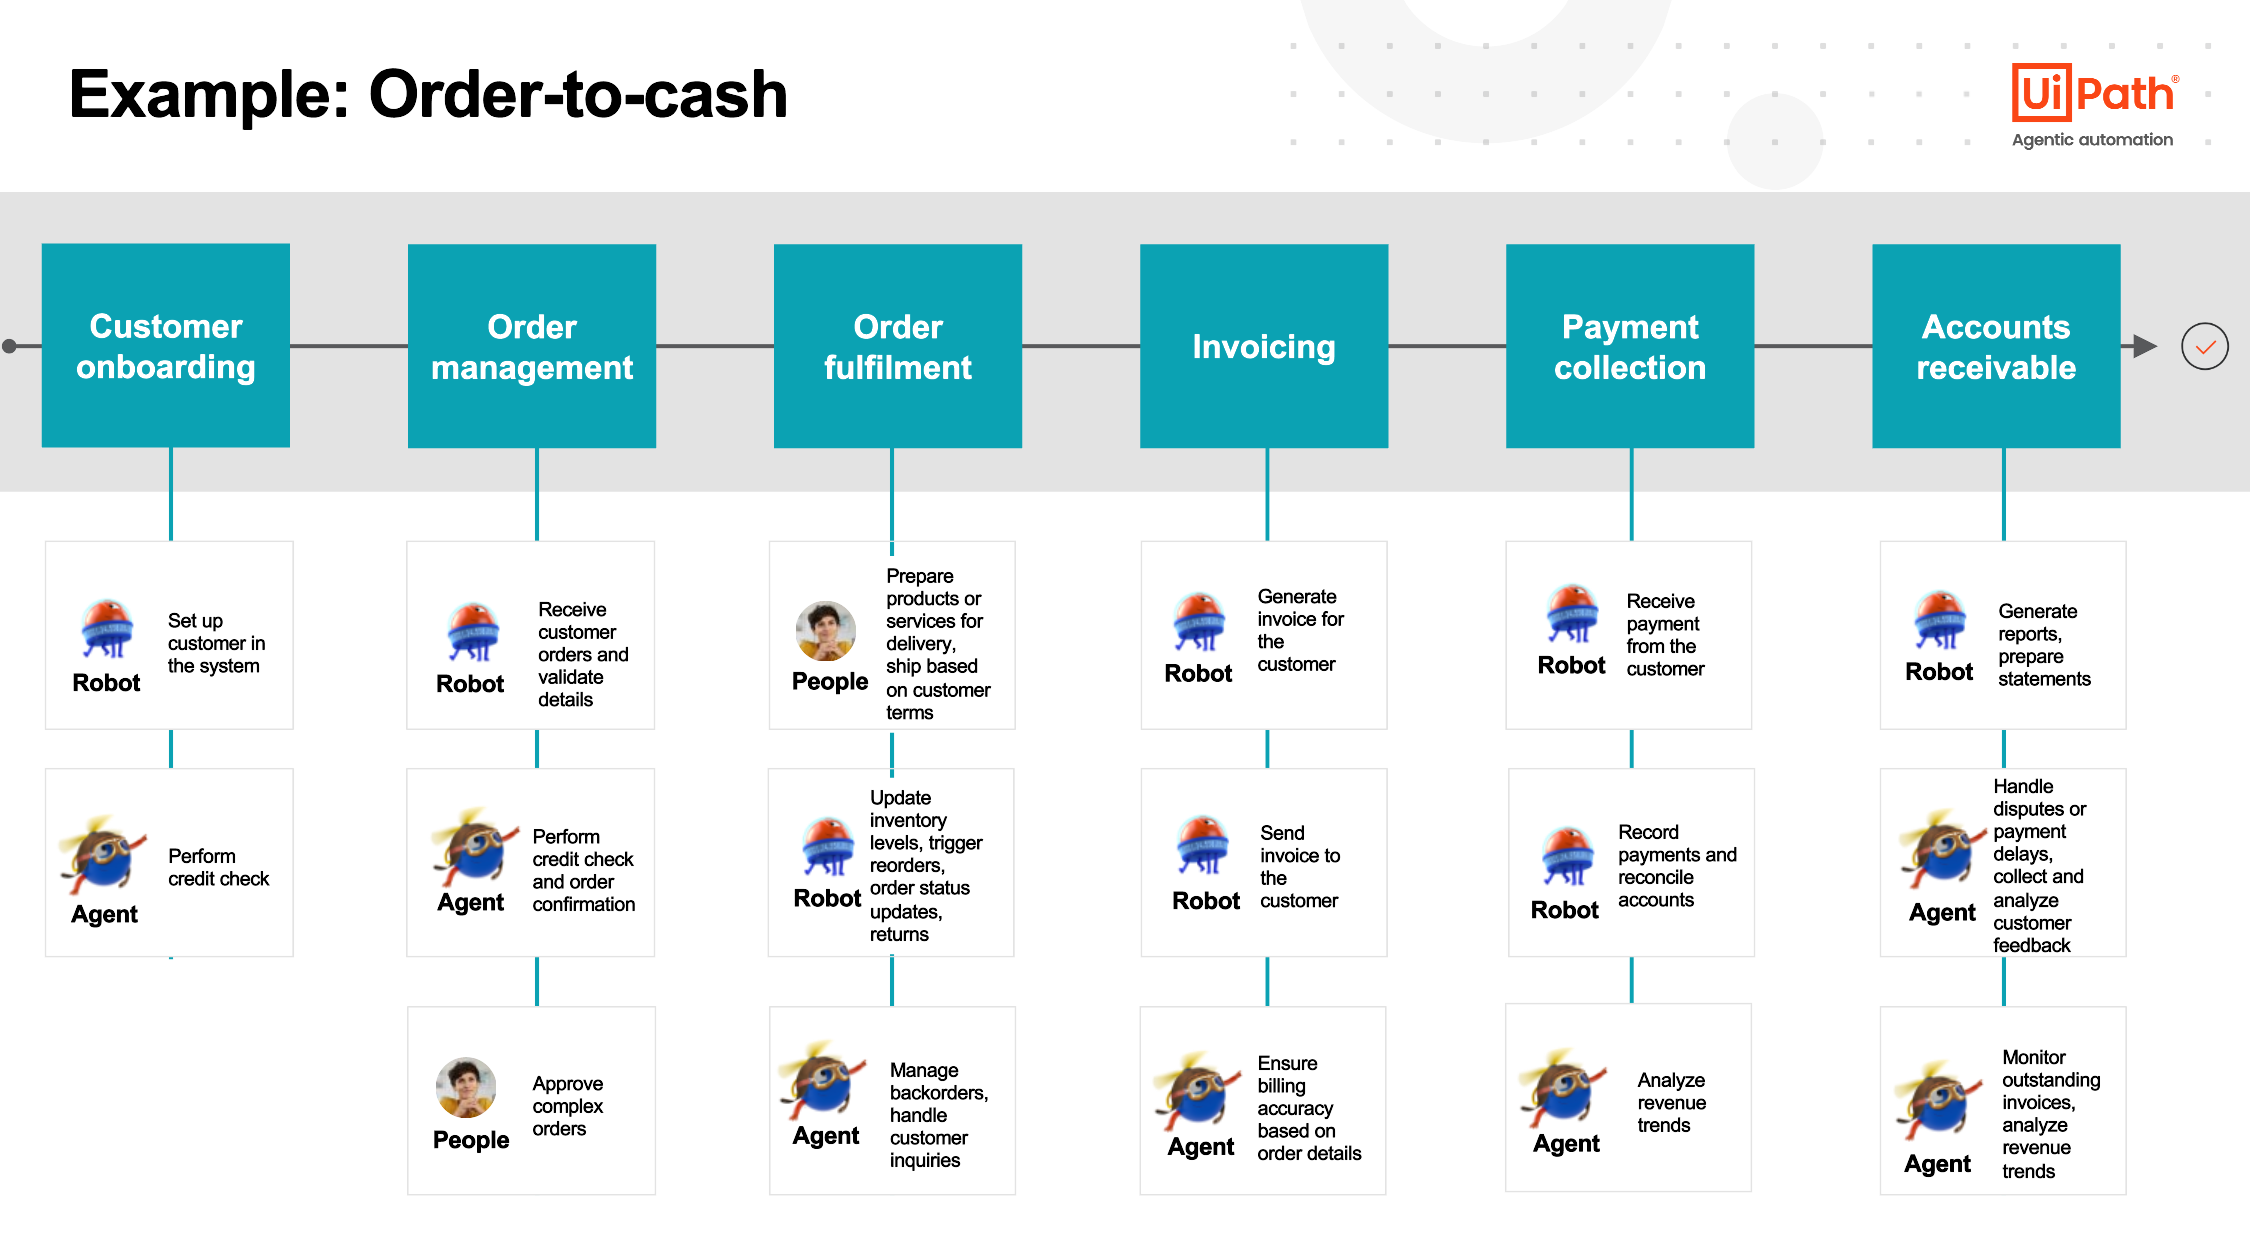
Maestro use-cases
Maestro is applicable across horizontal LOB and vertical specialized use-cases. Here are some examples of use-cases where organizations can benefit from Maestro:
What's New?
The following capabilities have been updated or added to Public Preview.
Process Modeling
Modeling canvas improvements on bpmn.uipath.com
Process Implementation
UiPath BPMN extensions
Service Tasks
Create and wait for queue item - via Orchestrator queues
Start and wait for external agents - via Integration Services connector support
Business Rule Task
Execute business rule - via Orchestrator loaded DMN rule
Send Task
Create queue item - via Orchestrator queues
Parallel & Sequential markers
File support
Download a file to DataService entity
Upload a file from DataService as input to Connectors
Reference variables
Create reference variables via Data Fabric entities (aka, Data Service entities)
Process canvas usability improvements
Variables/ Expression editor consistency with Studio Web
Easy break point access via right-click menu
Subprocess support drill-in / drill-out with navigation
Reconnecting edges from start and end with element highlights
Support for groups
Show/Hide validation errors
Debugging improvements
Support for multiple start events
Support for parallel invocation of subprocesses
Process Operations
Process instance management improvements
Subprocess monitoring to see status inside subprocess
Usability improvements to render variables
Utilize full screen for larger BPMN process models
Unified execution trail across agentic processes and agent executions
Process Monitoring
New Process Monitoring capabilities
New Monitor tab for historical insights with data retention up to 2 years (powered by Insights)
Heatmap latency overlay via toggle
Default process-level inline charts
Process Optimization
New Process Optimization capabilities
Process Optimization App in Process Mining to analyze the agentic process executions via Process Tracking Service
Known Issues
This page covers a list of all currently known issues and will be maintained by the team as new issues come up.
Business process is tenant bound
Business Process project configuration is currently tenant bound. Please ensure you remain in the same tenant between editing sessions.
Multiple business process files in project issues
Business Process project configuration currently only supports one business process (.bpmn) file. Although multiple files can be added to the project, it is not recommended as it will lead to unexpected issues for both debug and publishing.
Action App task loading error
You may encounter errors when loading your action app task in Action Center, such as the following. Please do a forced reload of the browser page to see if the issue resolves.


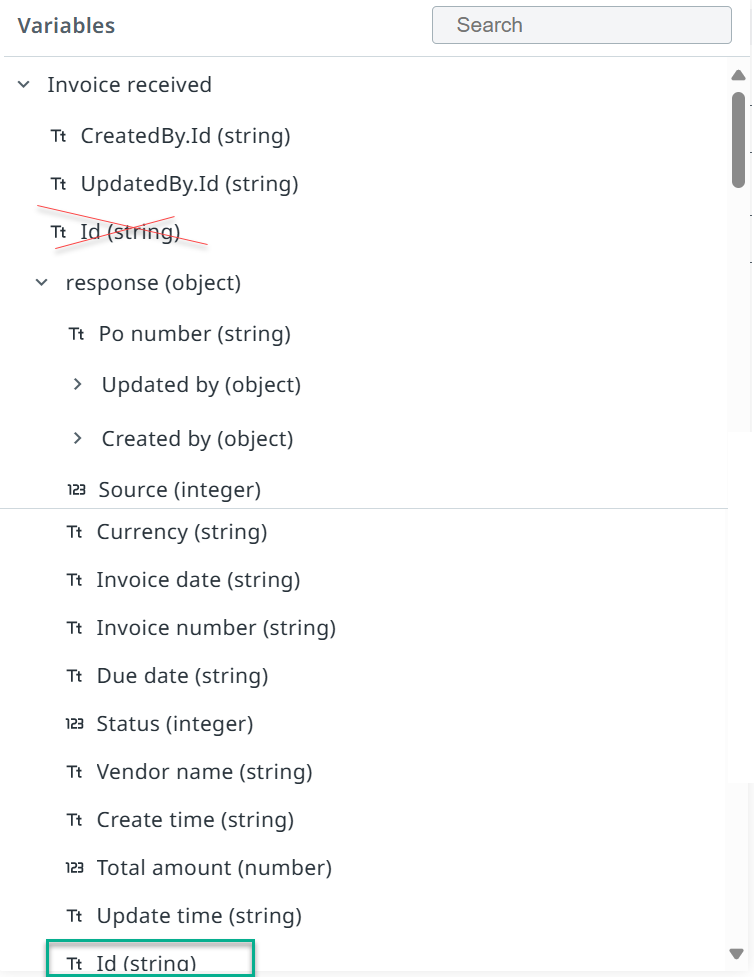
Integration Services output variable mapping
There is an issue with metadata mapping from event trigger responses and you may see two {variable} values in the variable browser when configuring inputs or expressions. You must select the one that is in the response object to ensure proper binding.
Pre-requisites and Considerations
Maestro capabilities are automatically enabled for all Standard and Enterprise customer tenants.
Enable/Disable Maestro
You can enable/disable Maestro from your tenant Administration services page:

HIPAA Disclaimer
Maestro Public Preview is not HIPAA compliant certified. HIPAA compliance certification is planned for a future release.
Product Team Session Recordings
Kick-off Calls
Private Preview Kick-off Call 1 (January 27)
Passcode: WF.45H2Z
Private Preview Kick-off Call 2 (February 13)
Passcode: azwc6c!+
Feedback Roundtables
Feedback Roundtable (Feb 3)
Passcode: 72dYp!!9
Feedback Roundtable (Feb 10)
Passcode: TFTy6U^F
Feedback Roundtable (Feb 24)
Passcode: %YpQ82*B
Feedback Roundtable (March 3)
Passcode: Jx^Gr9&@
Feedback Roundtable (March 10)
Passcode: ET^Pd4c4
Feature Tour
Process Modeling
How to access the Maestro modeling canvas
Maestro has a standalone canvas accessible by anyone via bpmn.uipath.com, where you can start modeling a business process with full canvas functionality (excluding implementation details).
To help get started with the modeling experience, we have a few templates of example BPMN models for common business processes - these can be found in the process templates section.
Canvas Features
Left Toolbar
The left toolbar contains modeling tools (hand tool to pan, marquee tool to select elements, generic types of BPMN elements (start/intermediate/end events, tasks, gateways, etc.), and an overflow menu that contains the full list of supported BPMN elements. In order to start modeling, click on an element in the left toolbar and drag it onto the canvas.
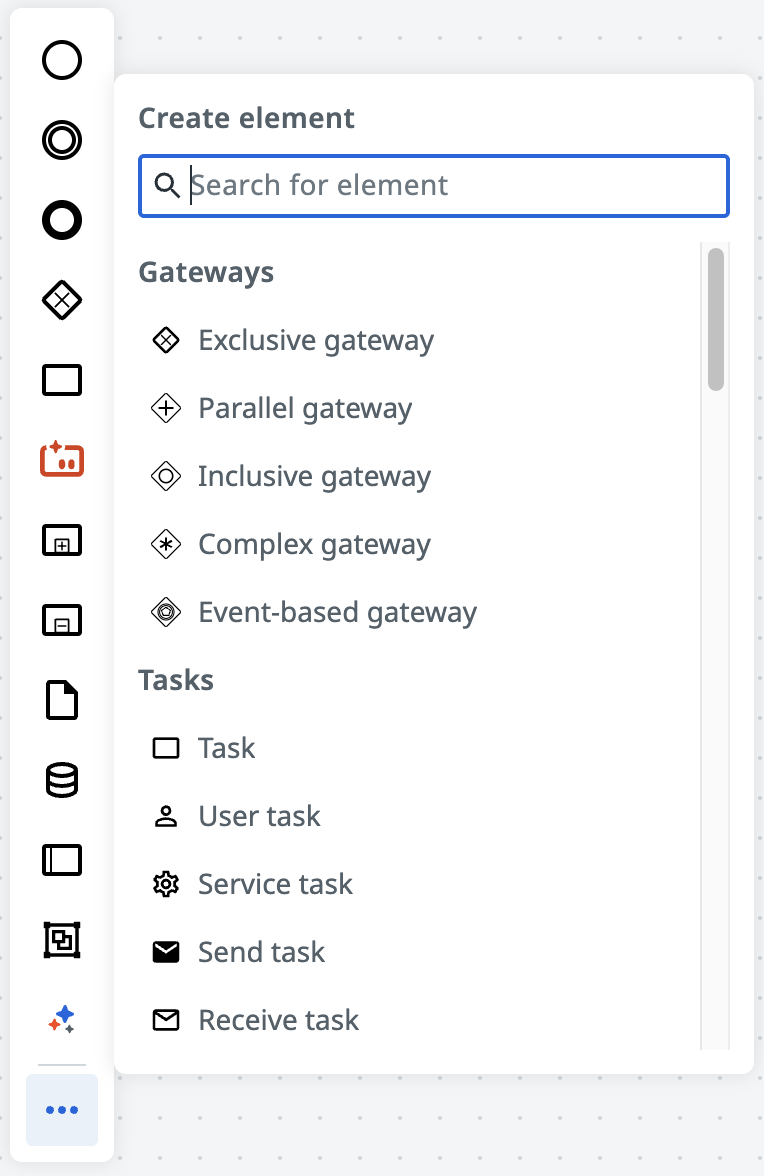
Element Toolbar
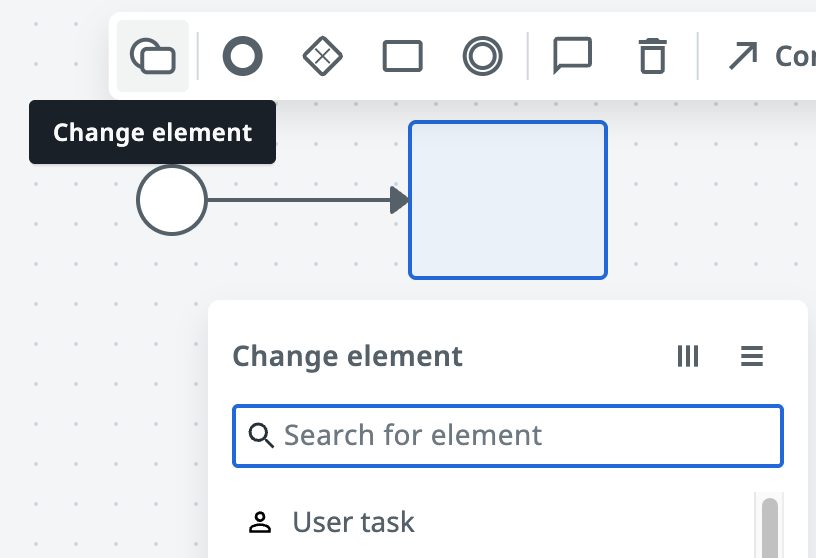
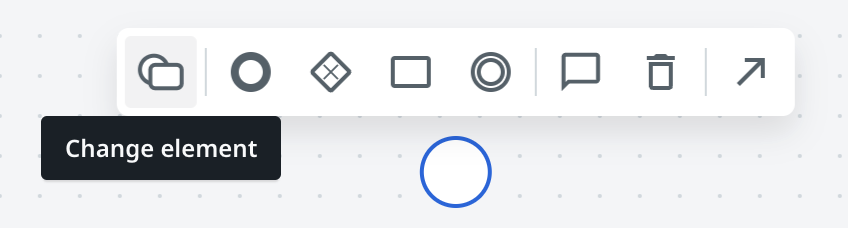
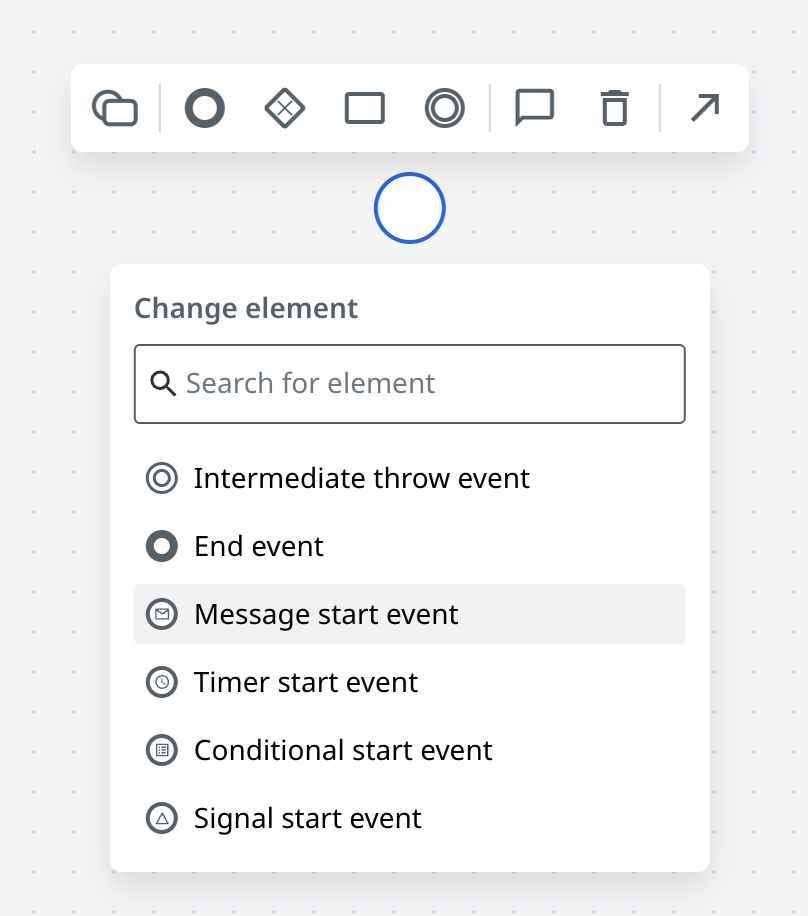
The element toolbar contains actions that can be performed when a certain element is selected. These actions include:
Change element: modify the selected element to a different element
Add end event: append end event to the selected element with preview
Add exclusive gateway: append exclusive gateway to the selected element with preview
Add task: append task to the selected element with preview
Add intermediate event: append intermediate event to the selected element with preview
Add text annotation: append text annotation to the selected element with preview
Delete: deletes the selected element
Connect: brings up the connector tool with the selected element as the source node
Edges Toolbar
The edges toolbar contains actions that can be performed when a certain edge is selected. These actions include:
Add text annotation: append text annotation to the selected edge with preview
Delete: deletes the selected edge
Validations Panel
The canvas contains a rules engine that validates the current model with certain BPMN rules and best practices, and is displayed in the bottom left of the canvas. Clicking on a warning or error within the panel will pan the canvas directly to the affected element.
Menu options
Menu options can be found in the upper right of the canvas, and contain the following options:
Create new (standalone canvas only): resets the canvas to a blank state
Import from file: imports BPMN model into the canvas (select from file picker)
Download to file: exports current BPMN model on the canvas as a .bpmn file
Organize connections: automatically rearranges all edges in the canvas to make the model look more organized
Undo: undos the previously performed action (displays the number of actions that can be undone)
Redo: redos the action that was previously undone (displays the number of actions that can be redone)

BPMN support
The canvas is compliant with the BPMN 2.0 standard, and supports the following elements:
Non-events
BPMN Construct | Supported in Modeler | Supported in Execution |
Pool |
|
|
Lane |
|
|
Subprocess |
|
|
Call Activity |
| Coming in GA |
Event Subprocess | Coming in GA | Coming in GA |
Transaction |
|
|
Undefined Task |
|
|
Service Task |
|
|
User Task |
|
|
Receive Task |
|
|
Send Task |
|
|
Business Rule Task |
|
|
Script Task |
| Coming in GA |
Manual Task |
|
|
Exclusive Gateway |
|
|
Parallel Gateway |
|
|
Inclusive Gateway |
|
|
Event Gateway |
|
|
Complex Gateway |
|
|
Multi-instance Parallel |
|
|
Multi-instance Sequential |
|
|
Loop | Coming in GA | Coming in GA |
Compensation | Coming in GA | Coming in GA |
Data Object |
|
|
Data Store |
|
|
Text Annotation |
|
|
Group |
|
|


Events: Modeling
Type | Start | Intermediate | End | |||||
| Normal | Event Subprocess | Event Subprocess non-interrupting | Catch | Boundary | Boundary non-interrupting | Throw |
|
None |
| N/A | N/A | N/A | N/A | N/A |
|
|
Message |
|
|
|
|
|
|
|
|
Timer |
|
|
|
|
|
| N/A | N/A |
Error | N/A |
| N/A | N/A |
| N/A | N/A |
|
Signal |
|
|
|
|
|
|
|
|
Conditional |
|
|
|
|
|
| N/A | N/A |
Escalation | N/A |
|
| N/A |
|
|
|
|
Compensation | N/A |
| N/A | N/A |
| N/A |
|
|
Cancel | N/A | N/A | N/A | N/A |
| N/A | N/A |
|
Terminate | N/A | N/A | N/A | N/A | N/A | N/A | N/A |
|
Link | N/A | N/A | N/A |
| N/A | N/A |
| N/A |
Multiple | Coming in GA | Coming in GA | Coming in GA | Coming in GA | Coming in GA | Coming in GA | Coming in GA | Coming in GA |
Multiple Parallel | Coming in GA | Coming in GA | Coming in GA | Coming in GA | Coming in GA | Coming in GA | Coming in GA | Coming in GA |


Events: Execution
Type | Start | Intermediate | End | |||||
| Normal | Event Subprocess | Event Subprocess non-interrupting | Catch | Boundary | Boundary non-interrupting | Throw |
|
None |
| N/A | N/A | N/A | N/A | N/A |
|
|
Message |
| Coming in GA | Coming in GA |
|
|
|
|
|
Timer |
| Coming in GA | Coming in GA |
|
|
| N/A | N/A |
Error | N/A | Coming in GA | N/A | N/A |
| N/A | N/A |
|
Signal | Coming in GA | Coming in GA | Coming in GA | Coming in GA | Coming in GA | Coming in GA | Coming in GA | Coming in GA |
Conditional |
|
|
|
|
|
| N/A | N/A |
Escalation | N/A | Coming in GA | Coming in GA | N/A | Coming in GA | Coming in GA | Coming in GA | Coming in GA |
Compensation | N/A |
| N/A | N/A | Coming in GA | N/A | Coming in GA | Coming in GA |
Cancel | N/A | N/A | N/A | N/A |
| N/A | N/A |
|
Terminate | N/A | N/A | N/A | N/A | N/A | N/A | N/A |
|
Link | N/A | N/A | N/A | Coming in GA | N/A | N/A | Coming in GA | N/A |
Multiple |
|
|
|
|
|
|
|
|
Multiple Parallel |
|
|
|
|
|
|
|
|


BPMN resources
UiPath BPMN Elements Support
The BPMN poster provides a quick overview of the standard elements.
You may also want to look at these additional BPMN resources.
Official site of BPMN - Object Management Group BPMN BPMN Specification - Business Process Model and Notation
Business Process Model and Notation (Wikipedia) Business Process Model and Notation
Process Implementation
How to implement an Maestro business process
A process model is configured with runtime implementation instructions via the canvas integrated with Studio Web. Studio Web enables you to implement, test, and deploy Maestro models using advanced developer tools that are tailored to your process needs. This unified developer experience allows you to create processes powered by automations, agents, human-in-the-loop tasks and system of record connections, which are then executed on a dedicated process engine.
Creating an agentic process
Creating an agentic process is similar to creating a regular Studio Web project:
Go to the Automations page in Studio Web https://studio.uipath.com/projects
Click the arrow next to the New project button.
Select Agentic process.
Your new process opens.
From the  Project Explorer button on the upper-left side of the designer, you can:
Use the
 Search button to find specific project files.
Rename and Test your project
Rename your process
Adding functionality
Start by either importing a BPMN model or drawing new one.
See Process Modeling for Canvas Features details.
Properties Panel
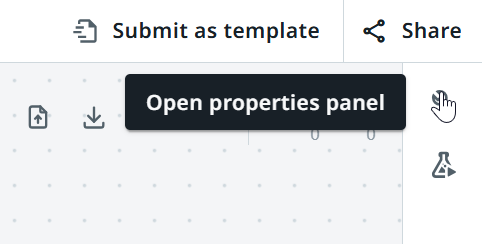
A business processes is implemented primarily by selecting elements and configuring them via the properties panel, accessed by clicking in the upper right-hand corner.
The property panel has several sections for configurations depending on the element.
General
Name - the label you see on the canvas
ID - the system generated unique ID. this is the value used to reference the element in other properties and expressions
Description - additional details for the element
Implementation
Type specific details for the selected element, such as Start and wait for automation type for Service Task.
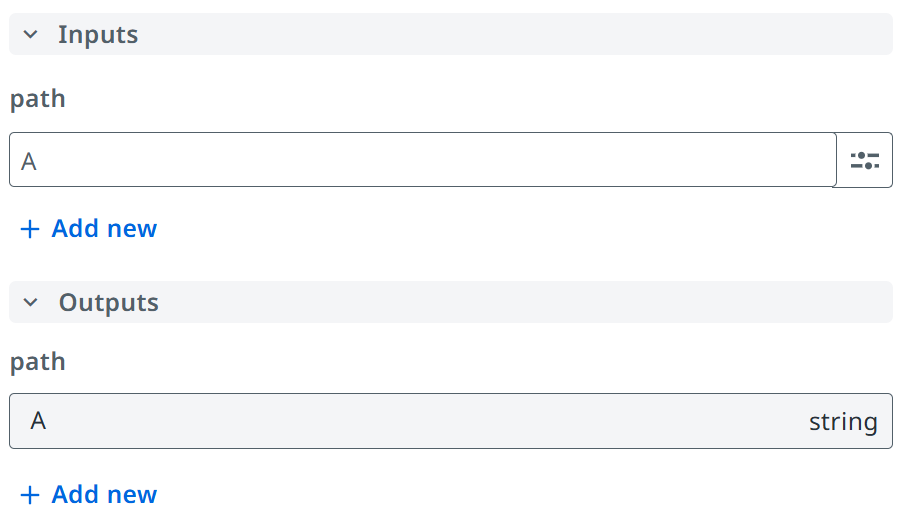
Inputs
Inputs for the selected element, of which some may be required.
Outputs
Outputs for the selected element. These will be available as variables or expressions in other elements.
Variables and Expression Editor
Use the selector next to a property panel input field to switch between text, variables and expressions.
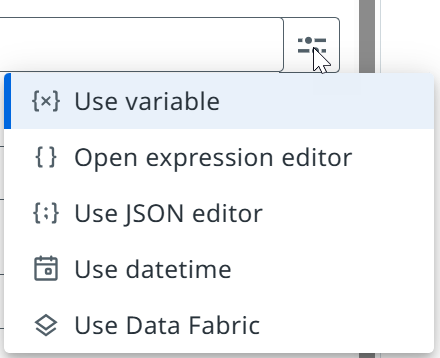
Use variable - select existing variable or element output value
Open expression editor - build complex expression
Use JSON editor - build JSON input
Use datetime - use date time picker
Use Data Fabric - use properties from Data Fabric entity
Variables are used to configure element properties and pass values between your elements, automations, agents, app tasks and connections. Element outputs are automatically available as variables throughout the process.
Expression Editor is used to write more complex expressions to configure element properties. The Expression Editor is available for most element properties and features intelligent code completion for variables, arguments, methods, properties, objects, or keywords. You can write expressions on multiple lines and use Ctrl + Space to see the list of available options. You can open the Variable selection panel and select a variable, argument, or property. You can provide and test values in the Validate expression panel.
JSON Editor is used to construct JSON input.
Tasks
Tasks provide the building blocks for process execution. UiPath platform capabilities are accessed via standard BPMN task types.
Service Task
Used to configure a call to start and wait on execution external to the process engine, typically to another UiPath service, such as automation, agent or queues.
Workflows
Supports deployed Workflows.
Implementation> Type: Start and wait for RPA workflow
Agents
Supports deployed Agents.
Implementation > Type: Start and wait for agent
Implementation > Type: Start and wait for external agent
Queues
Support deployed Queues.
Implementation > Type: Create and wait for queue item
User Task
Used to configure a step in the process execution that requires a human-in-the-loop to perform. This step can contain details for the assignees, task form, inputs, outputs and escalations. The process execution will pause at this step until an assignee has actioned the task.
Supports deployed Action Center Action apps.
Implementation > Type: Create action app task
See Action Center - Action apps for more details on building and configuring Action apps for Action Center.
Send Task
Used to configure a call to an external system. Process execution will make the call and complete in synchronous nature.
Supports Integration Services connector activities, including custom connectors.
Implementation > Type: Execute connector activity
Receive Task
Used to configure a trigger from an external system. Process execution will pause and wait for the configured trigger happen before continuing with execution.
Supports Integration Services connector triggers, including custom connectors.
Implementation > Type: Wait for connector event
Business Rule Task
Used to configure the execution of a Business Rule(DMN). Process execution will make the call and complete in synchronous nature.
Supports Business Rules in DMN 1.3 stored in Orchestrator.
Implementation > Type: Execute business rule
Markers
Used to configure the execution o certain task type to create multiple executions by iterating over a List variable.
On any task type while selected click on Change element an select one of the marker types.
Parallel multi-instance
It will execute in parallel and wait for all runs to be completed successfully before continuing to execute the rest of process.
Sequential multi-instance
It will execute one by one each of the items in the list and wait for each to be completed successfully before starting the next one, until all runs are completed then continuing to execute the rest of the process
Gateways
Gateways provide the flow control for your process. Condition logic is configured to determine which path to take. Once the paths have been drawn, the condition logic for deciding which path to take can be configured via the path line or the gateway directly.
Exclusive gateway
An exclusive gateway is used to configure one or more paths of which only one will be taken depending on conditions.
Inclusive gateway
An inclusive gateway is used to configure multiple paths to be taken simultaneously depending on conditions.
Parallel gateway
A parallel gateway is used to configure a split into multiple paths of execution, or to merge multiple incoming paths of execution. A split will create parallel executions for all outgoing paths.
Event gateway
An event gateway is used to configure a wait for a trigger from one of at least two parallel paths of execution. Execution will be paused at an event gateway until one of the paths is triggered. All paths must contain an intermediate catch event of either timer, message or signal.
Events
Events provide the ability to describe when something happens during process exaction. there are three main events in process diagraming - start, intermediate and end events. we also refer to these events as either ‘catching’ which react to some trigger or ' throwing' which are creating some trigger.
Subprocess
A subprocess is a collection of other tasks and subprocesses used to split a complex process into multiple parts which are easier to navigate and manage.
See Process Modeling for additional details on BPMN support timing.
Debugging
Debugging business process works in similar way as debugging other Studio Web projects.
To debug your business process, select the Test option from the top left toolbar. You can also use the Test step-by-step option to debug your project one element at a time.

After selecting a test option, the business process will automatically be deployed and run. After a short while, the app will open in a separate browser tab, and you can test its functionality.
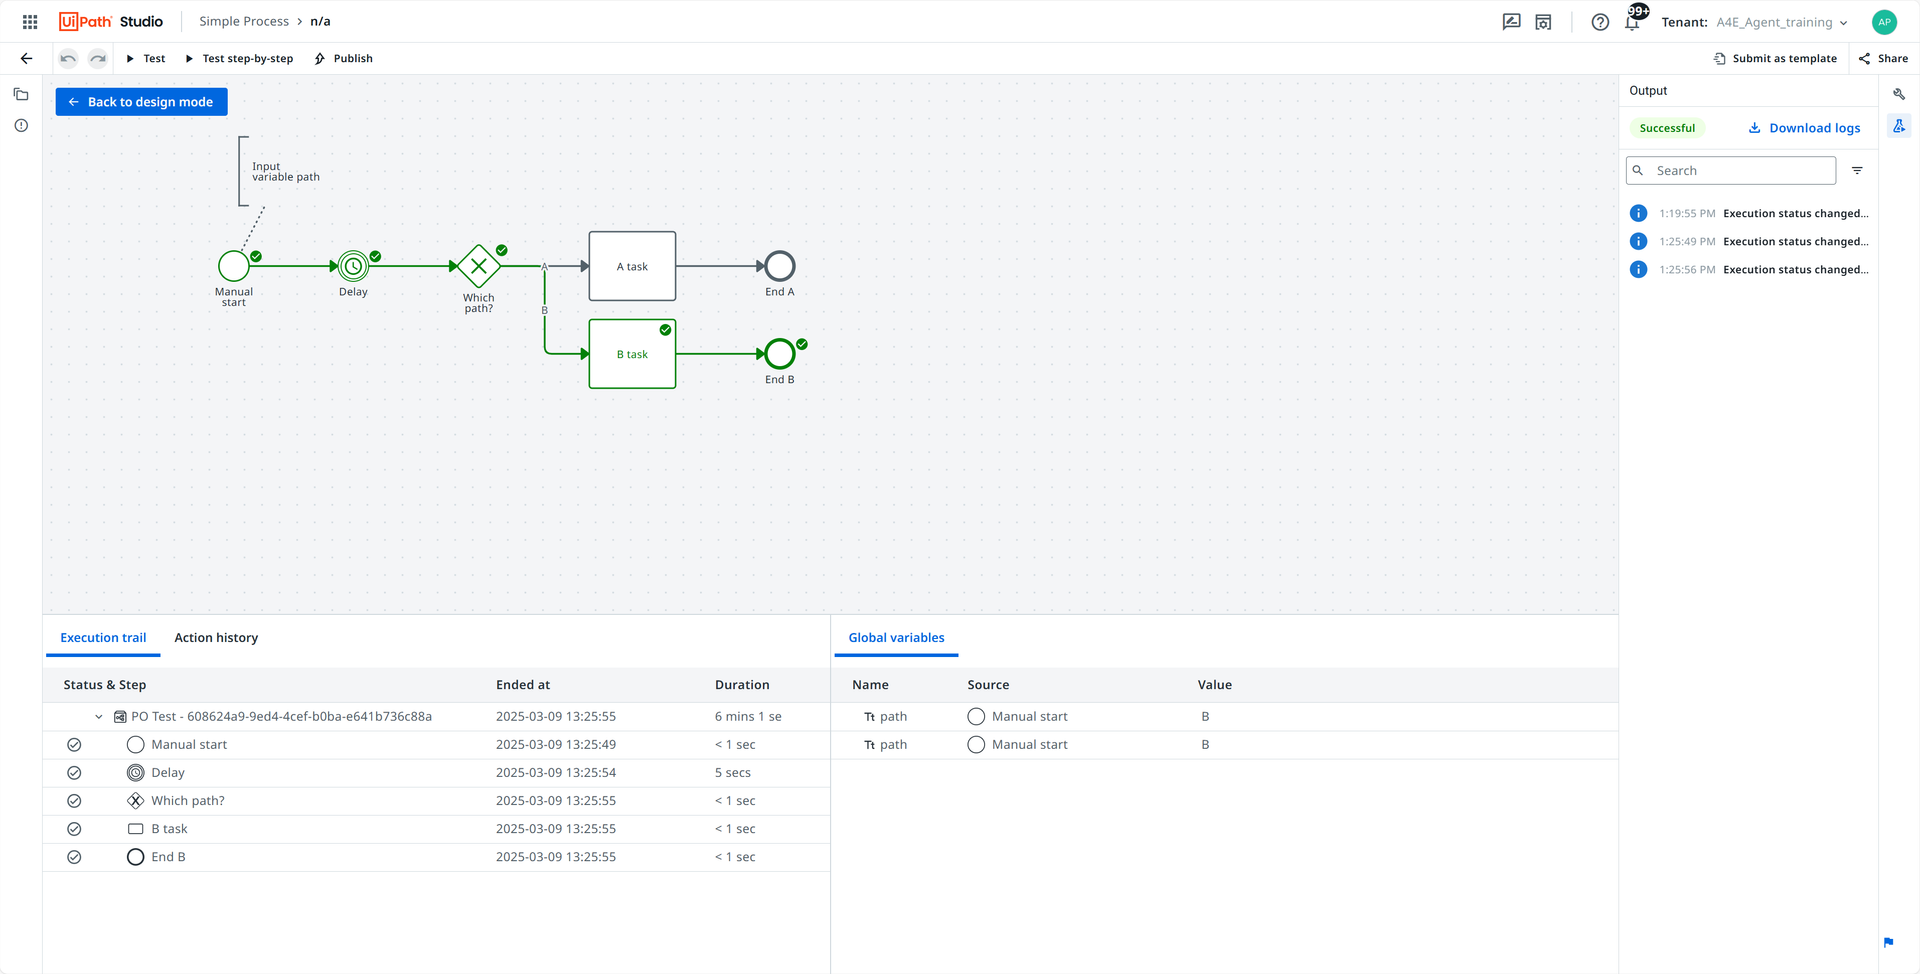
Notice that the business process is now running in debug mode. You can now click and interact with the elements executed and examine their details.
The Output panel shows the overall execution status.
The Globals shows you the values of the variables for the entire process.
The Action history shows you the comments logged from any manual interactions during the execution.
The Execution trail shows you detailed information (Details) and variable values (Variables) for each step in the execution. Select the expand button to see additional variable details.
You can also set breakpoints on elements to see how they are executed.
When a breakpoint is triggered in a business process, the process engine will pause execution so you can examine the execution details.
Select the Continue button from the top ribbon to continue running the entire workflow, or Next step to advance to the next step in your automation. Select Stop to end the debugging process and return to your business process.

Publishing, deploying, and upgrading business process projects
Publishing business process project
To publish a business process project:
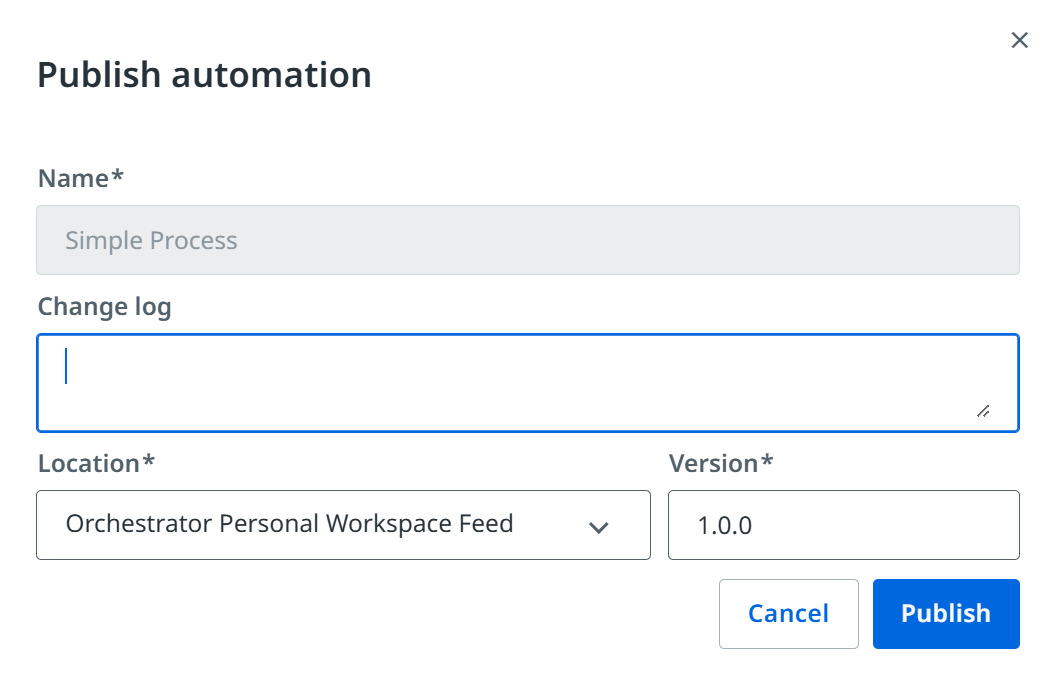
Select the Publish button at the top of the process canvas.
In the Publish automation window, enter a name and a description for your automation, and select a version.
Click the Publish button.
You can then access your published web app after deploying it in Orchestrator.

Deploying agentic process projects
To deploy a published business process project, navigate to Orchestrator and:
Select the Orchestrator folder you wish to deploy your project in.
Select Automations and click the Add process button.
Choose the business process project you want to deploy from the Package Source Name drop-down menu, the version from the Package Version drop-down, and the entry process from Entry point drop-down if available.

Click Next and provide any Package Requirements.
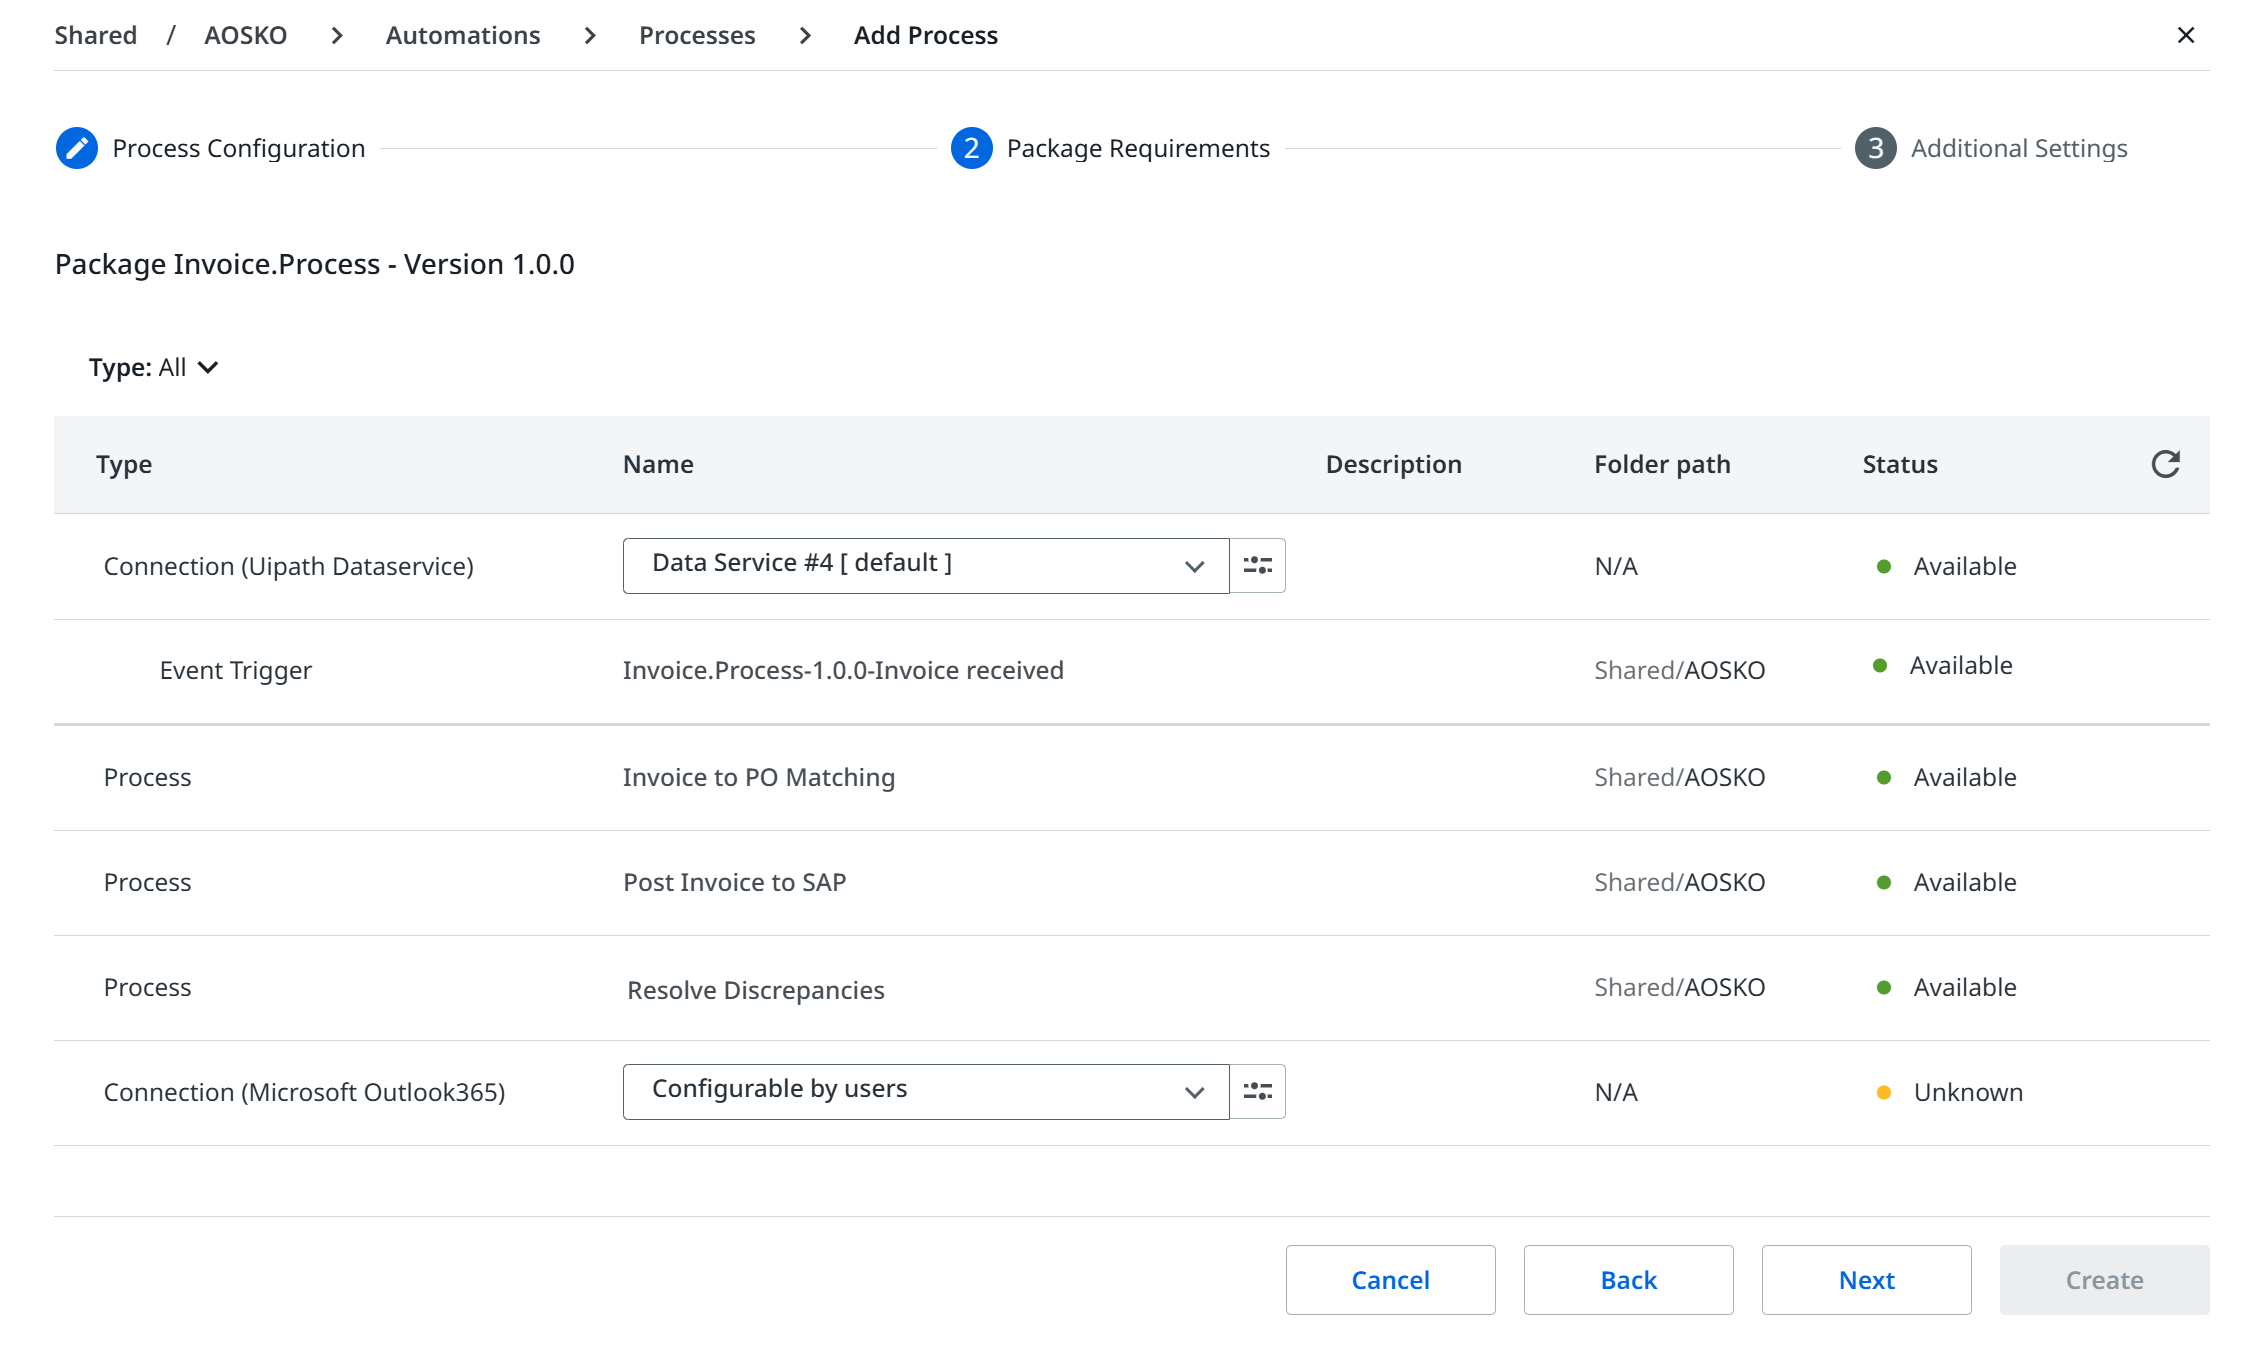
Click Next and finalize Additional Settings.

Click Create to deploy your business process.
After deployment, your business process appears under the Process column, look for ones where Scope=Agentic Process. Clicking it then opens the Edit process page, where you can update the process configuration, requirements, and other settings.
See the Orchestrator guide for more information on managing processes.
Upgrading and removing web app projects
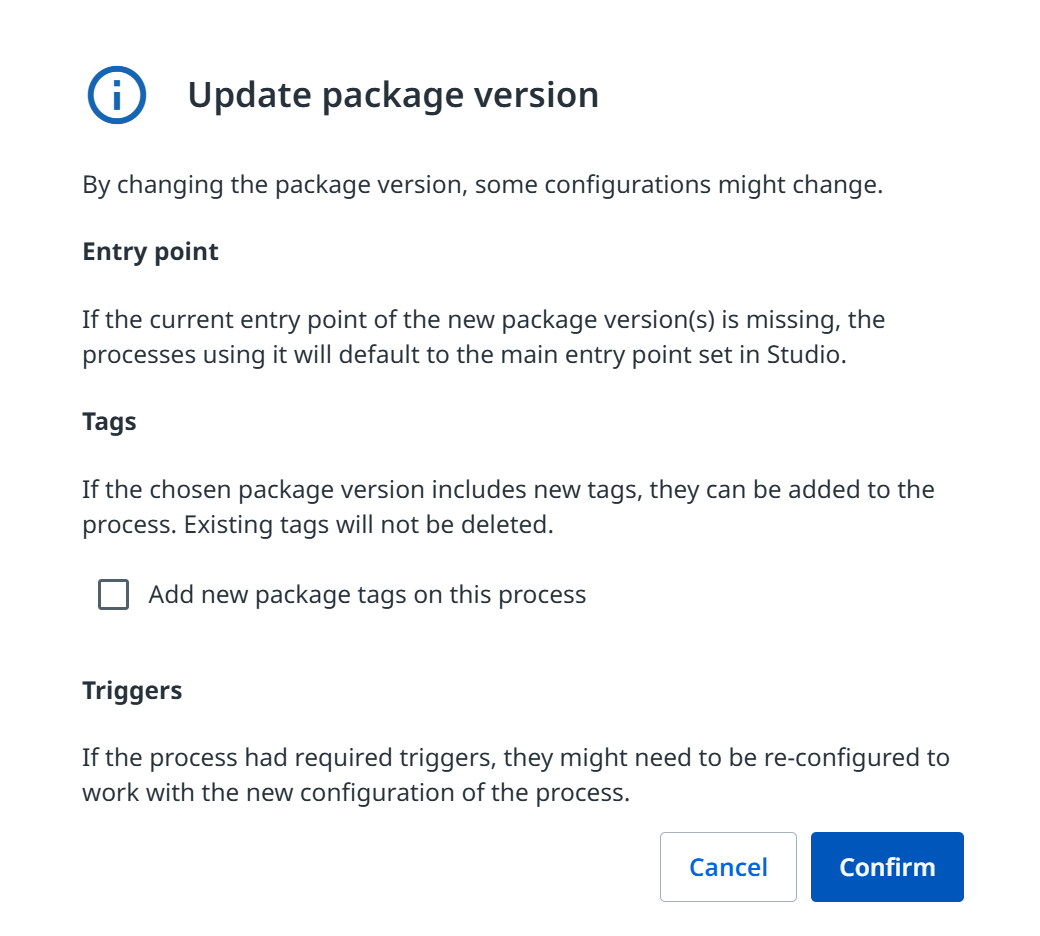
When you publish a new version of a business process project, an Updates are available icon appears under the Version column in Orchestrator. To upgrade your published project:
Click the button on the right of the process.
Click Upgrade to latest version.
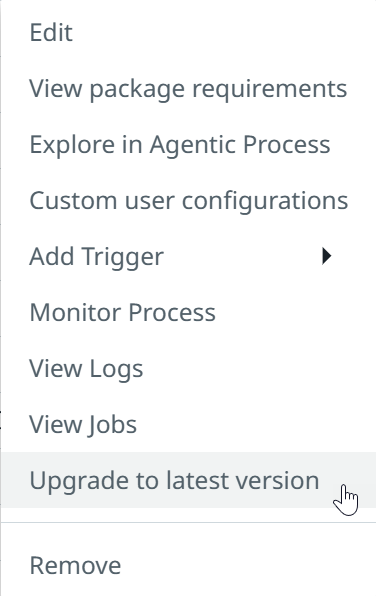
Select the Confirm button in the Update package version window.
Setting up robot account access
Agentic process uses the same concepts as a robot in terms of permissions. We recommend creating one Robot account in the folder where it is deployed with:
Automation User folder role
Allow to be Automation User tenant role
This role will have all the need permissions for both Agentic process and any other RPA, Apps, Connectors, Business rules, etc.
Process Operations
What is Process Operations?
Process Operations provides real-time execution data to help oversee and track specific instances as they progress through different stages of processes. The process operations experience consists of a process overview homepage and a processes page with all instance and single instance views.
Process Overview Homepage
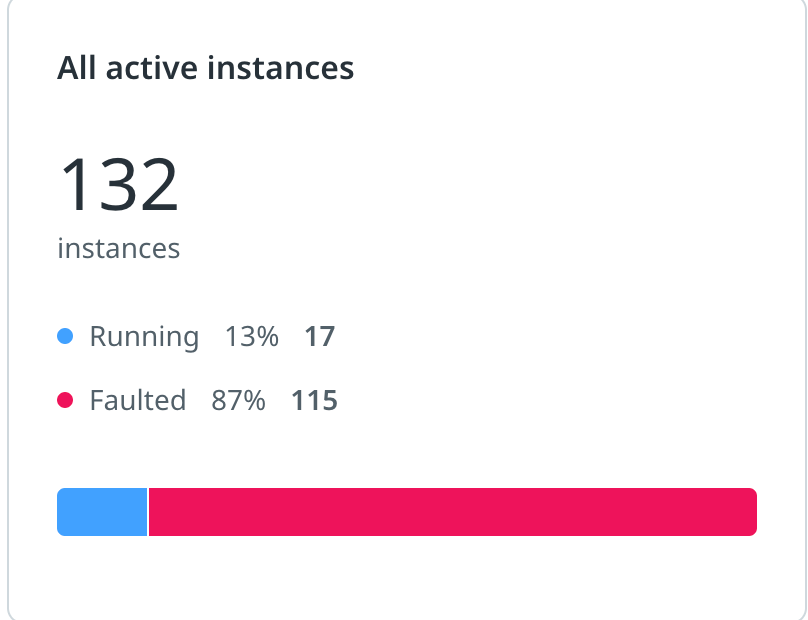
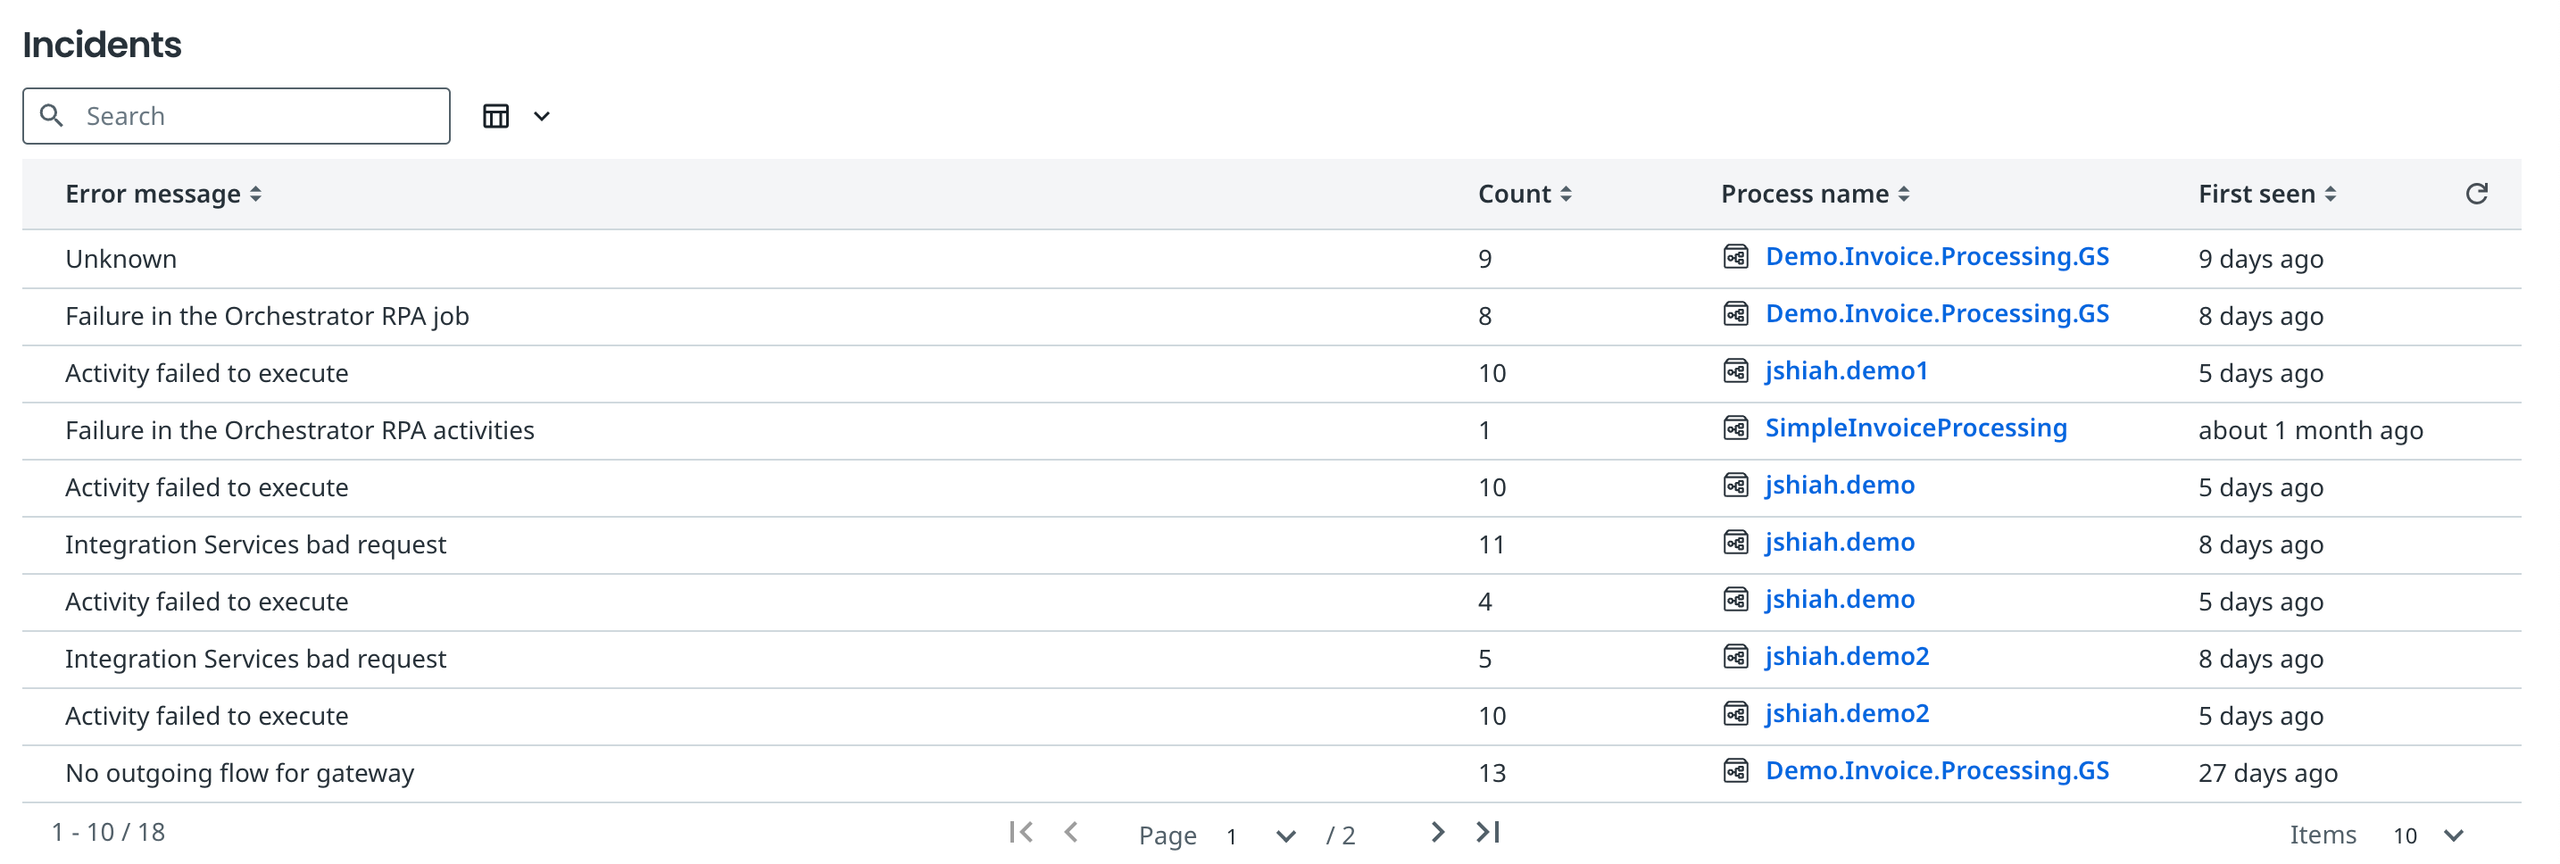
The process overview Homepage provides an operational summary of all processes instances, and includes an active instances dashboard, a table of all incidents, and a table of all processes.
Active instances dashboard
The active instances dashboard displays the count of all instances, broken down by running vs. faulted instances.
Incidents table
The incidents table displays all unresolved incidents, where an incident maps to a faulted instance. The table is grouped by error message per process, and includes how long ago a specific error message was first seen for that process.
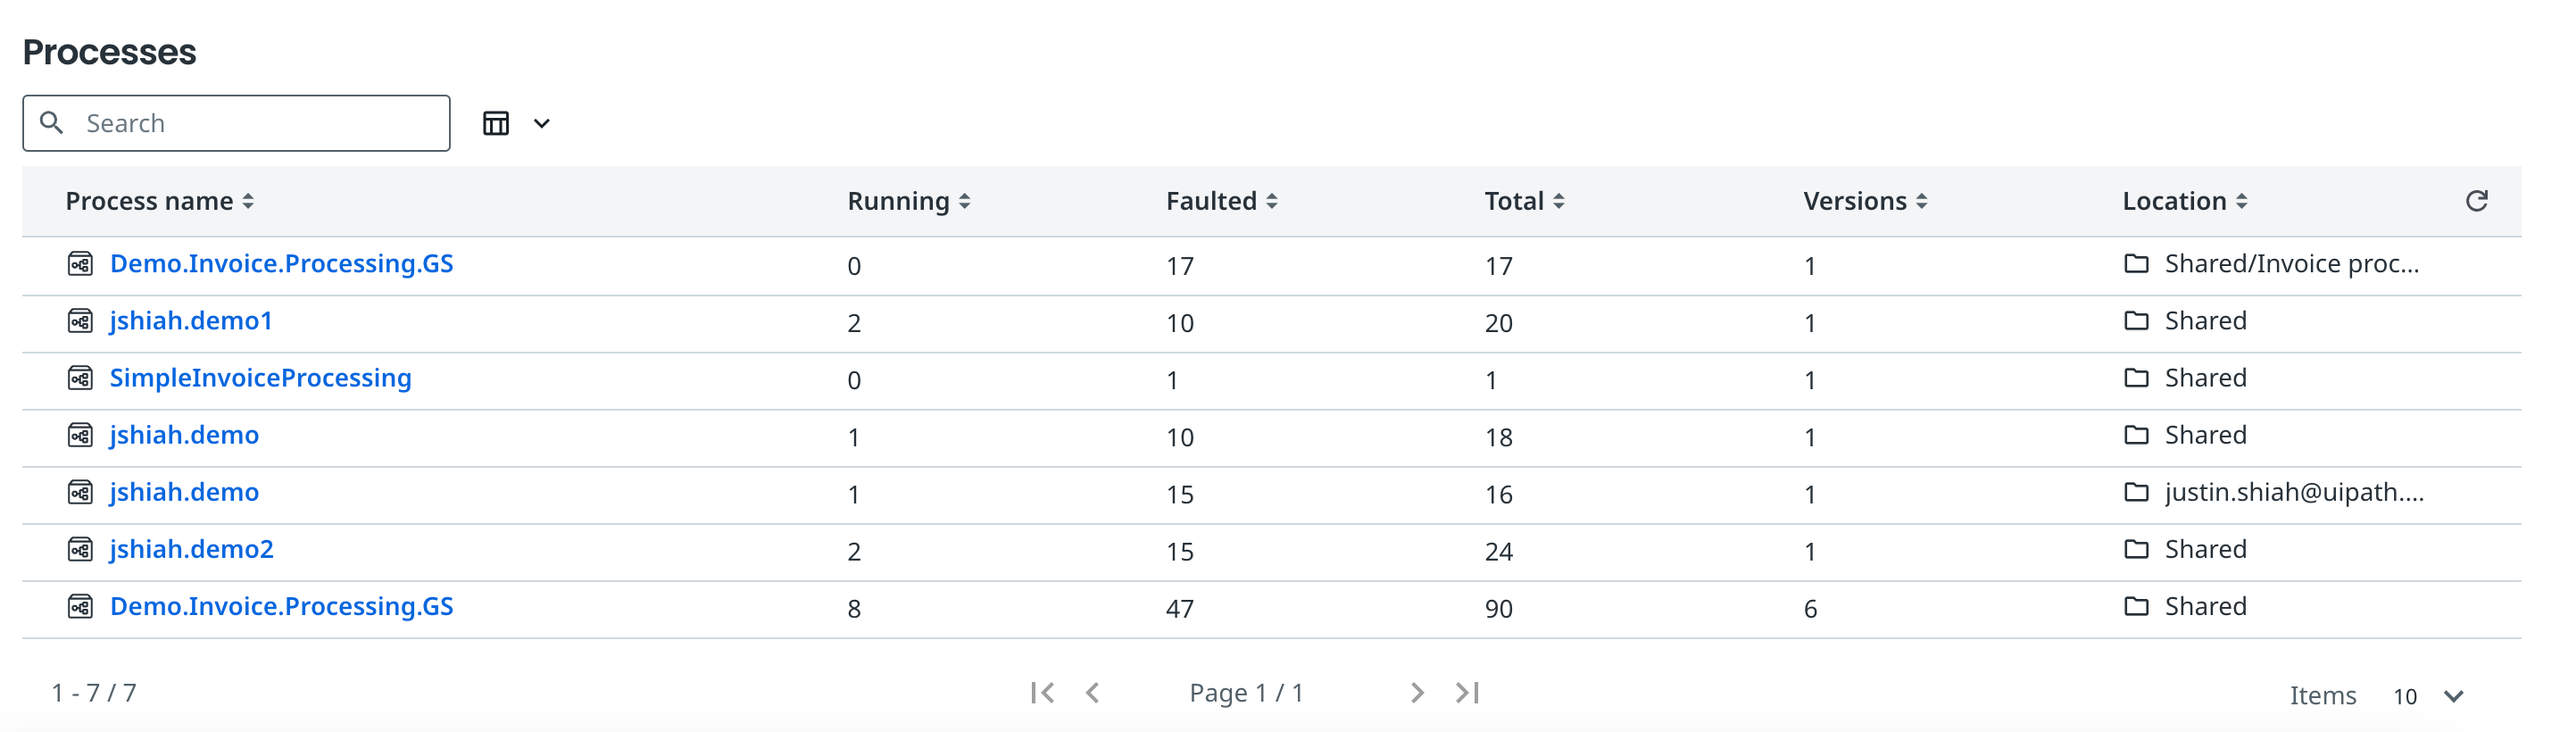
Processes table
The processes table contains a list of all processes in the tenant, and includes the counts for the number of running instances, faulted instances, and total instances along with the number of versions and folder location in Orchestrator.
Processes
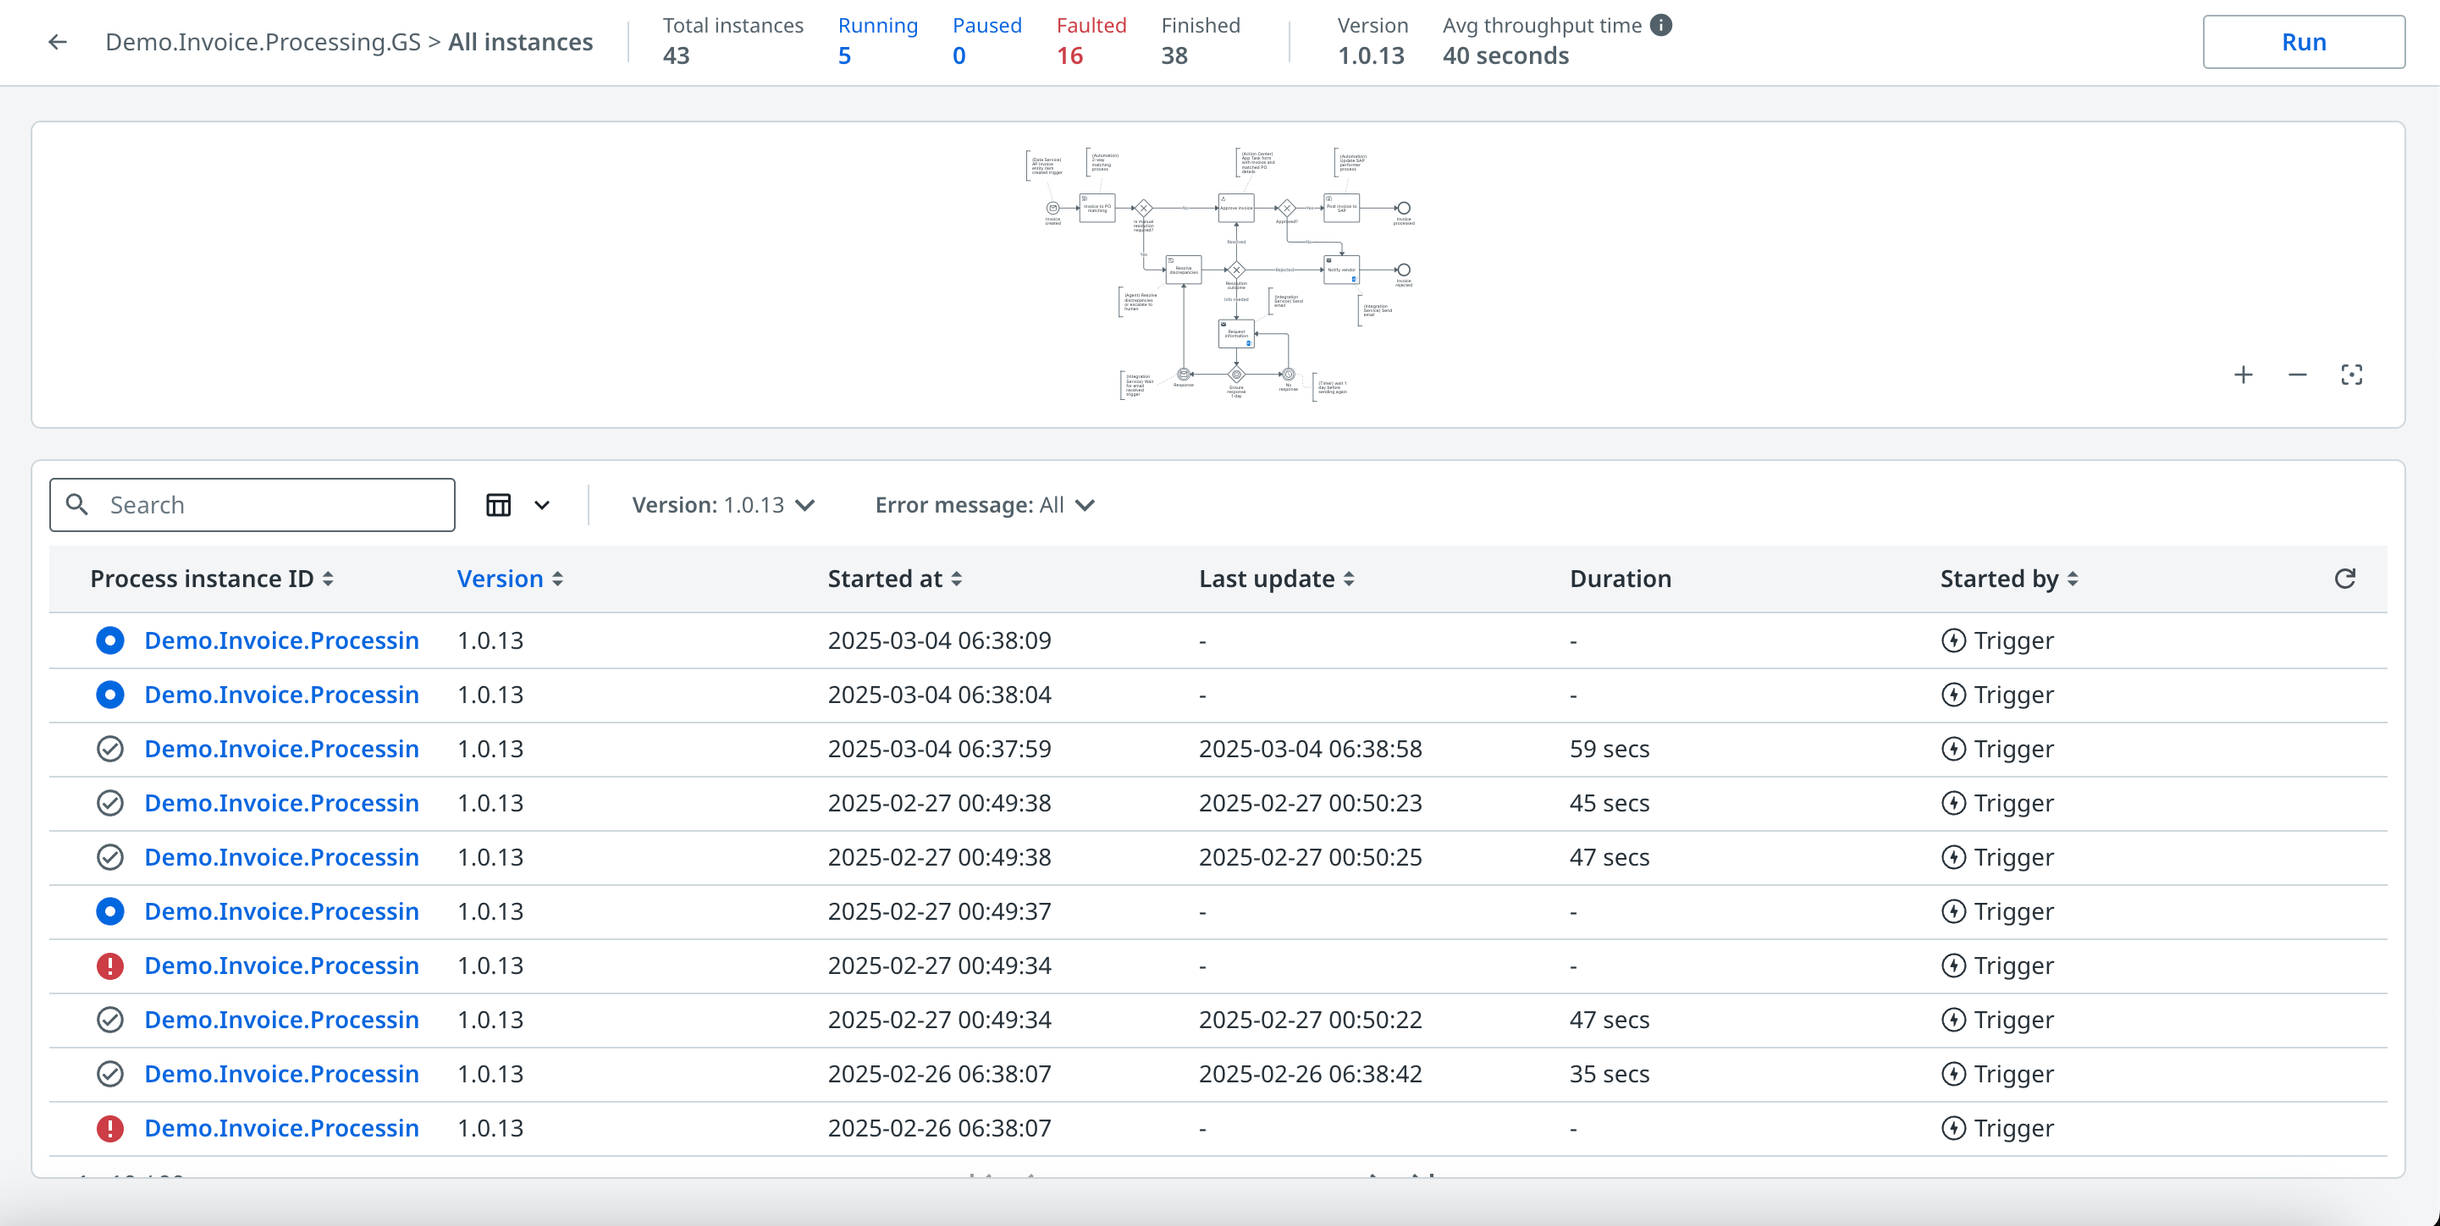
All instances view
When clicking into a specific process from the processes table, a table of all instances for that process is displayed. In addition to this, there is also a diagram representing the process model that can be viewed through selecting a single version in the table.
Single instance view
When clicking into a single instances from the all instances view, a diagram with the execution status of each node is displayed along with the instance’s execution trail and information about variables and action history. The execution trail represents each step (node) in the instance’s execution, and clicking on a step will highlight that node in blue on the diagram and also display information such as node ID, node label, execution duration, and input/output variables.
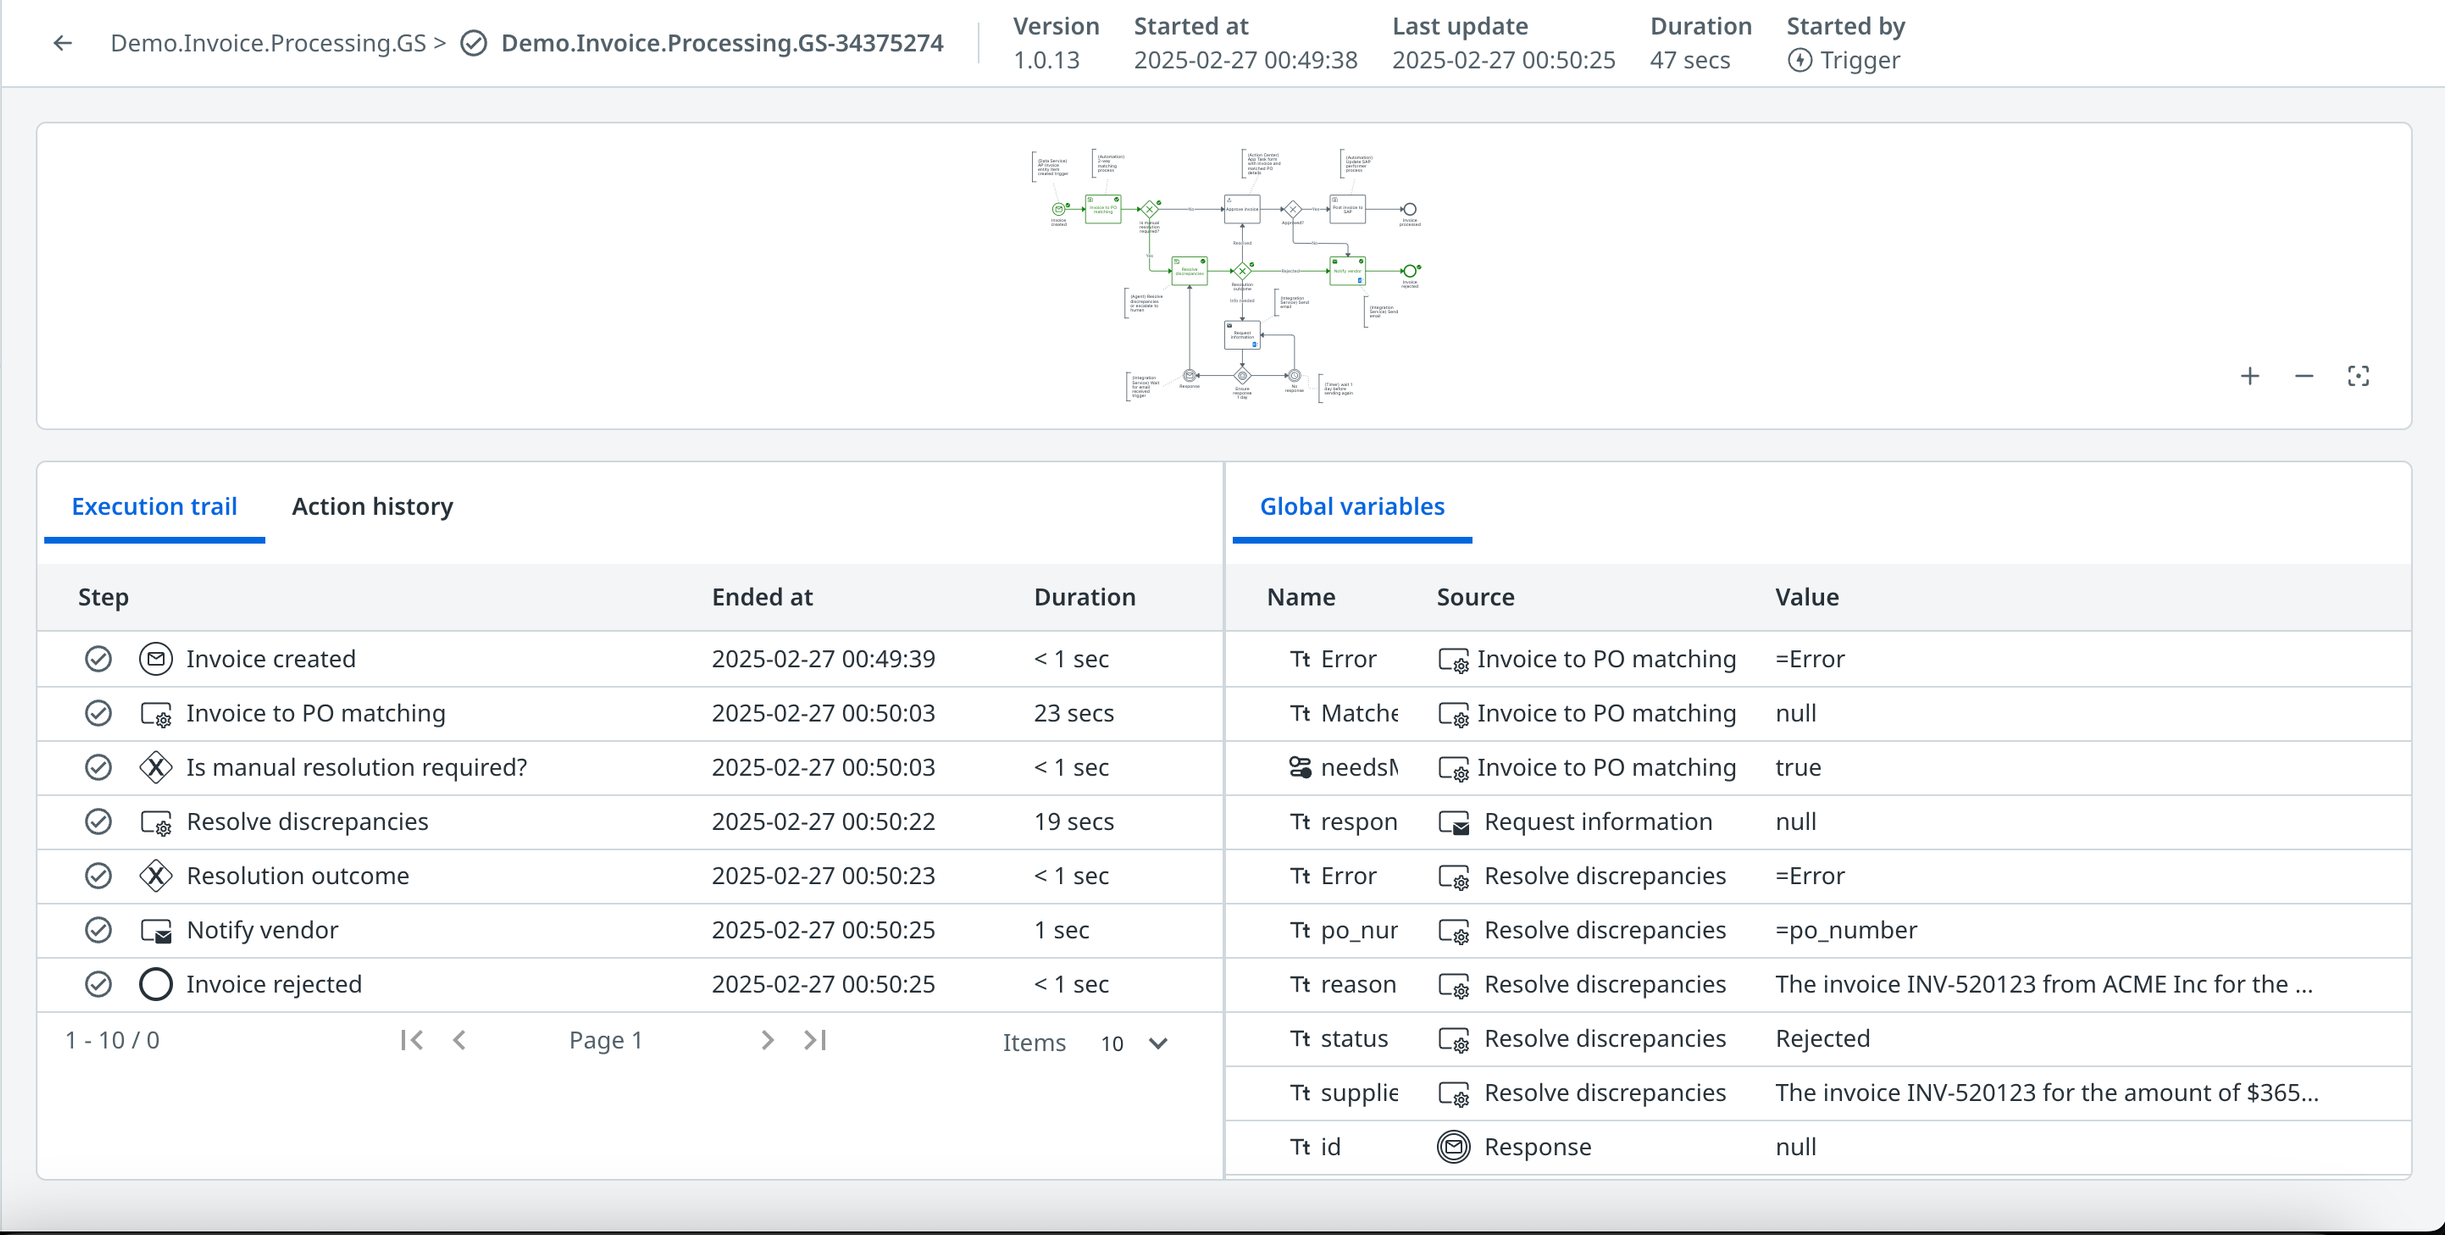
There is also the ability to perform workflow actions on the instance, which include pause, resume, retry, cancel, and migrate. When performing one of these actions, there is a comment section to log additional details that are then shown in the action history section.
Pause
Performing pause on an instance will pause the execution after all currently running nodes have completed.
Resume
Performing resume on an instance will resume the execution.
Retry
Performing retry on an instance will restart all the current activities in the workflow from the last completed step. Typically this is done after editing a variable or updating something in an external system for a faulted instance.
Migrate
Performing migrate on an instance will upgrade the instances to a different version of the process, which allows you to update the instance with the latest logic, configurations, or workflows from the target version.
Cancel
Performing cancel on an instance will stop all current activities and terminate their progress in the workflow. This action is irreversible.
Process Monitoring
What is Process Monitoring?
Agentic Orchestration has process analytics that allow you to monitor historical executions of your processes in an aggregated manner. The monitoring page can be accessed in the all instances view for a single process via the monitoring tab and includes default process-level dashboards and a diagram of the model that displays execution count execution duration, and a heatmap.
Monitoring Page
Process-level Dashboards
There are a set of dashboards that are provided by default for each process, which include:
Incident count over time
Completed instance count over time
Top 10 faulted elements
Top 10 elements by longest duration
Top 10 outliers by duration
Average duration for inactive instances
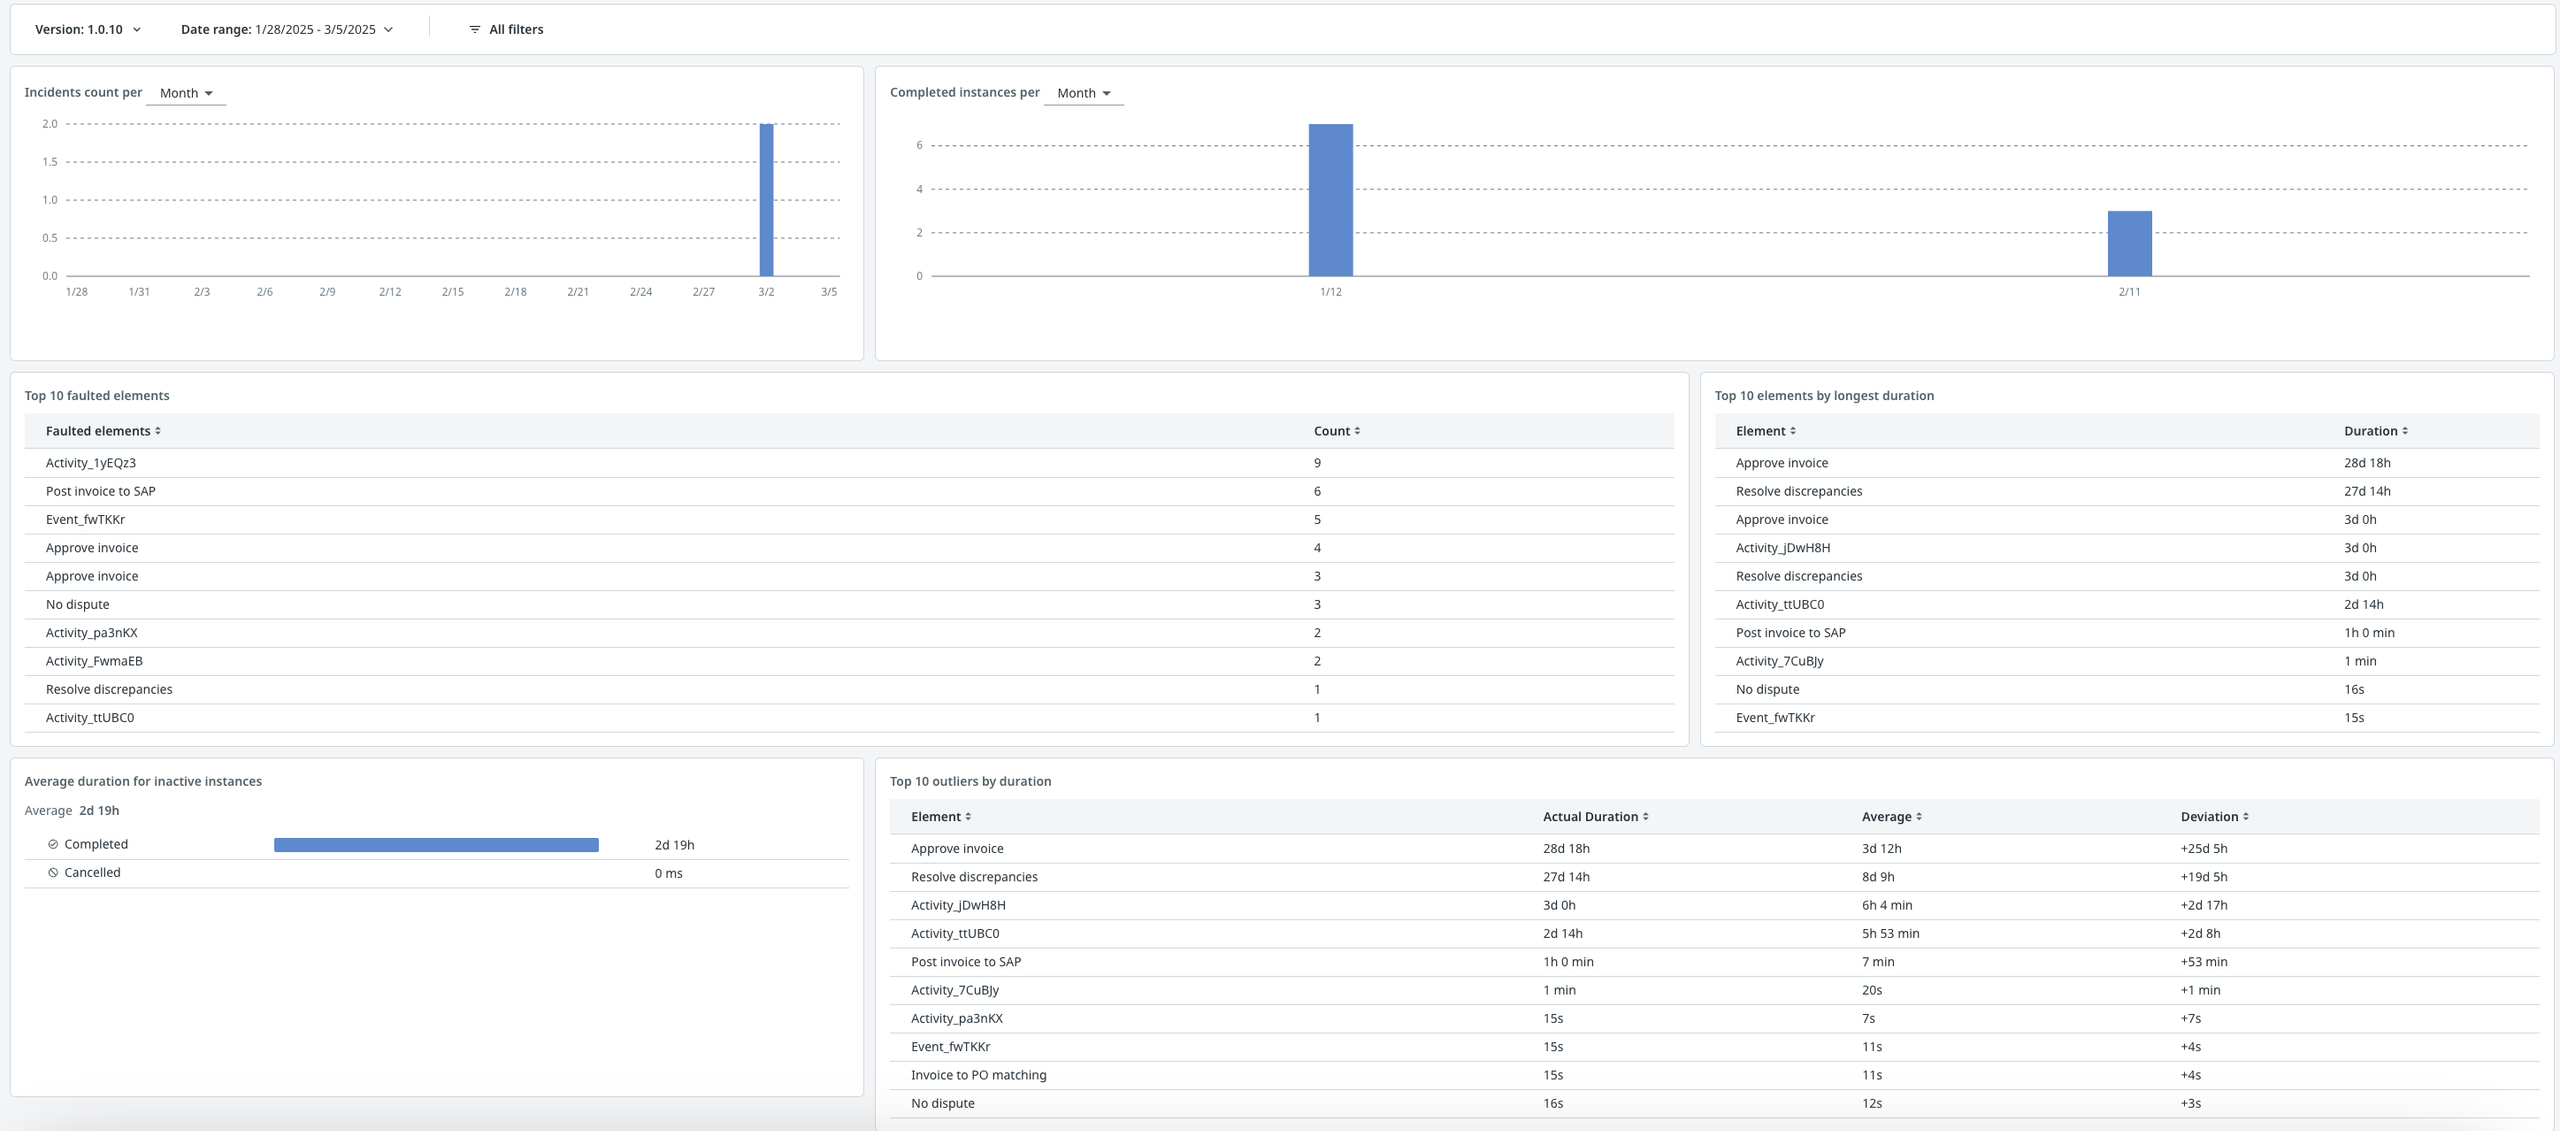
Diagram View
Execution Duration
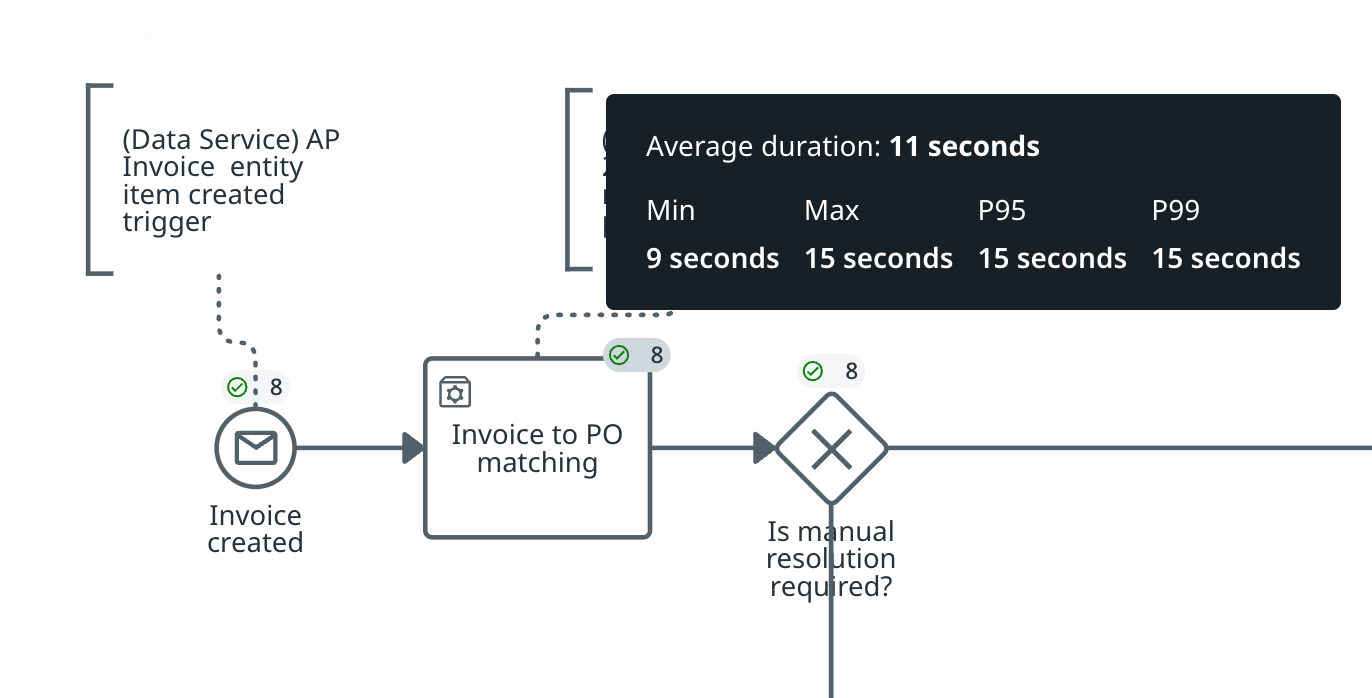
Execution duration indicates the amount of time it has taken for all instances of that node, broken down by status (completed, in progress, faulted, etc.).
Duration Metrics
• Average duration: This represents the mean duration of all observed tasks.
• Minimum duration(Min): The shortest duration recorded among all tasks.
• Maximum Duration(Max): The longest duration recorded among all tasks.
• 95th Percentile Duration (P95): This indicates that 95% of the tasks had a duration less than or equal to this value.
• 99th Percentile Duration (P99): This indicates that 99% of the tasks had a duration less than or equal to this value.
Execution Counts
Execution counts indicate the number of instances that have flowed through that node, broken down by status where green represents completed instances, blue represents in progress instances, and red represents faulted instances.
Heatmap
The heatmap view shades elements based on their P50 duration, where blue represents the shortest duration and red represents the longest duration.
Filtering
There are global filters available that affect the dashboards and diagram, these filters include:
Version
Date range
Status
Element ID
Process Optimization
Process Mining - Process Optimization and Tracking
What is Process Optimization?
Maestro has process analytics that allow you to monitor historical executions, detect inefficiencies, bottlenecks, or delays in your process and identify opportunities for process improvement and optimization.
The Process Optimization application can be accessed for a single process via Process Mining and the Process Optimization template. It includes a summary dashboard and capabilities such as Inefficiency detection, Compare, Simulation, Conformance checking, Root-cause-analysis, etc.
It also allows customers to combine the data from automation with data from 3rd party sources to enhance the business perspective on the end to end orchestrated process. Customers can define their own KPIs using a no-code interface and define custom charts and dashboards for their needs.
Summary dashboard
The Summary dashboard provides high-level trace information. You can use this information to get a global overview of the data.
https://docs.uipath.com/process-mining/automation-cloud/latest/user-guide/summary-dashboard
Operational monitoring
The Operational monitoring dashboard provides details on the most important aspects of the process. This allows you to analyze how frequently your process is executed with success or failure, how often failures occur and what are the trends over time.
Automation potential
The Automation potential dashboard can be used to find automation opportunities in the process.
Action Center tasks
The Action Center tasks dashboard provides information on the tasks that work through Action Center.
Due dates
The Due dates dashboard allows you to analyze how often tasks were completed on time or late. This can provide insights into the process efficiency and it can highlight potential bottlenecks or areas for improvement.
https://docs.uipath.com/process-mining/automation-cloud/latest/user-guide/due-dates-dashboard
Other process mining capabilities:
https://docs.uipath.com/process-mining/automation-cloud/latest/user-guide/conformance-checking
https://docs.uipath.com/process-mining/automation-cloud/latest/user-guide/root-cause-analysis
https://docs.uipath.com/process-mining/automation-cloud/latest/user-guide/compare
https://docs.uipath.com/process-mining/automation-cloud/latest/user-guide/tags
https://docs.uipath.com/process-mining/automation-cloud/latest/user-guide/due-dates
https://docs.uipath.com/process-mining/automation-cloud/latest/user-guide/input-data
https://docs.uipath.com/process-mining/automation-cloud/latest/user-guide/introduction-to-dashboards
Process Tracking for Maestro
Agentic Process nodes are tracked automatically by the Process Tracking Service and exposed in Process Mining to get a unified view of the process and further optimize it.
Business Rules
Overview
Business Rules enable the storage and management of DMN-based rules in Orchestrator, evaluation within any process via a dedicated activity, and rule modifications without the need for redeploying the processes that use them.
In Orchestrator we store and manage with the following set of capabilities:
Store DMN files with role base access for both users and robots.
Versioning
Linking of Business rules across folders
Tagging
For executing Business rules we have the new Business Rules task in Maestro which supports DMN v1.3.
Pre-requisites
Access to a DMN editor that supports DMN v1.3 ex. BPMN.io, Trisotech or similar.
Demo
Orchestrator documentation
Business Rules allow RPA developers to store and manage Decision Model and Notation (DMN) files as part of a workflow or process diagram.
A developer can model a DMN file outside the UiPath platform with the help of a DMN-compliant editor. A DMN decision is a Studio project file composed of the following:
The DMN file.
An workflow (.xaml or .cs coded).
When the DMN file is created, you can upload it to the folder context as a new business rule object
Field | Description |
Name | The display name of the business rule. |
Current version | The version number of the DMN file currently used in a given business rule. |
Description | The description of the business rule object. |
Labels | The list of all labels associated with the business rule. You can search the business rule list by Labels. |
Properties | The list of all properties associated with the business rule. You can search the business rule list by Properties. |
Permissions for Business Rules
The Business Rules permission governs access and control over business rules and their contents.
Creating a business rule
The requirements for creating a business rule are:
The Create permission for Business Rules.
A DMN file.
When you build a DMN file, we recommend you create a new portable Web-based canvas so it can be used in UiPath products.
Make sure that argument names consist only of letters, digits, and the underscore character. The names must begin with a letter or the underscore character.
On the Business Rules page, select Add business rule, then Create a new business rule.
Give the business rule a Name and a Description.
In the File field, browse for a DMN file. When the file is uploaded, two new items are displayed:
The Download button, which you can use to locally download the business rule version.
The Version field, which is prepopulated with the business rule's current version, and can be edited at this point.
The DMN file size should not exceed 1 MB.
After you save the business rule with the uploaded DMN file, you can no longer change its version.
Each time a business rule object is changed, by default, it retrieves the latest one.
For better business rule management, you can optionally add Labels and Properties. To create new properties, use the Additional settings button.
Select Add to create your business rule.
Accessing business rule versions
To keep track of your business rules, use the Version field.
After you save the business rule with the uploaded DMN file, you can no longer change its version.
You can view the version of a business rule from the Business Rules page. To check the version, select a business rule, then either edit the business rule, or go straight to More Actions, and select View versions.
If needed, you can also download the version of a business rule through one of the following methods:
Once you upload the DMN file during the business rule creation, select the download icon located next to the file.
From the Business Rules page, on the desired business rule, select More Actions, then Download version. Alternatively, under More Actions, select View versions. A side panel opens, where you can select the download icon next to the version you want to download.
Business rule links
Linking business rules from other folders
On the Business Rules page, select Add business rule, then Link from other folders.
Next, the Import Business Rule page displays a list of all business rules from other folders.
Select one or more business rules to add to the current folder, then Continue, and then Link.
Managing business rules links
On the Business Rules page, select a business rule, go to More Actions, and select Manage links.
In the next window, select one or more folders where to add a business rule, or deselect folders to remove a business rule.
Select Update.
Executing a business rule
Before you execute a business rule, make sure you:
Modelled a DMN file with the help of a DMN-compliant editor.
Created a new business rule in Orchestrator by uploading the DMN file.
To execute a business rule, open Agentic process
Add to your process a Business rule task.
Select the DMN file stored in Orchestrator as the Business rule.
Map input and output arguments according to how the DMN file is modelled.
Editing a business rule
You need Edit permissions on Business Rules to edit a business rule.
On the Business Rules page, select a business rule, then go to More Actions, then select Edit.
Next, you can edit the following fields: Name, Description, Labels, Properties, and File.
After you save the business rule with the uploaded DMN file, you can no longer change its version.
Make sure that argument names consist only of letters, digits, and the underscore character. The names must begin with a letter or the underscore character.
Select Update.
Removing a business rule
You need Delete permissions on Business Rules to remove a buisness rule.
On the Business Rules page, select a business rule.
Next, go to More Actions.
Select Remove.
How-To Guides
Getting Started with Process Modeling
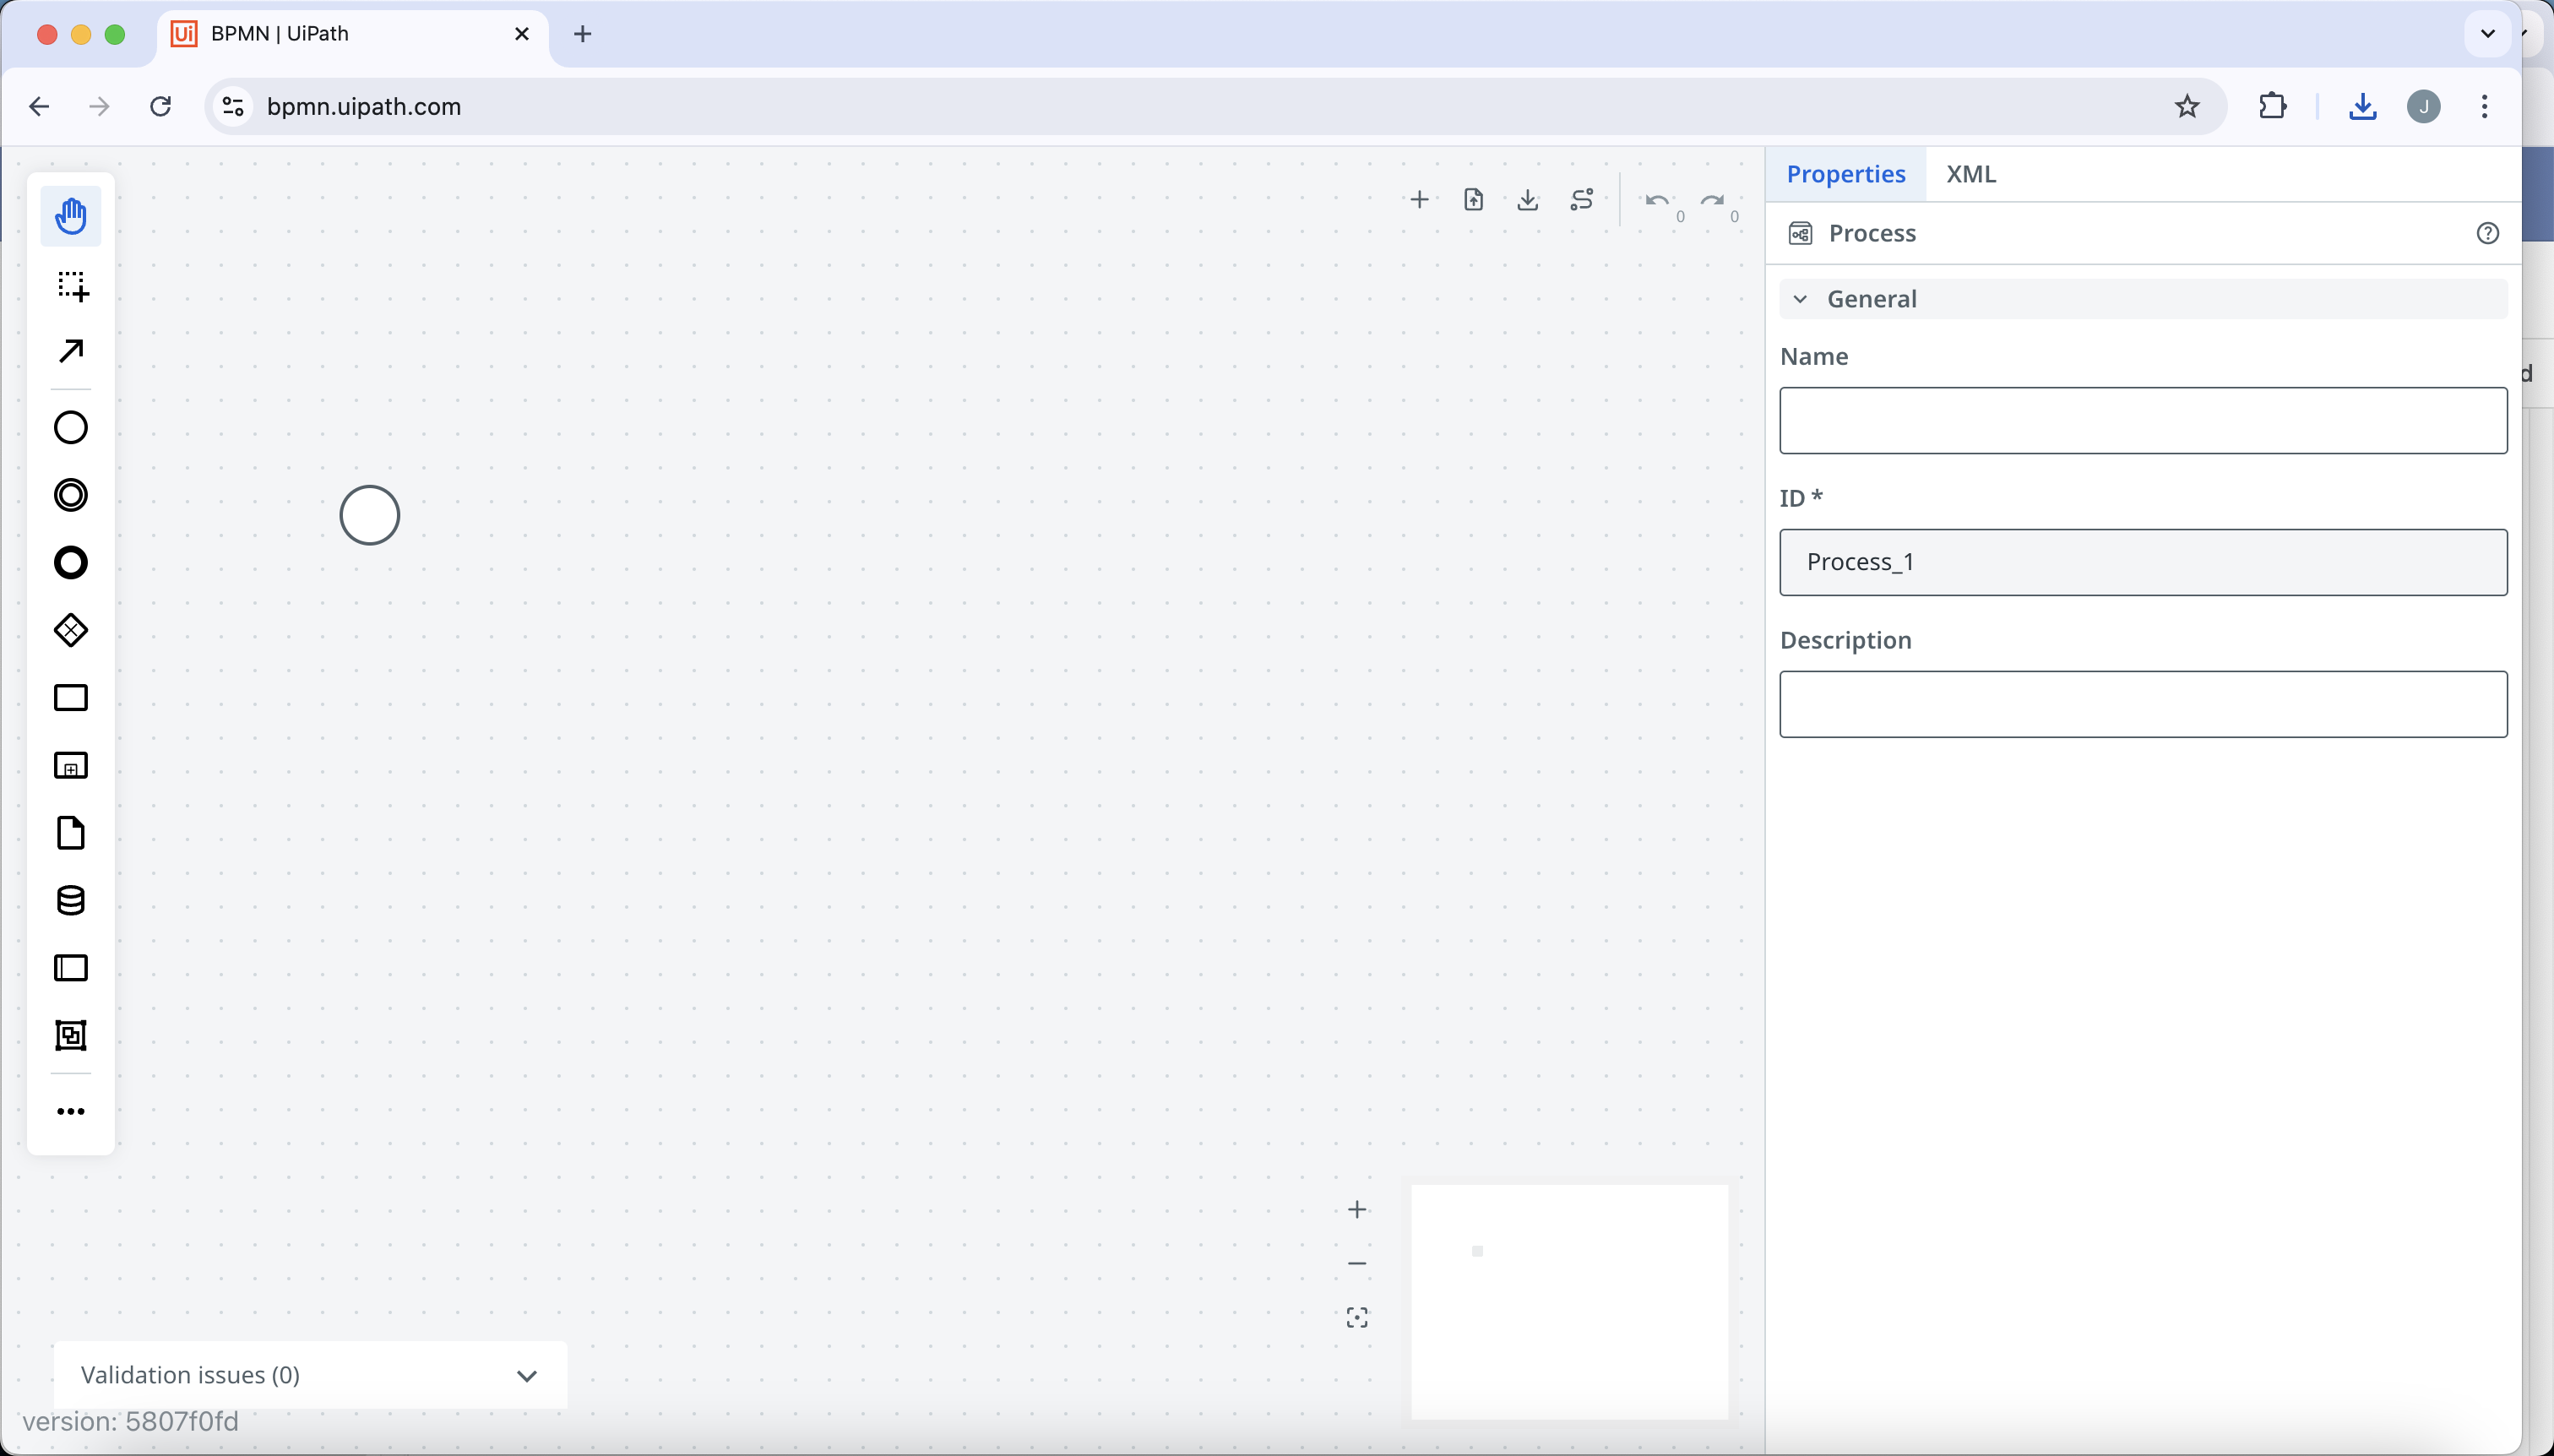
To get started with process modeling, first navigate to bpmn.uipath.com - our standalone canvas that is accessible by anyone. An empty start event will be on the canvas by default.
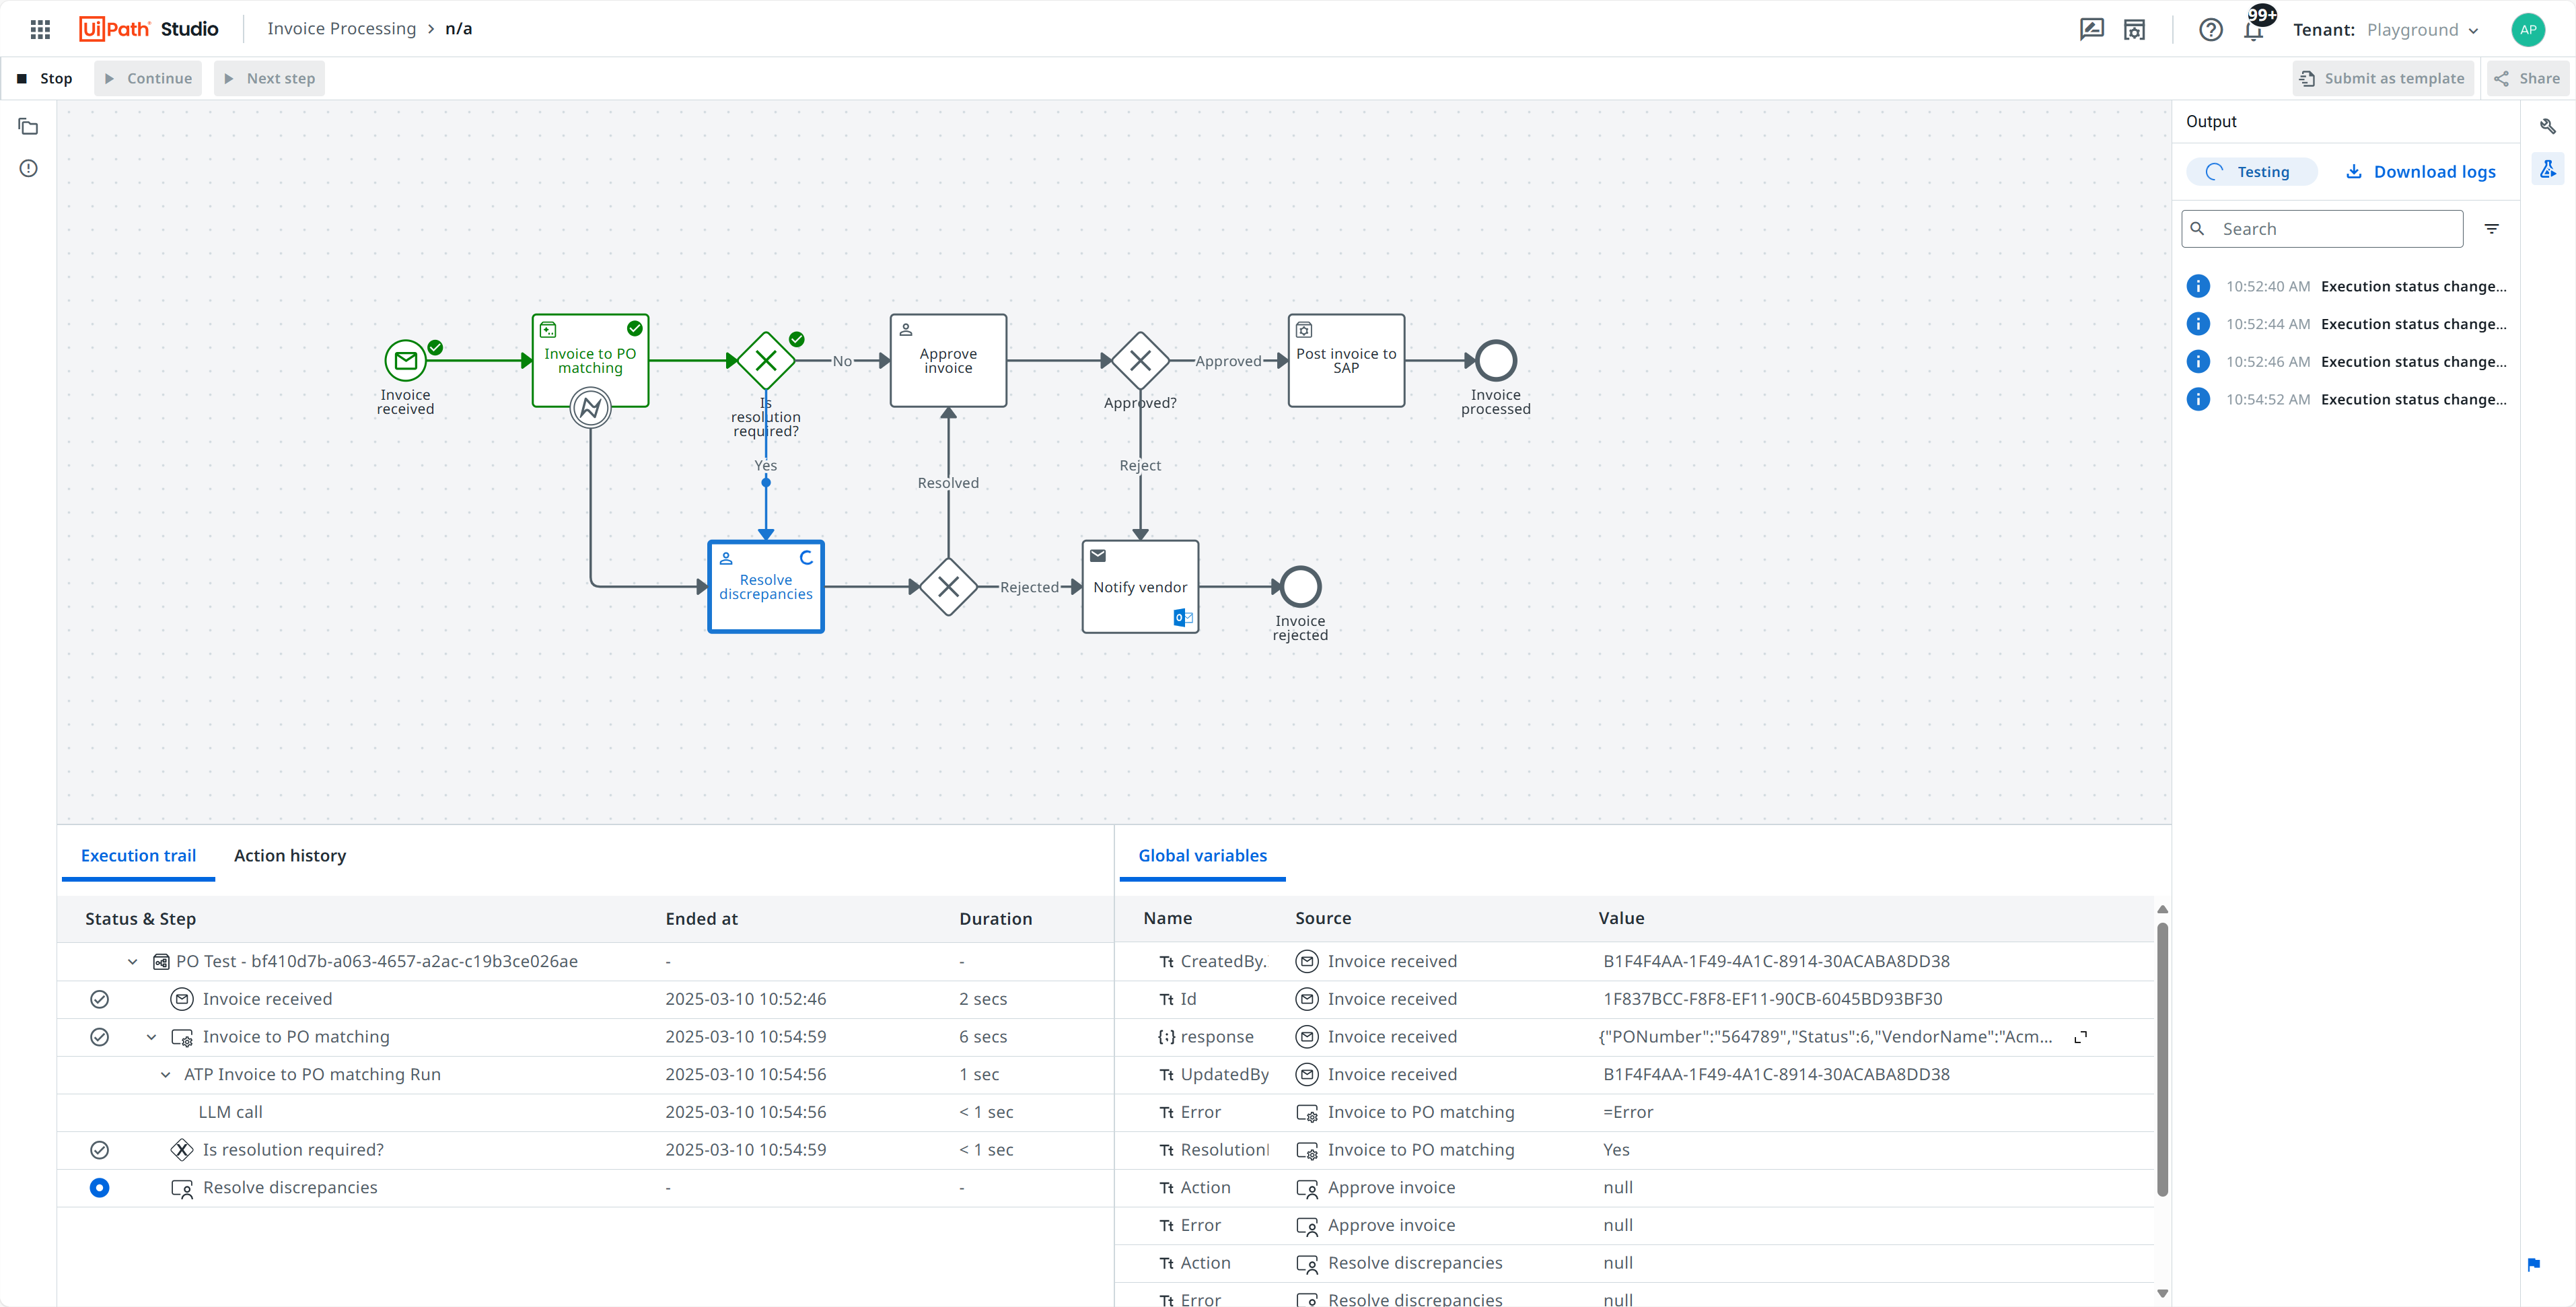
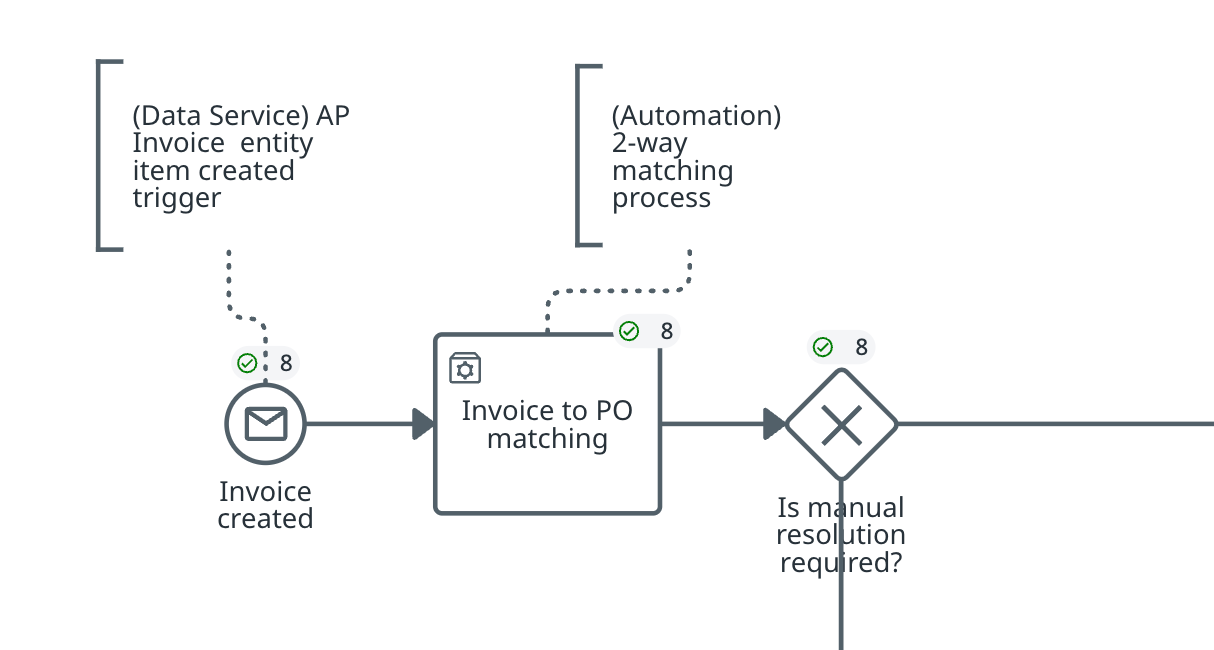
We’ll take an invoice processing business process as an example process to build out:
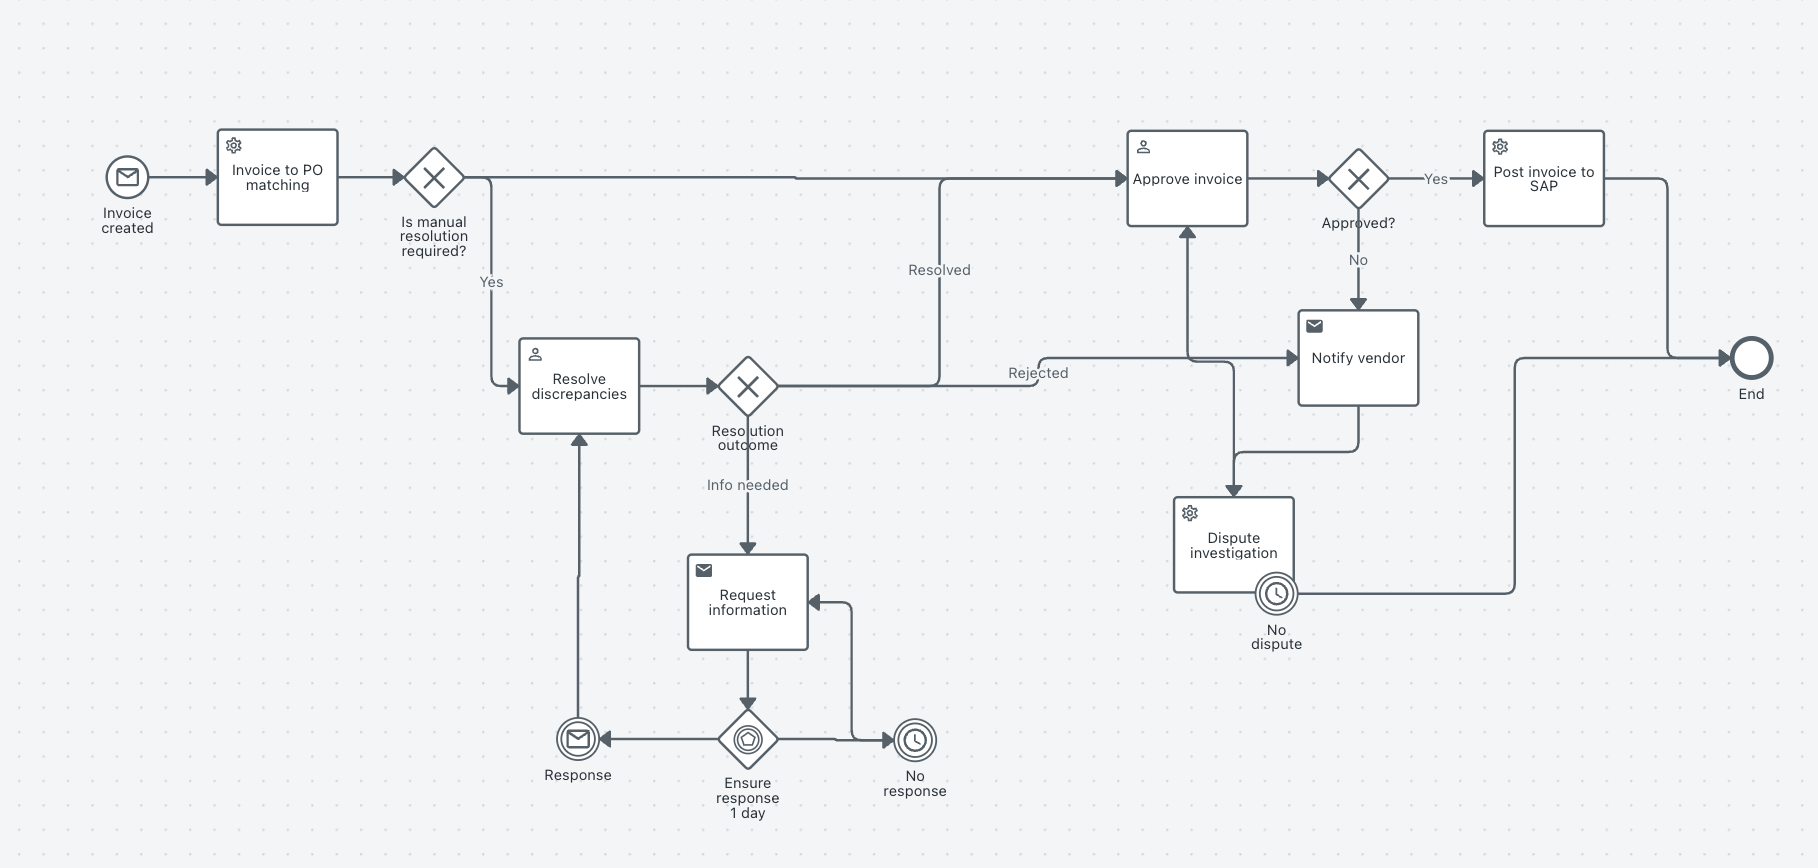
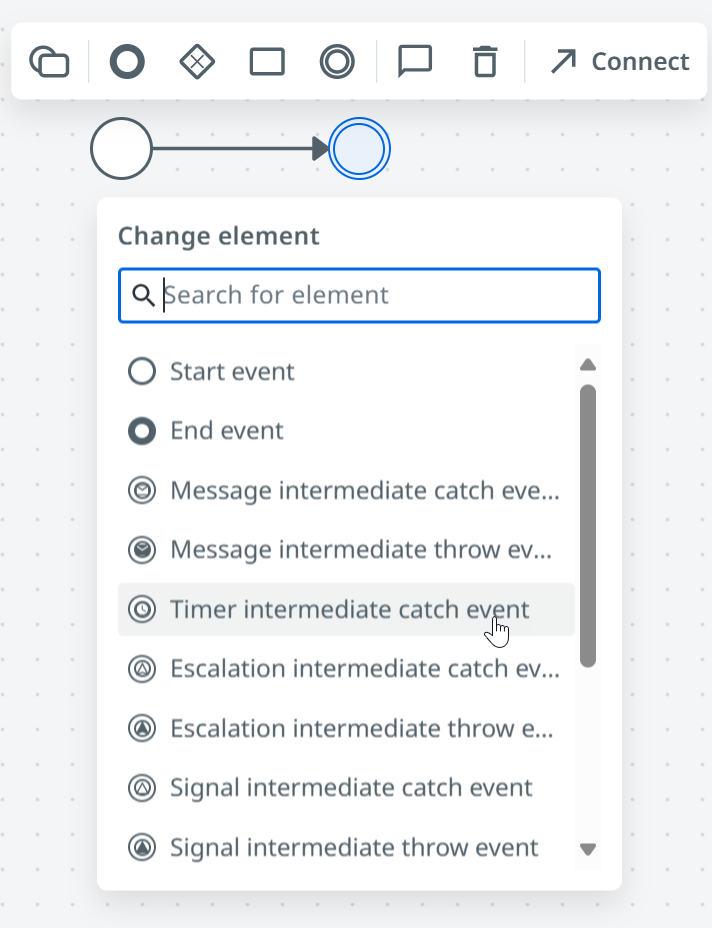
Click on the start event to bring up the element toolbar and select the change element icon.
Within the change element menu, select message start event.
You should now see the blank start event change into a message start event. To add a name to the element, you can double click on the element and type in the name, or fill in the name field in the properties panel to the right.
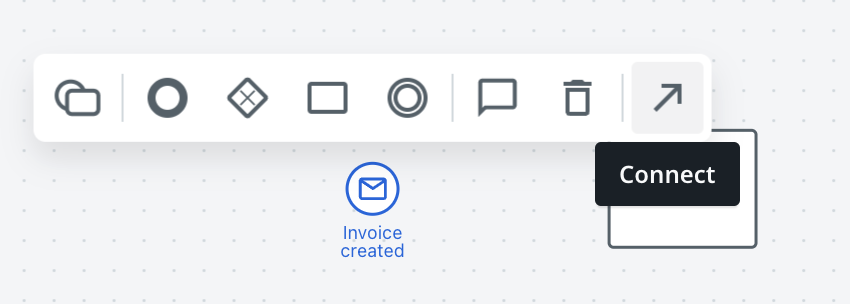
To add a new element onto the canvas, click on the task element in the left toolbar and drag it onto the canvas. Once the new element is on the canvas, select the message start event to bring up the element toolbar and select connect.
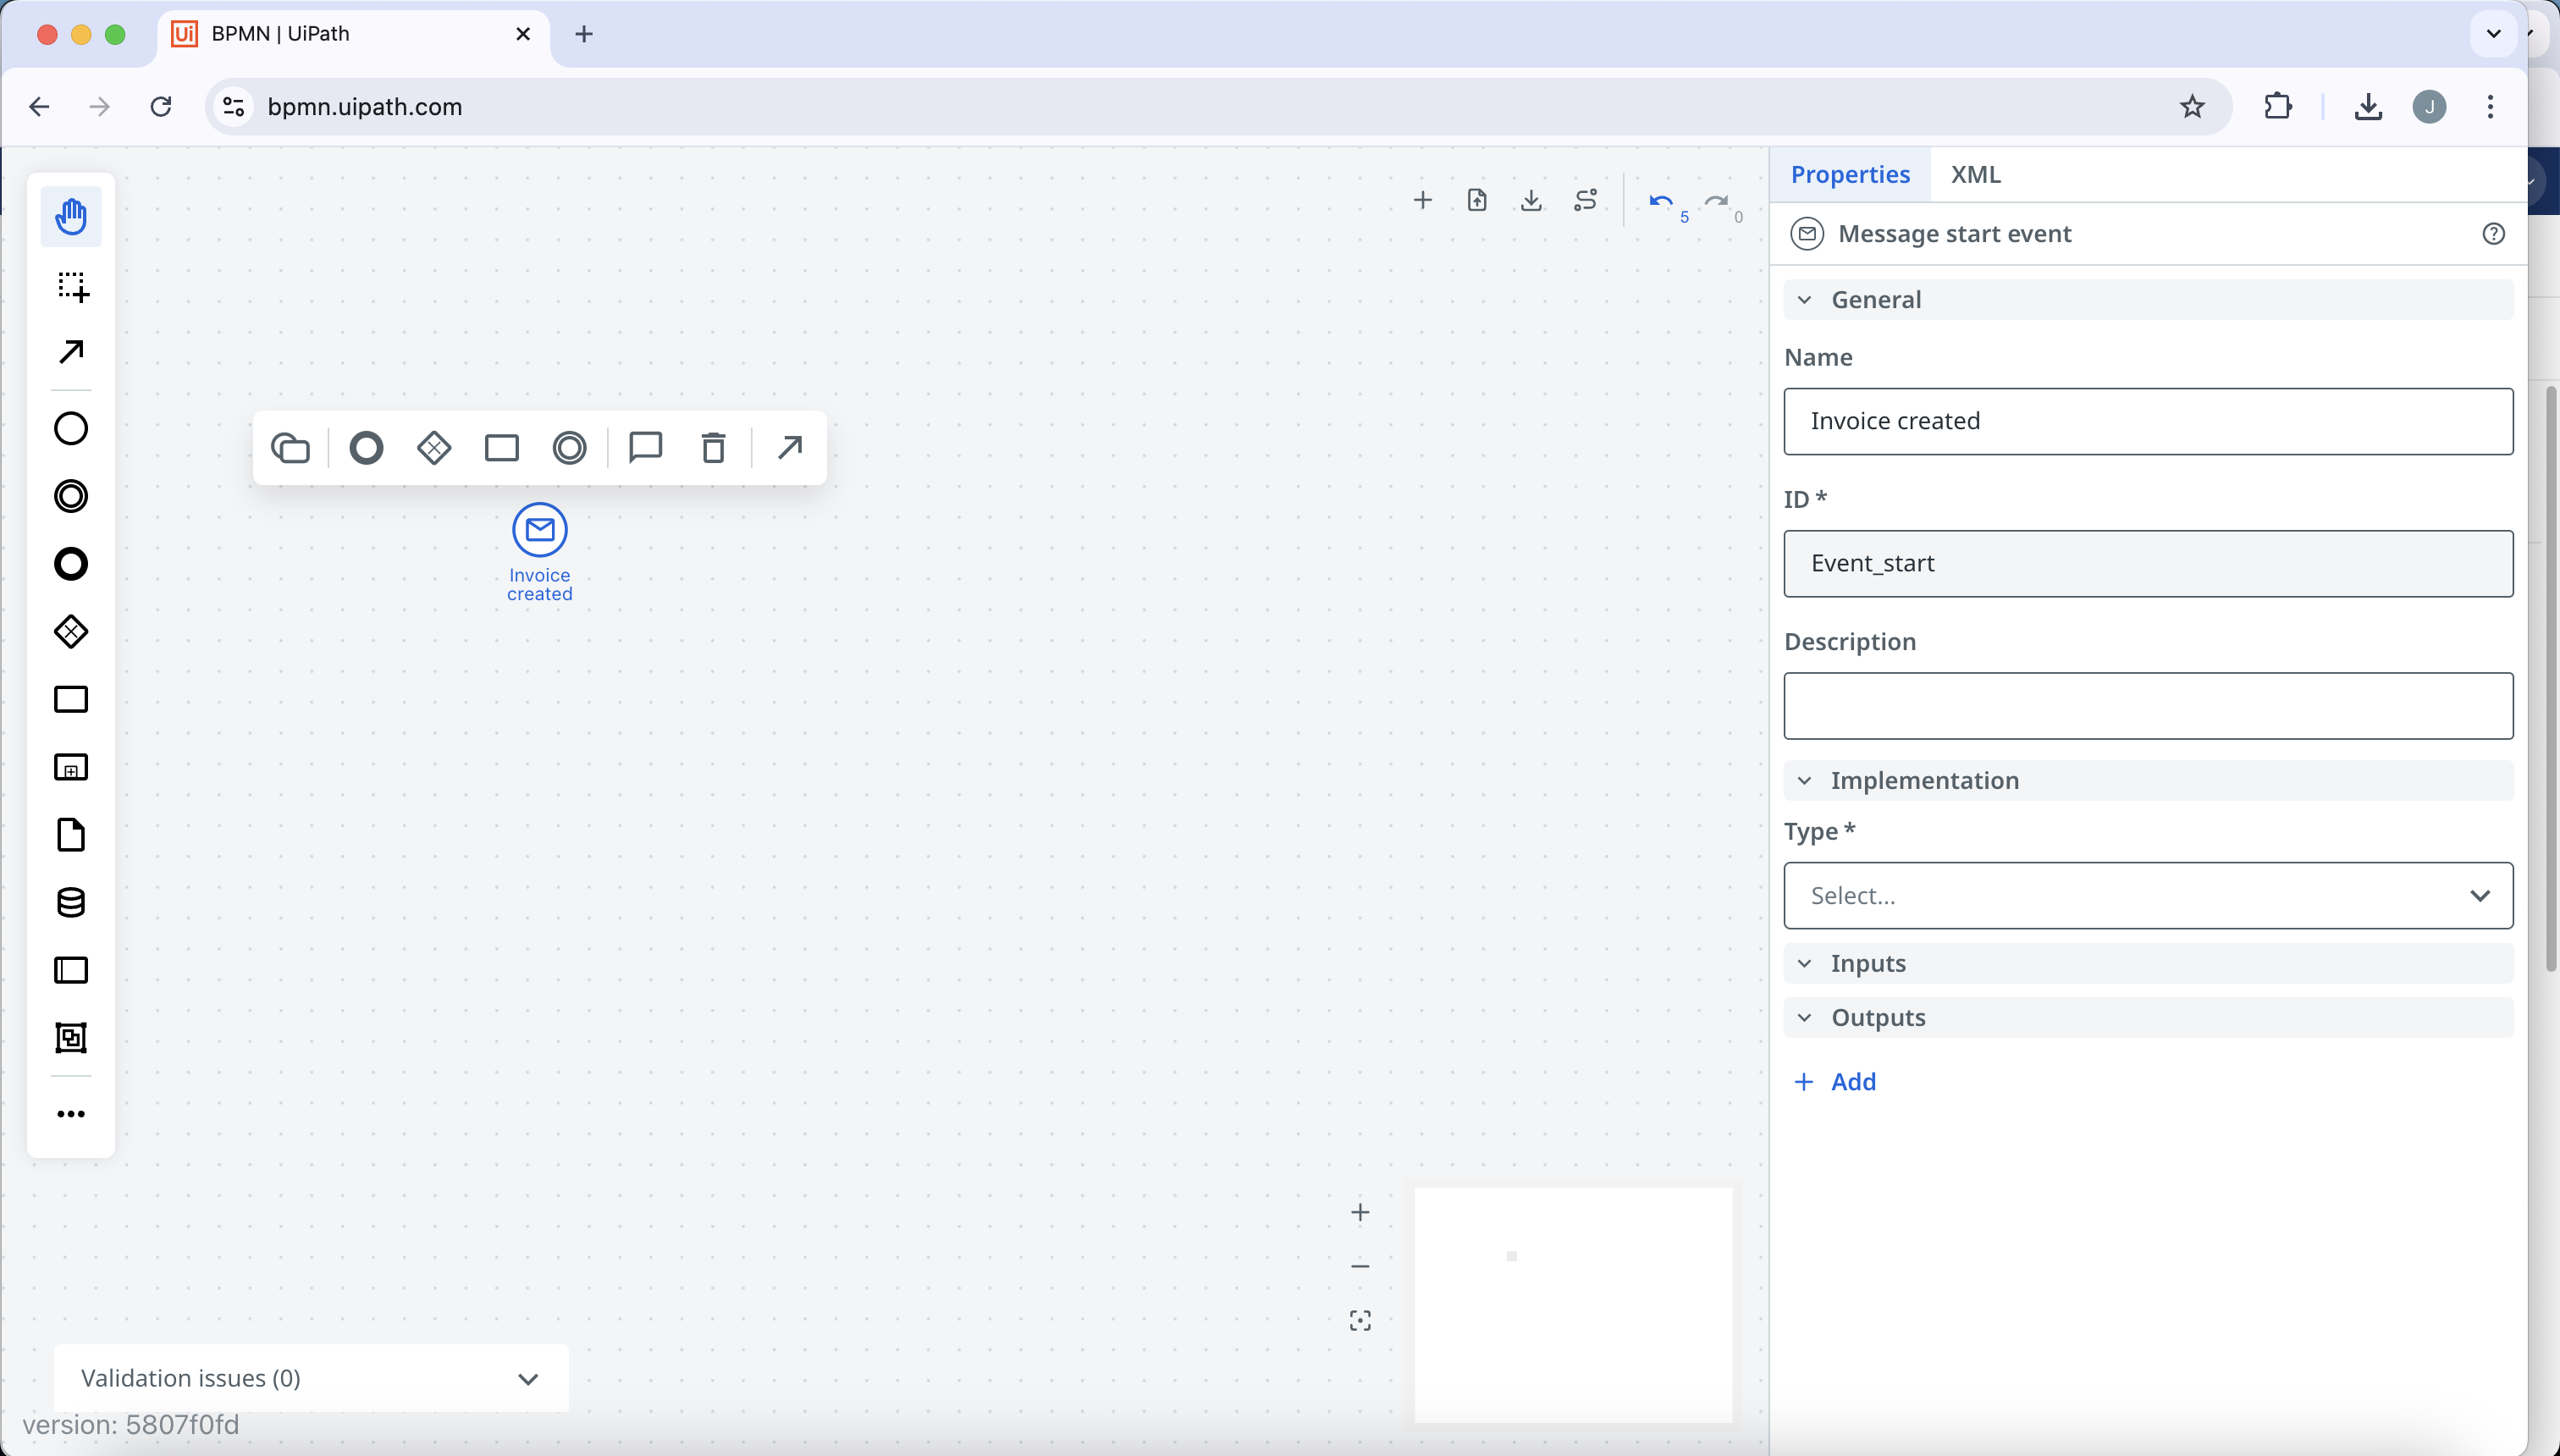
Drag the connection arrow to the target node and release to connect the two elements.
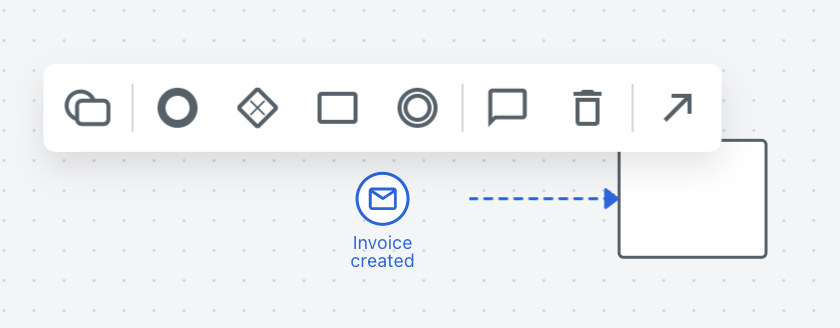
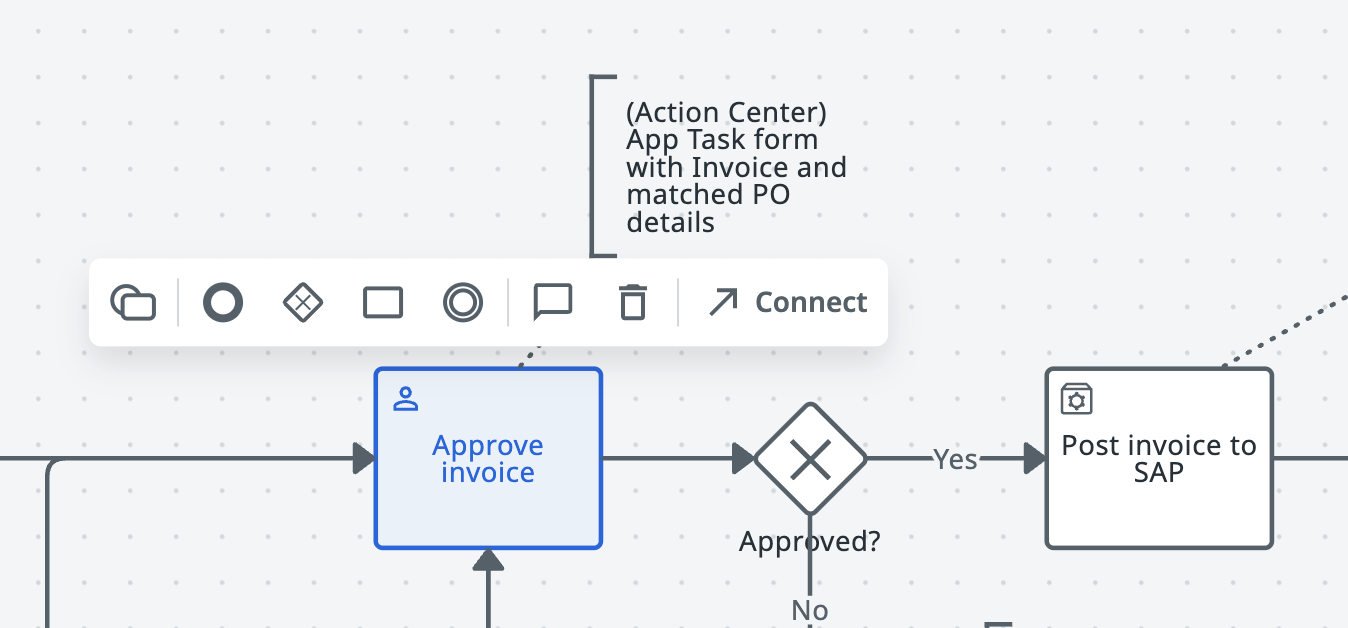
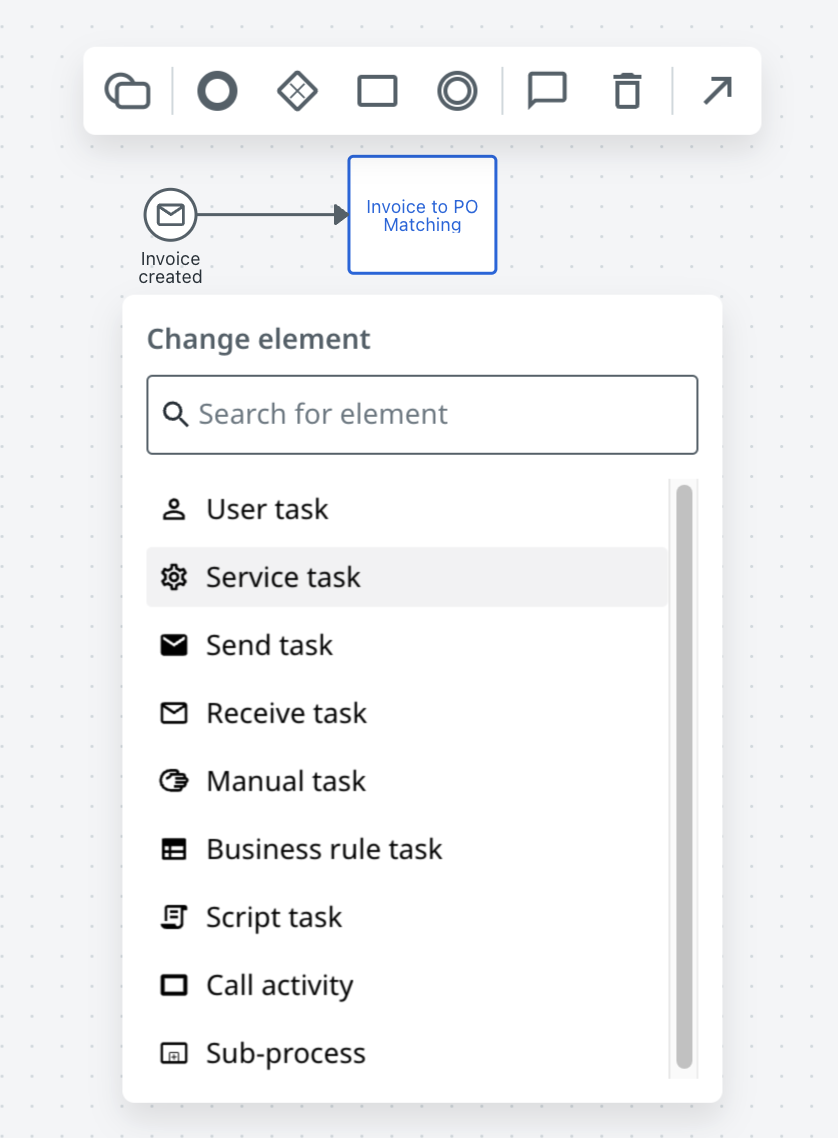
An alternative to dragging an element onto the canvas and manually adding a connection is to use our quick connect feature in the element toolbar. First, delete the task by clicking the trash can on the element toolbar. Next, select the Add: Task option which will automatically add a task and connect it to the message start event. Name the task Invoice to PO matching.

10. Change the Invoice to PO matching task to a service task by clicking on the change element option in the element toolbar and selecting service task.
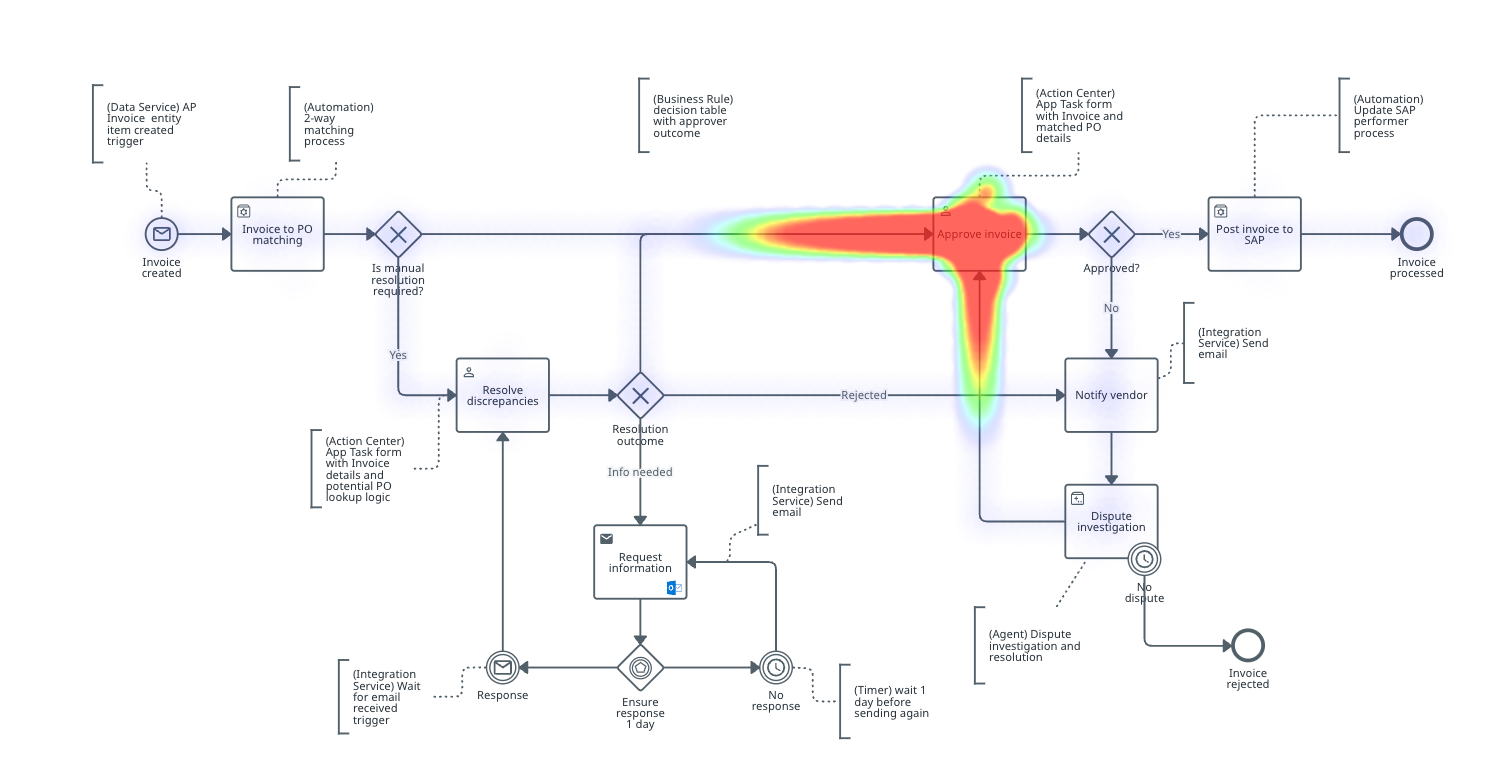
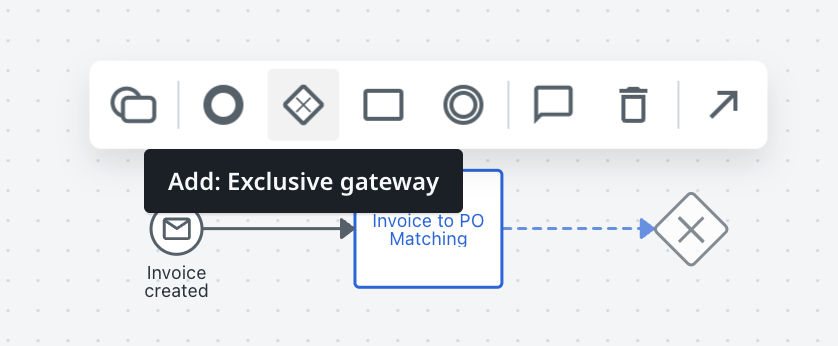
Click on the Invoice to PO matching task and select the Add: Exclusive gateway option. Name the exclusive gateway Is manual resolution required?
10. Next, add two tasks to the exclusive gateway by selecting Add: task twice on the exclusive gateway and rearrange the tasks like so:
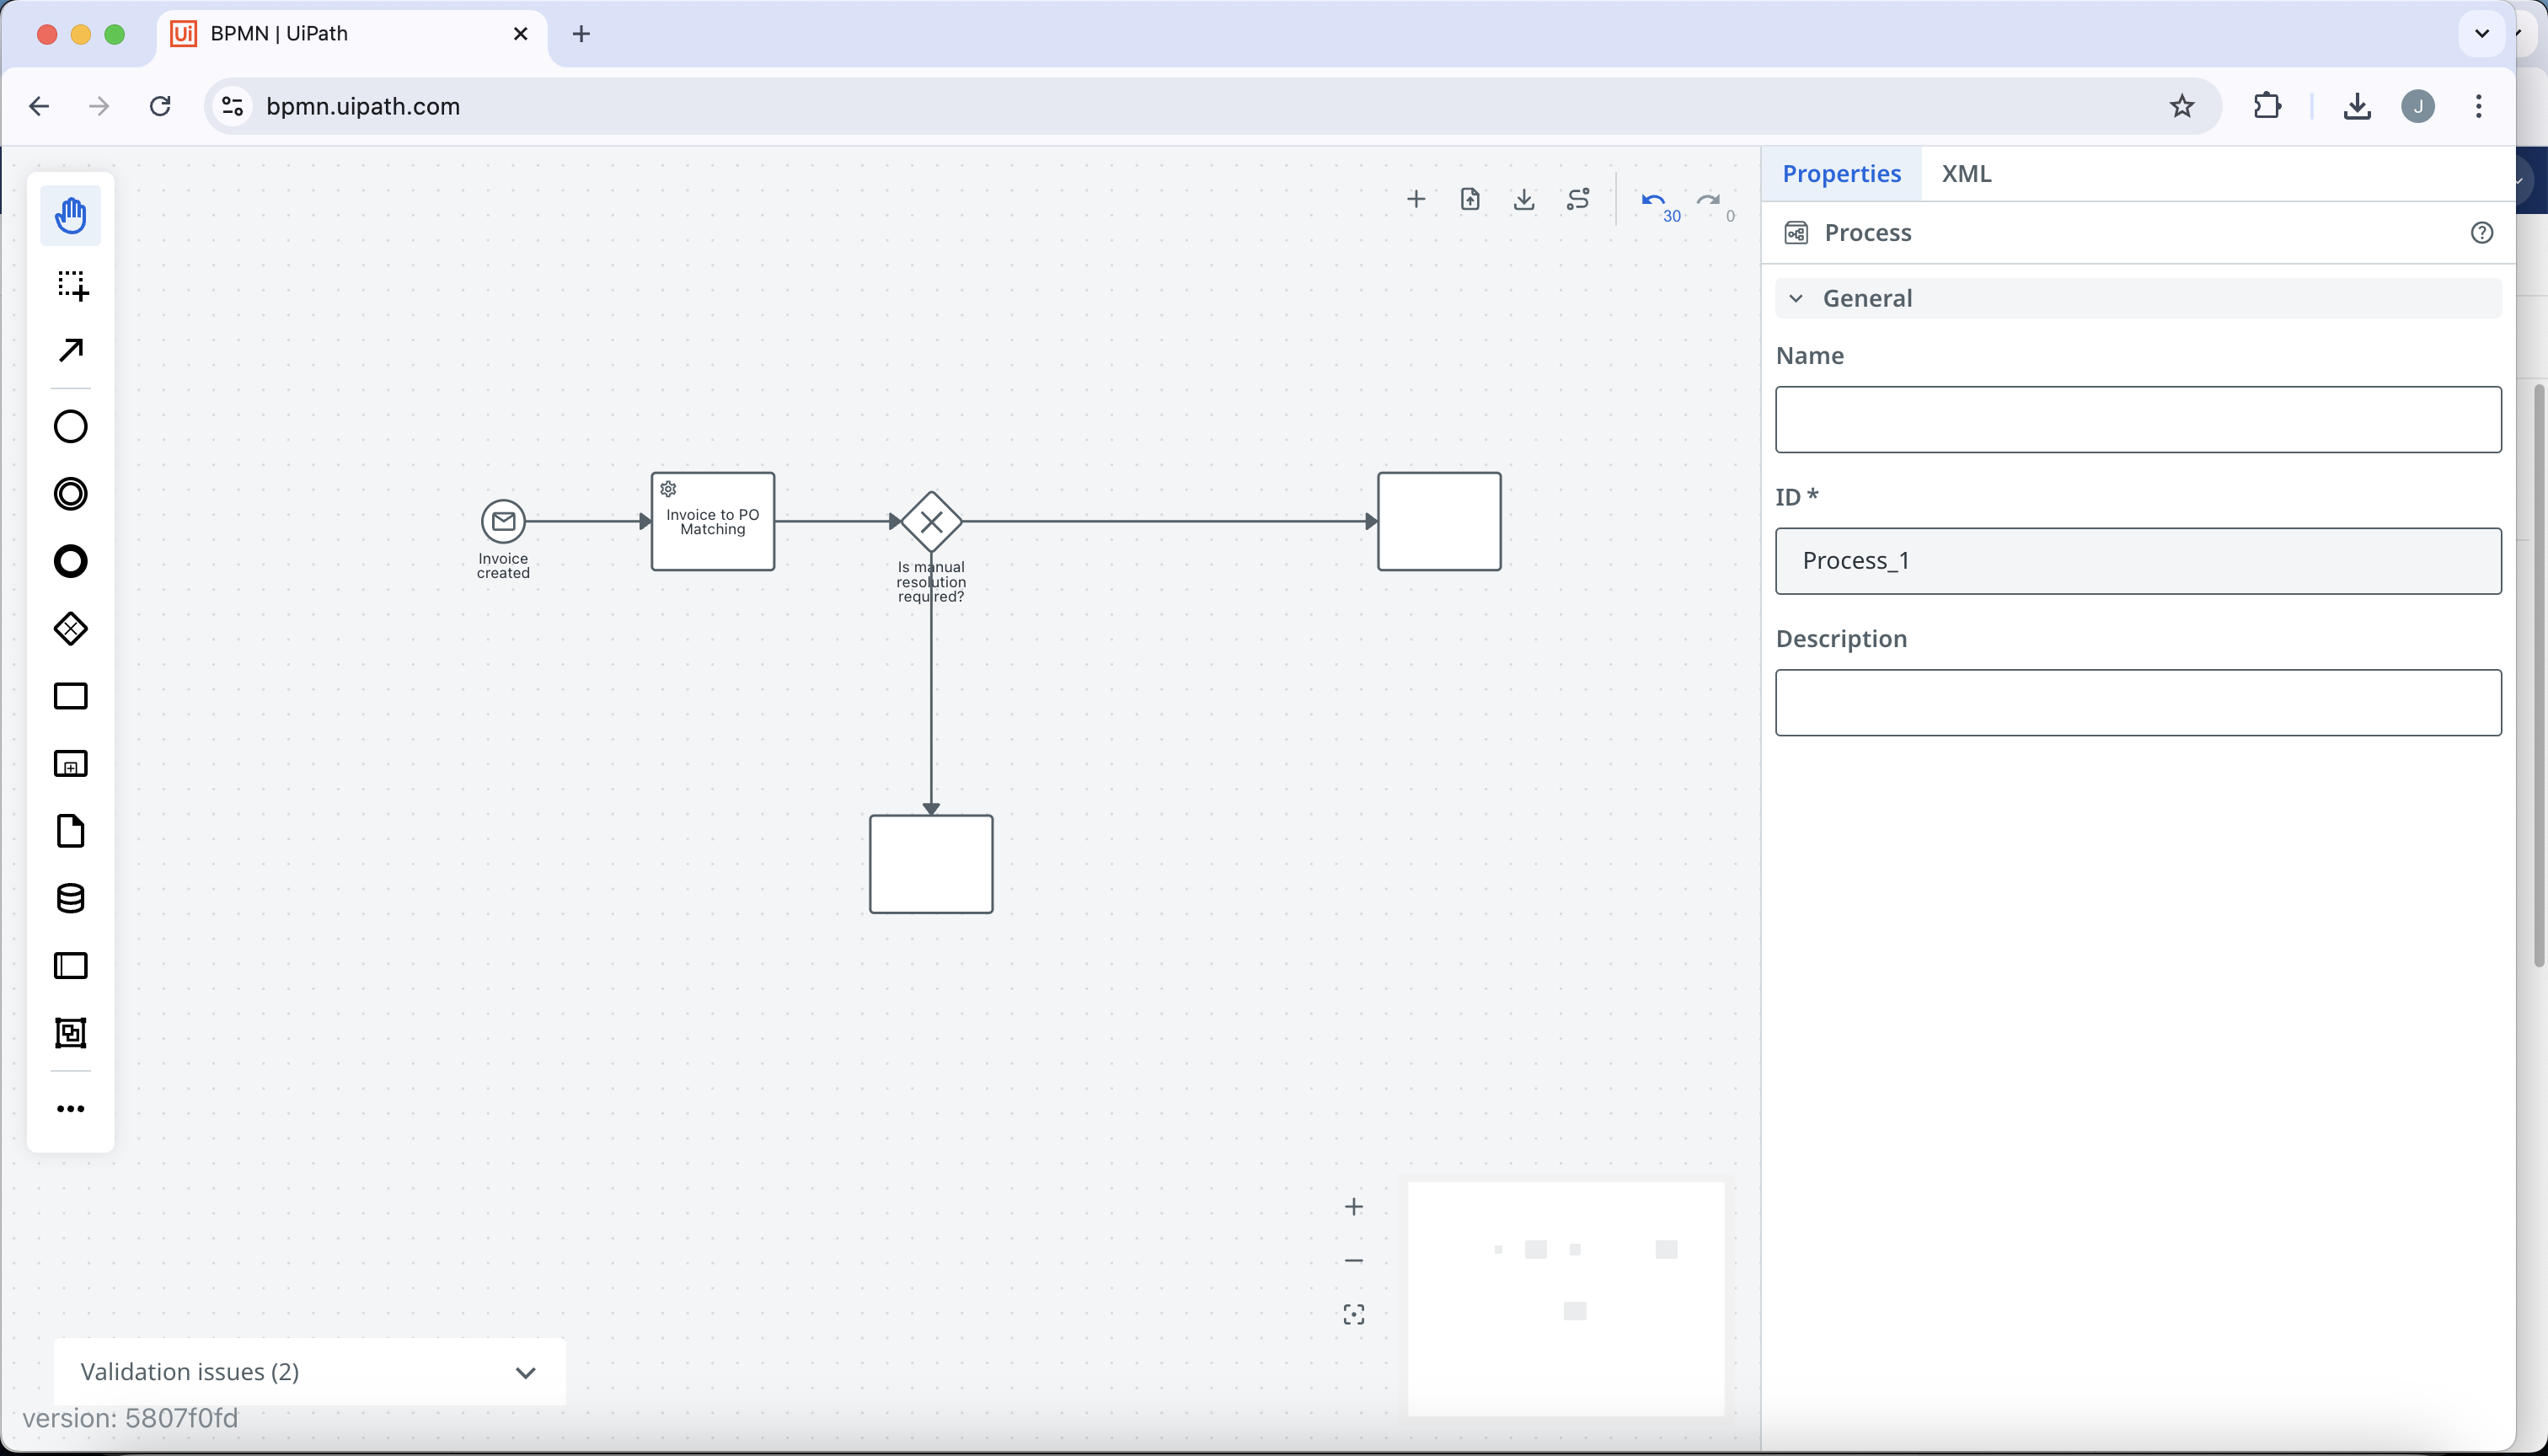
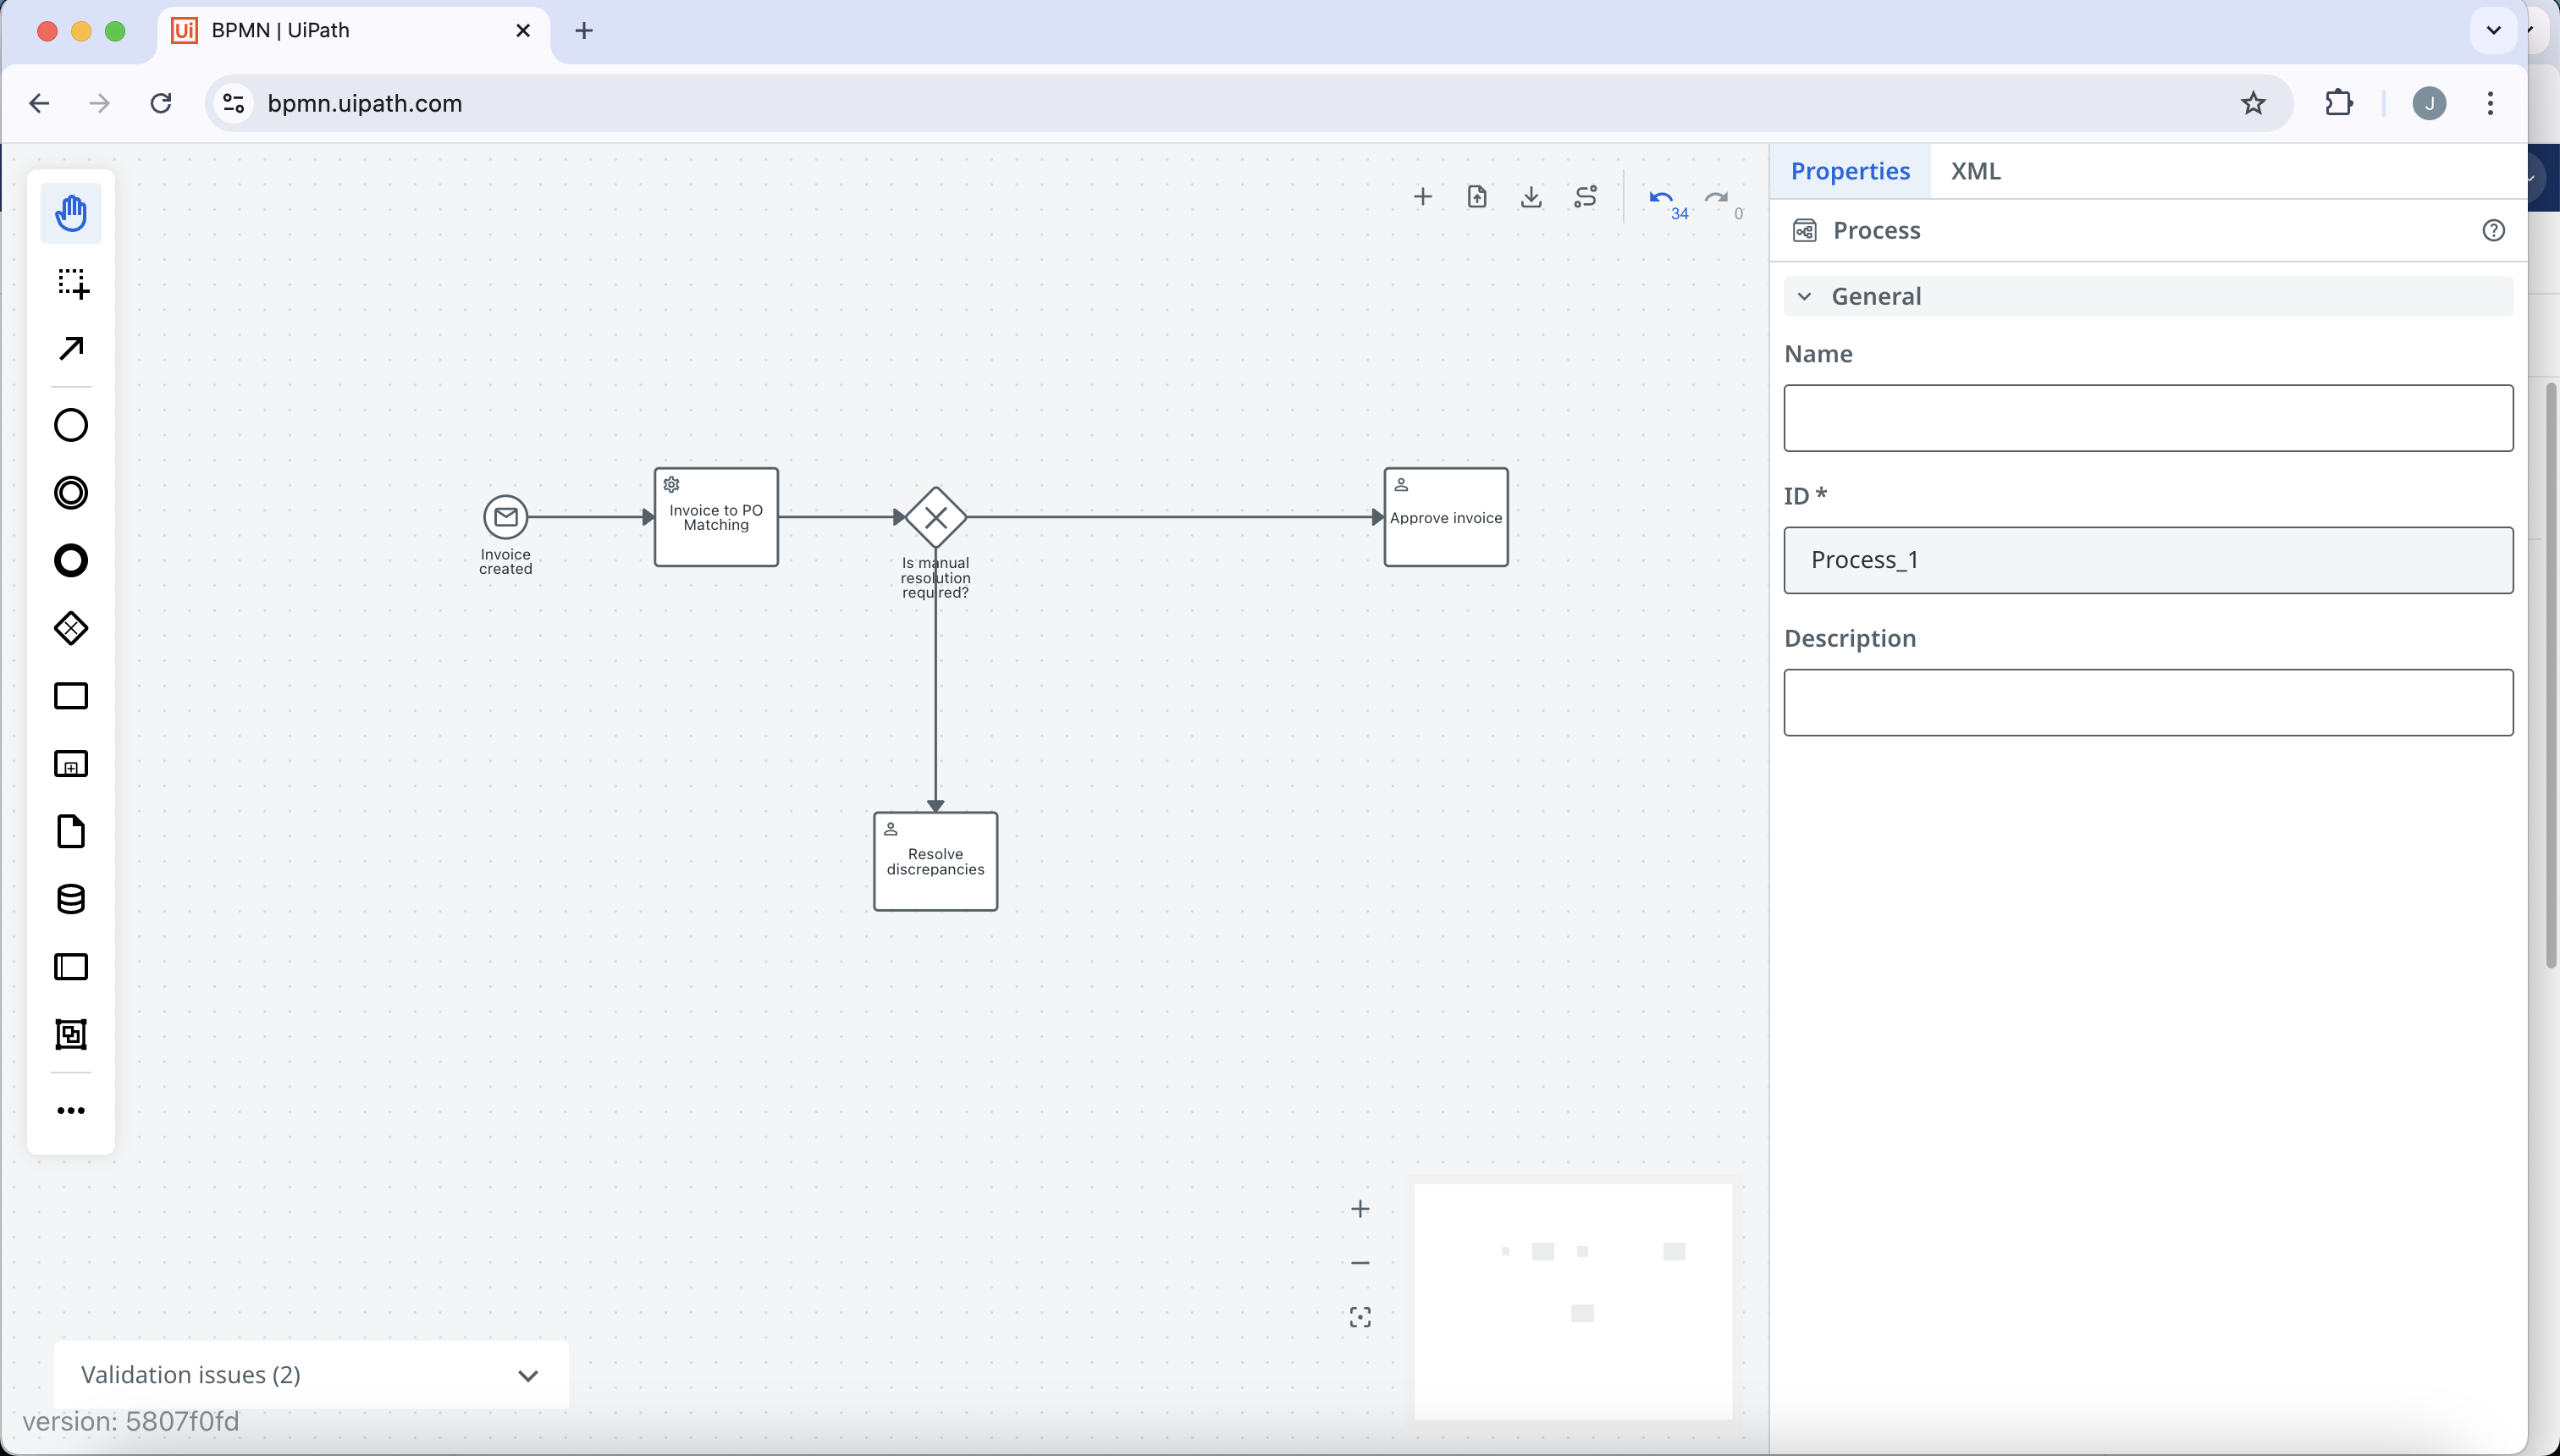
11. Name the edge going to the right out of the exclusive gateway as No and the corresponding task as Approve invoice. Name the edge going out the bottom of the exclusive gateway as Yes and the corresponding task as Resolve discrepancies. Change both tasks to be a user task.
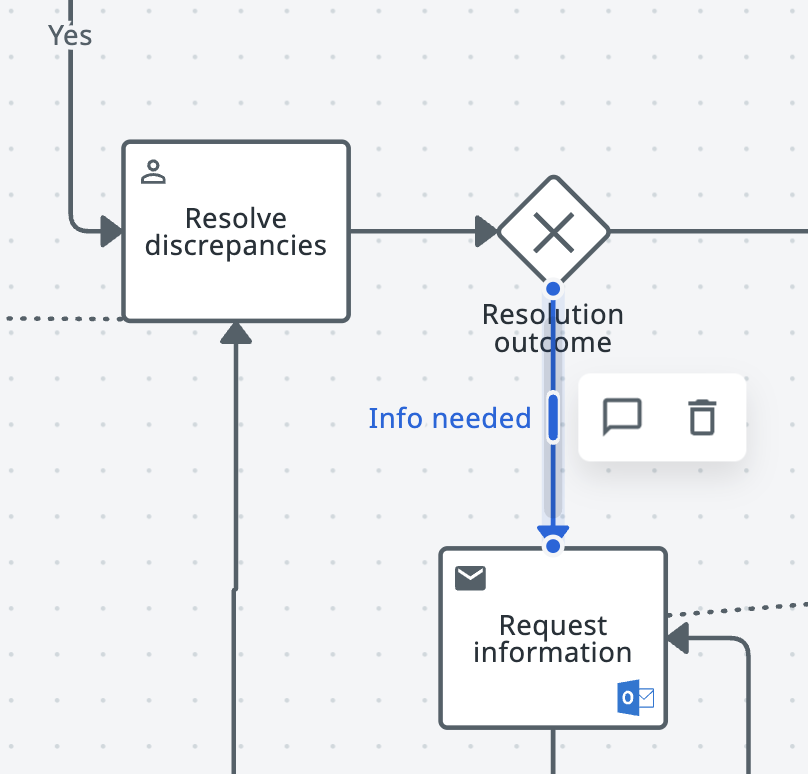
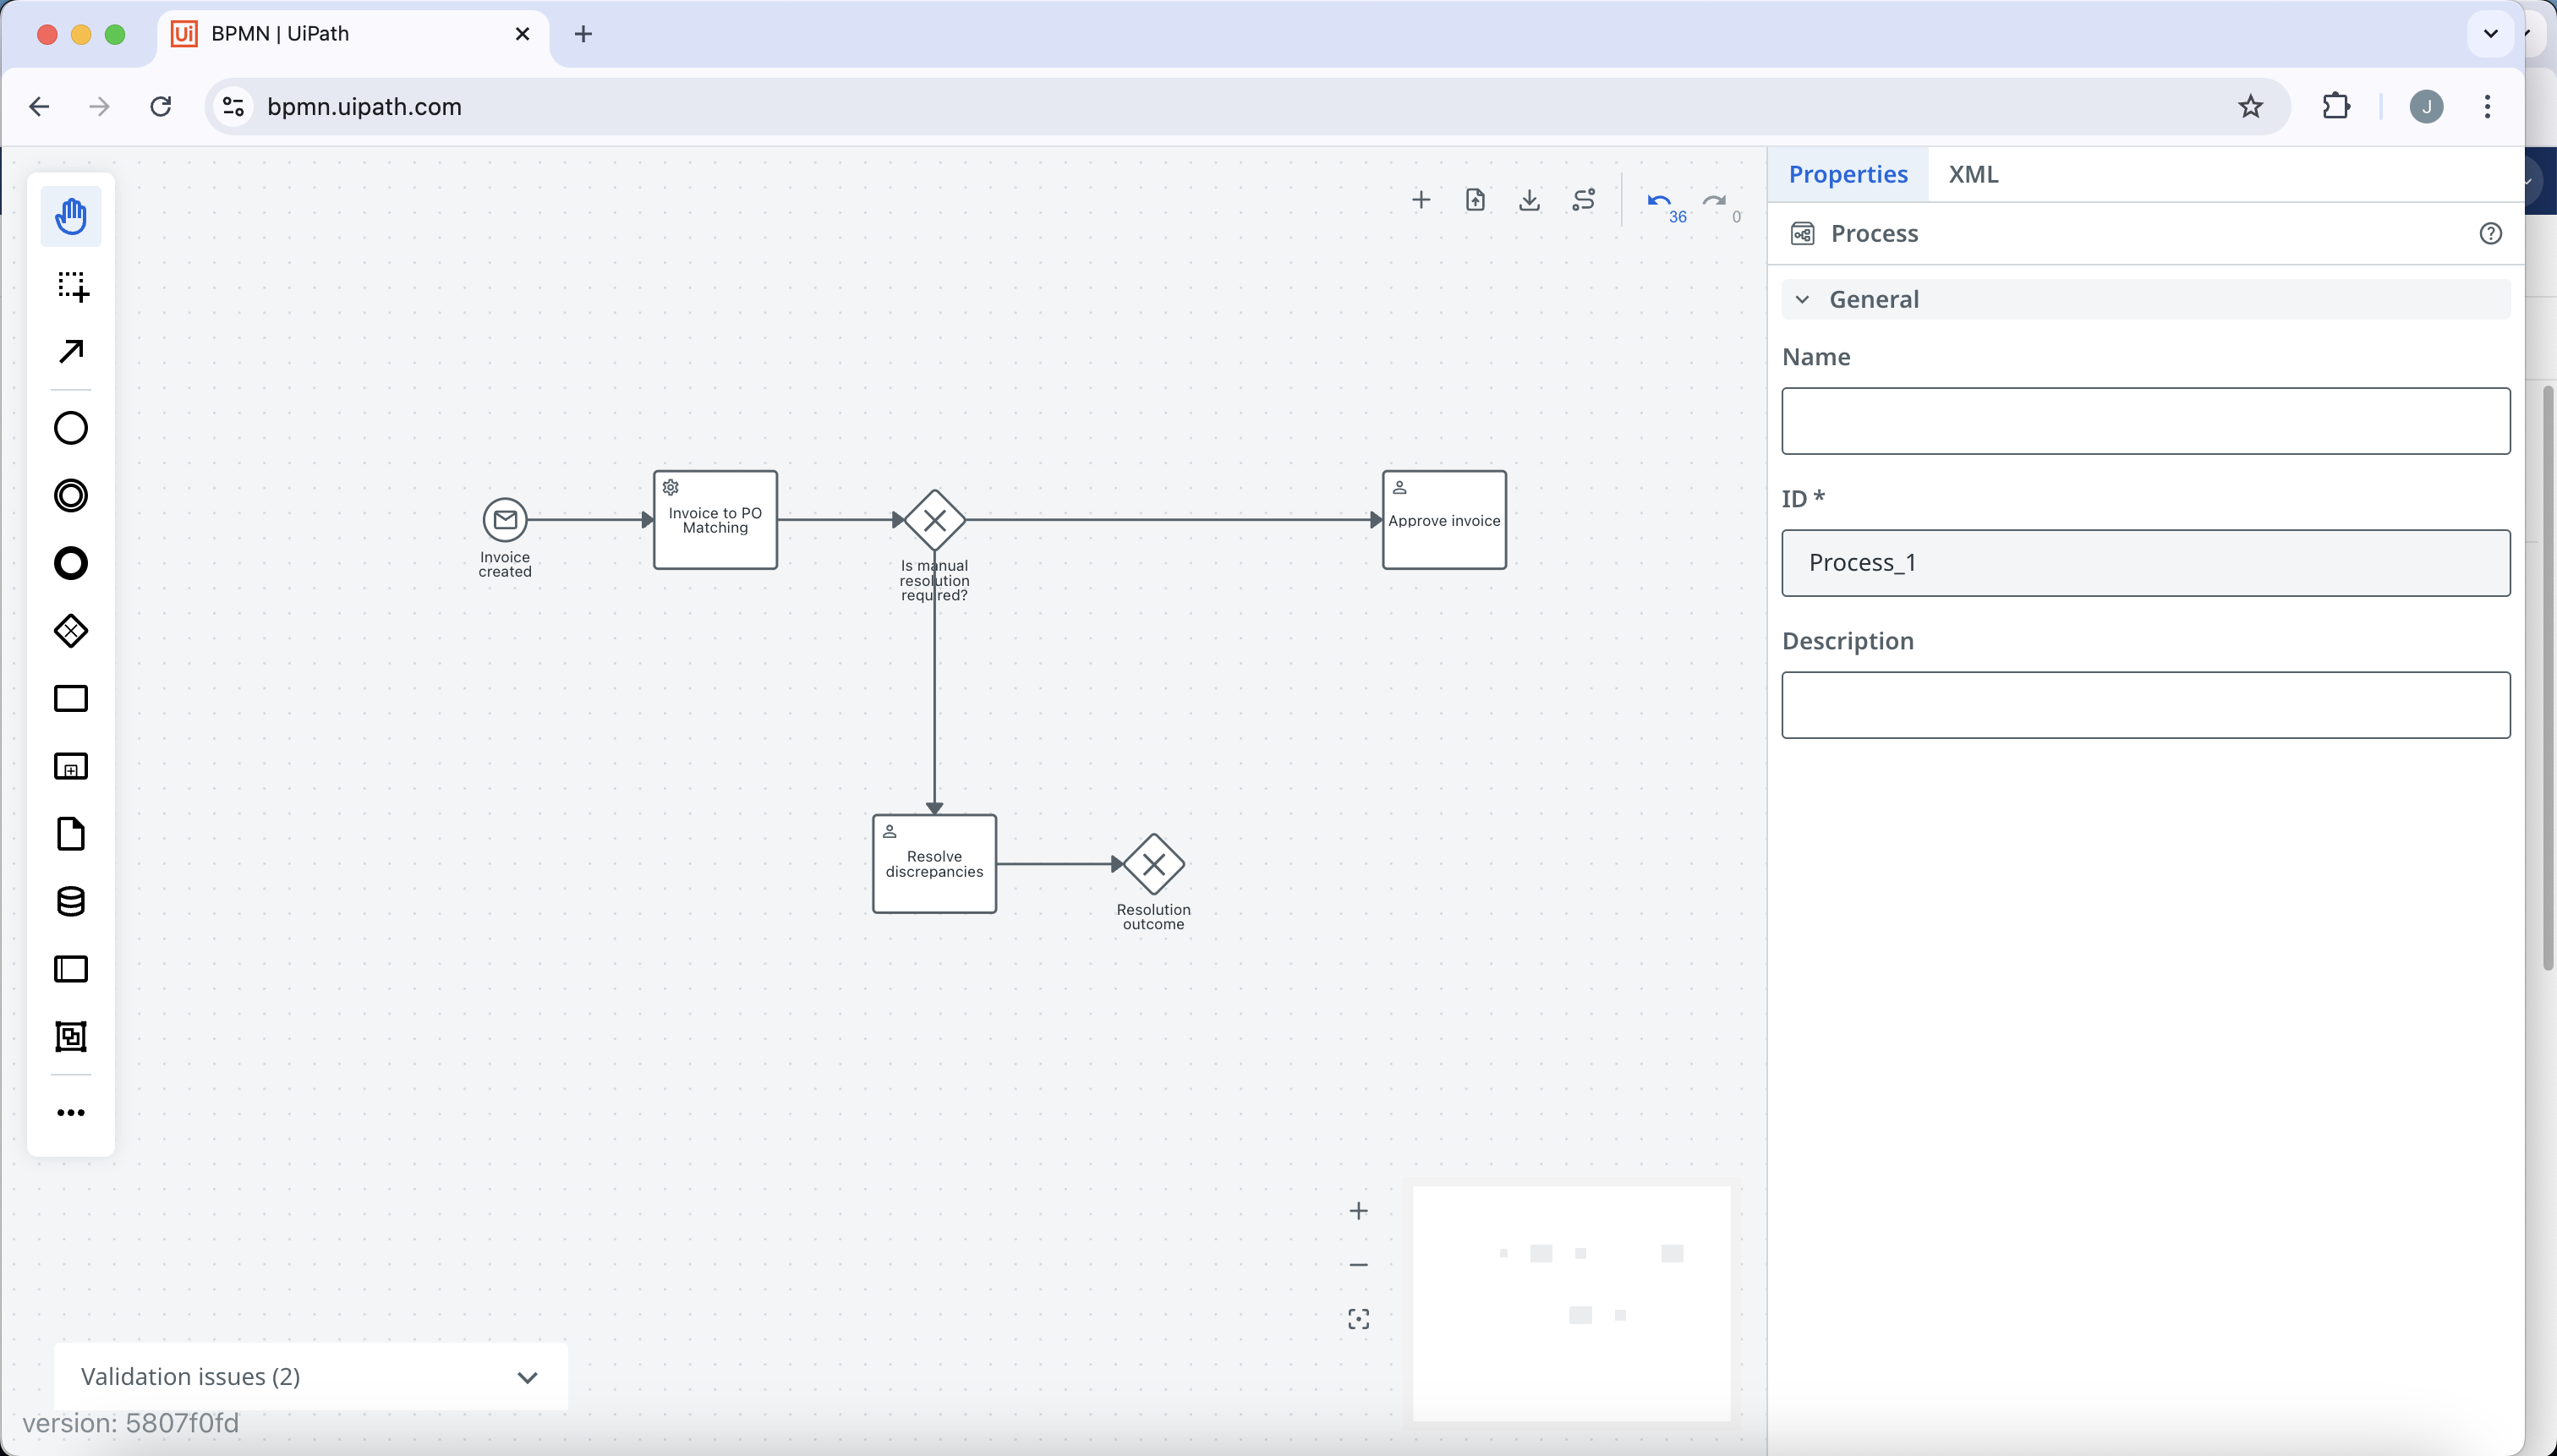
12. Click on the resolves discrepancies user task and add an exclusive gateway called Resolution outcome.
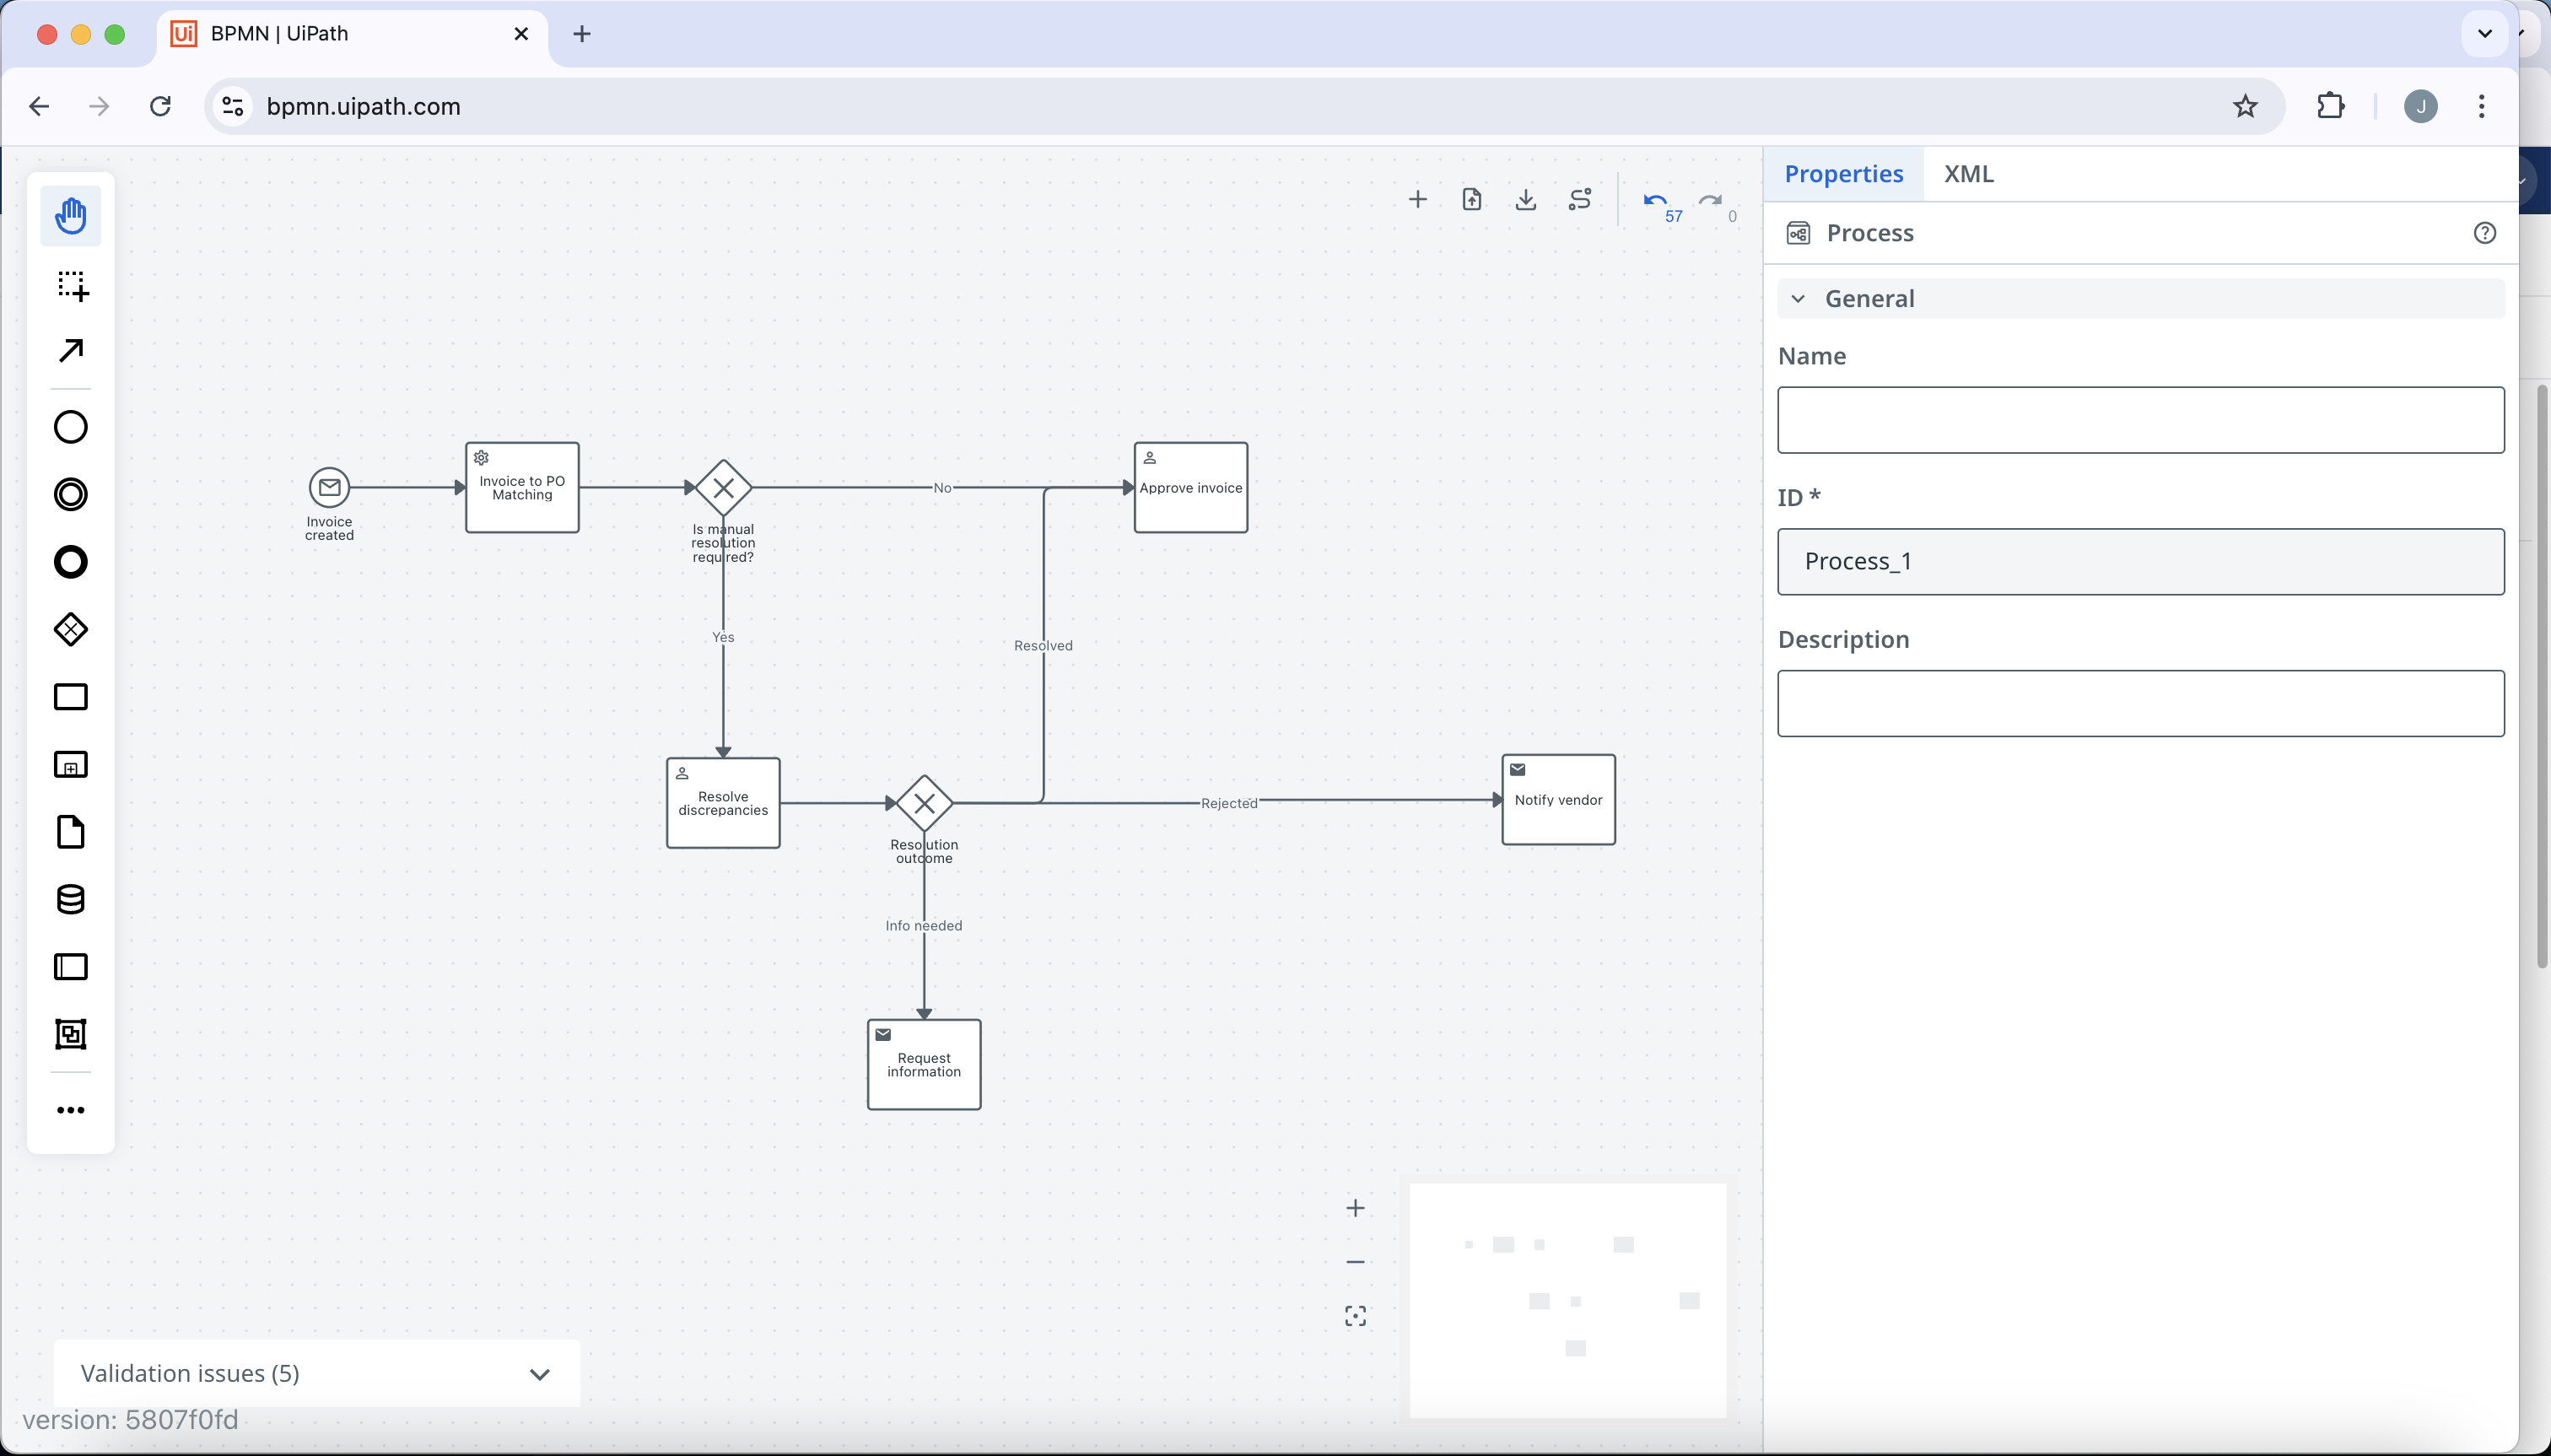
13. Click on the Resolution outcome exclusive gateway and add two tasks: Notify vendor with edge name of Rejected, and Request information with edge name of Info needed. In addition to this, create a third edge called Resolved that connects to the previously created approve invoice user task. Change the notify vendor and request information tasks to both be send tasks.
14. Click on the request information send task and add an exclusive gateway. Click on the exclusive gateway to bring up the element toolbar, and change the type of gateway to an event-based gateway. Name the event-based gateway Ensure response 1 day.
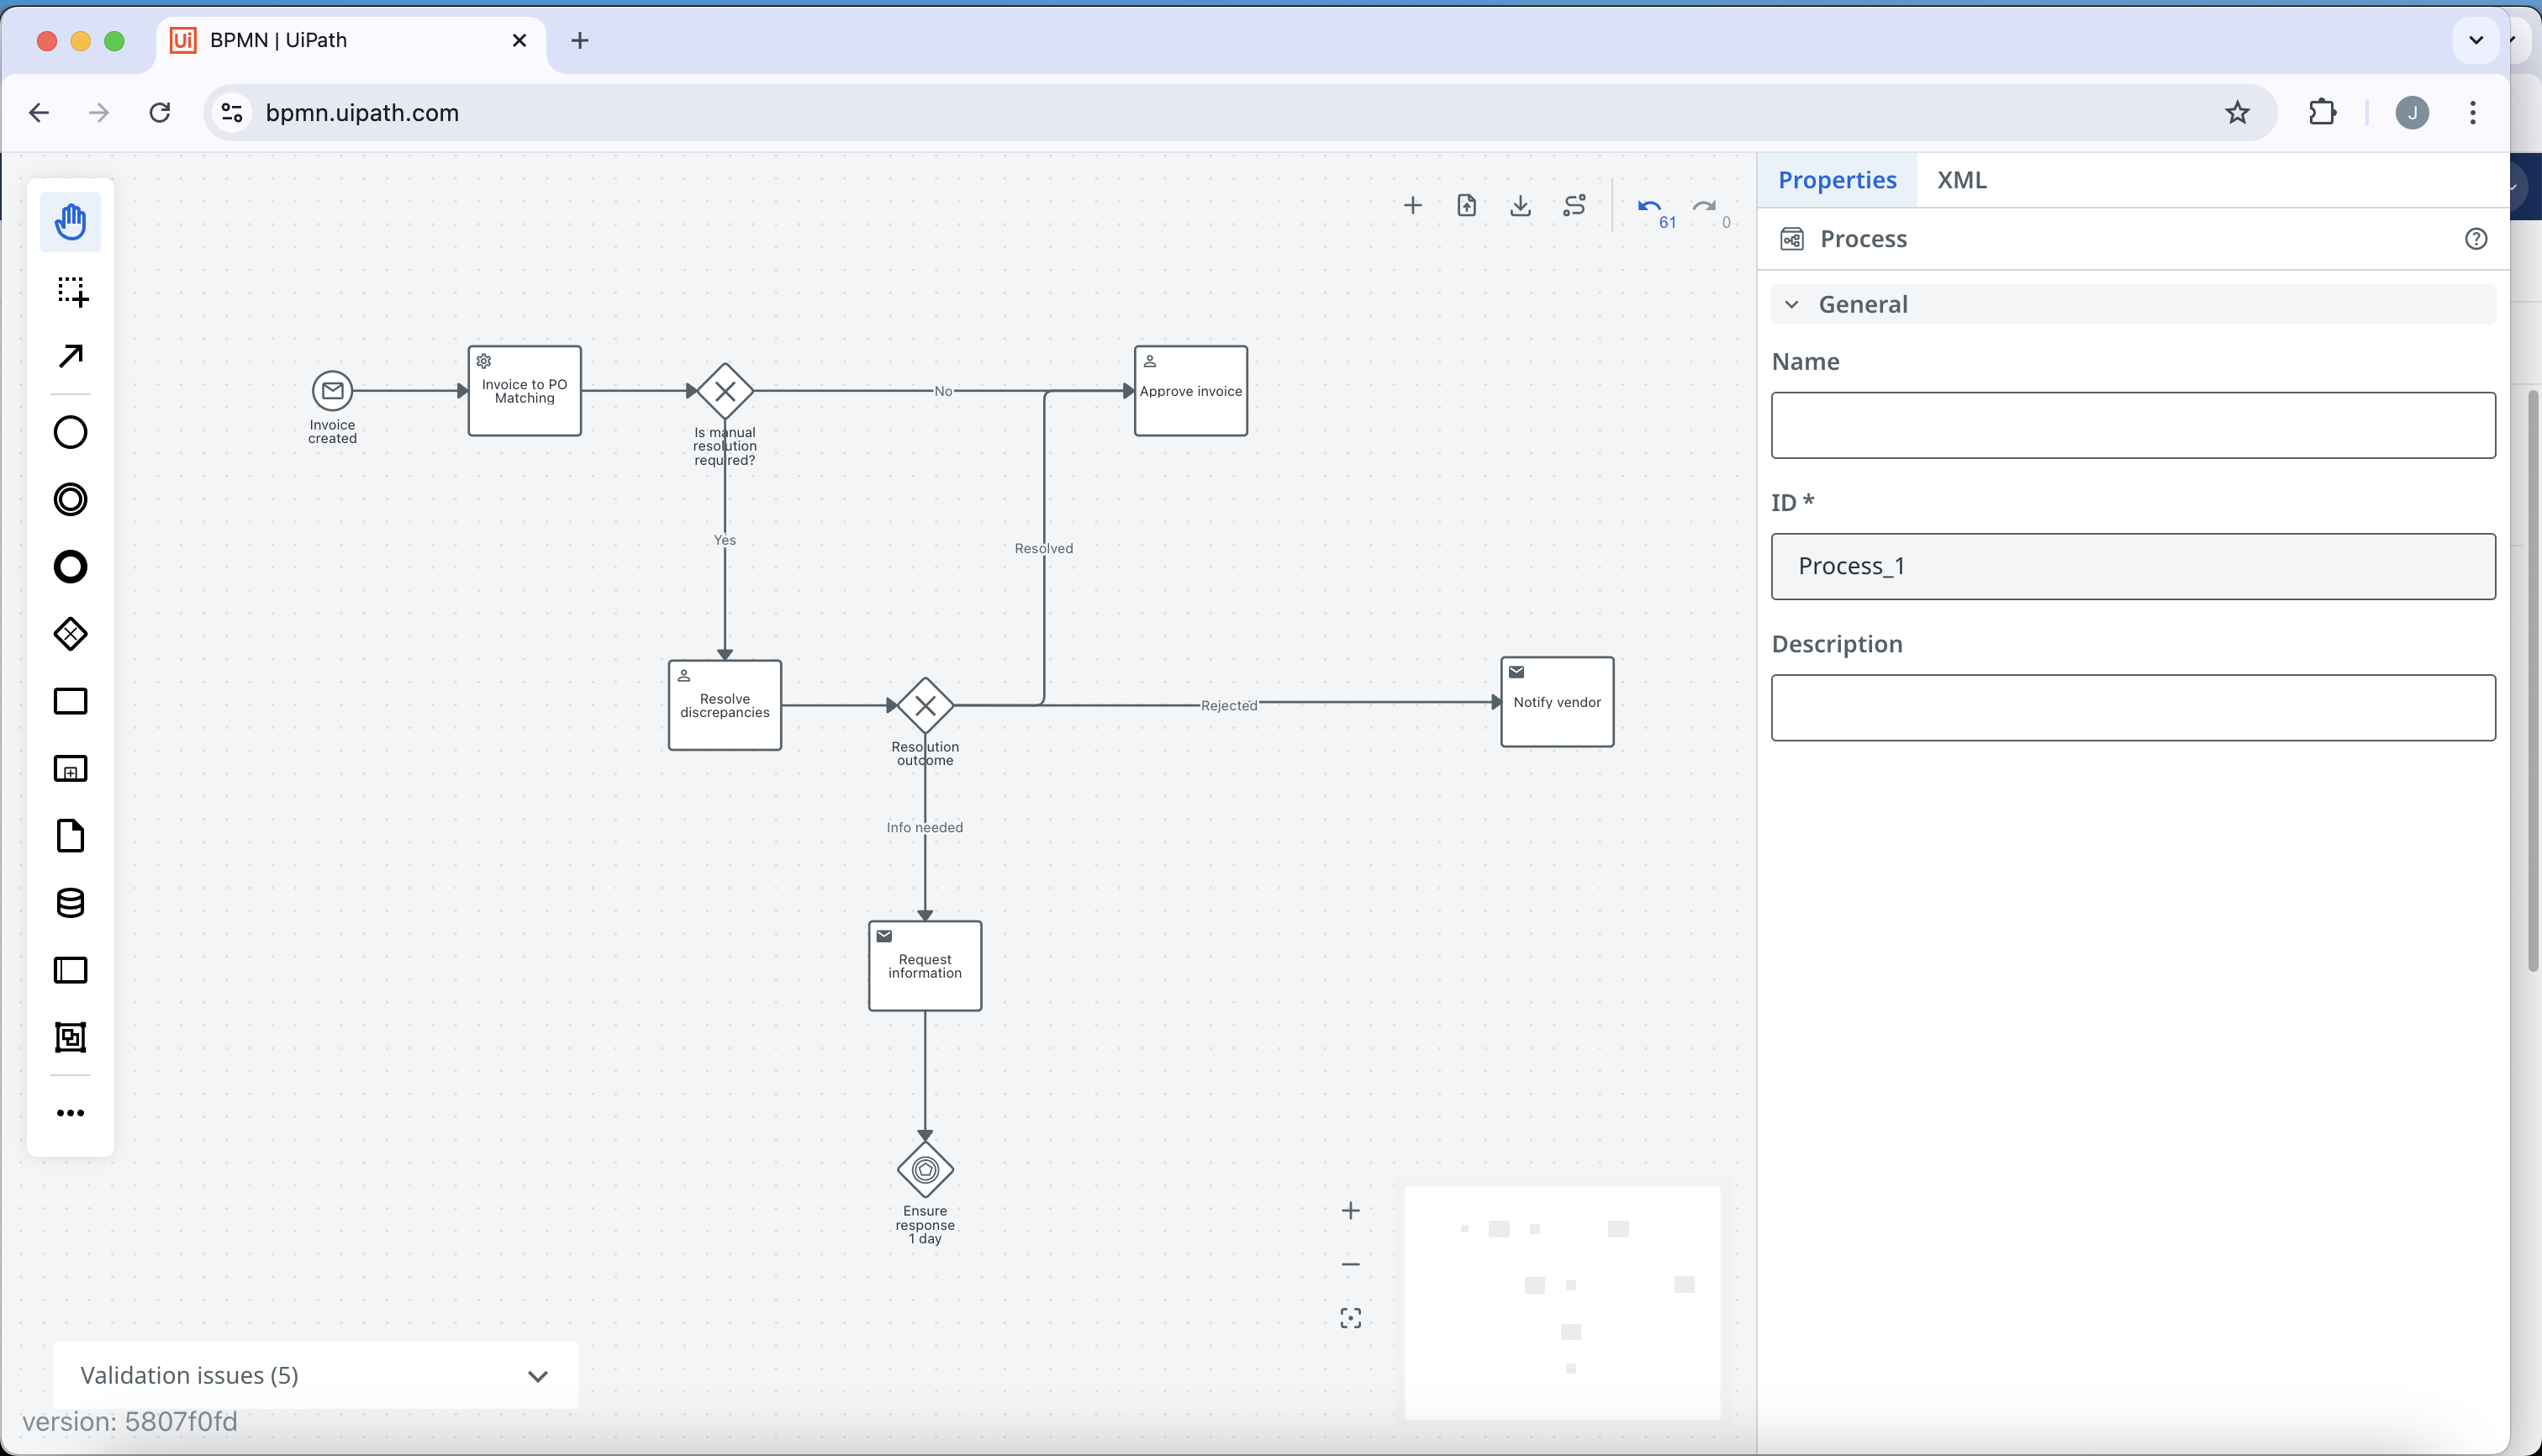
15. Click on the ensure response 1 day gateway to bring up the element toolbar and select Add: timer intermediate catch event. Name the timer intermediate catch event No response, and connect it to the request information send task.
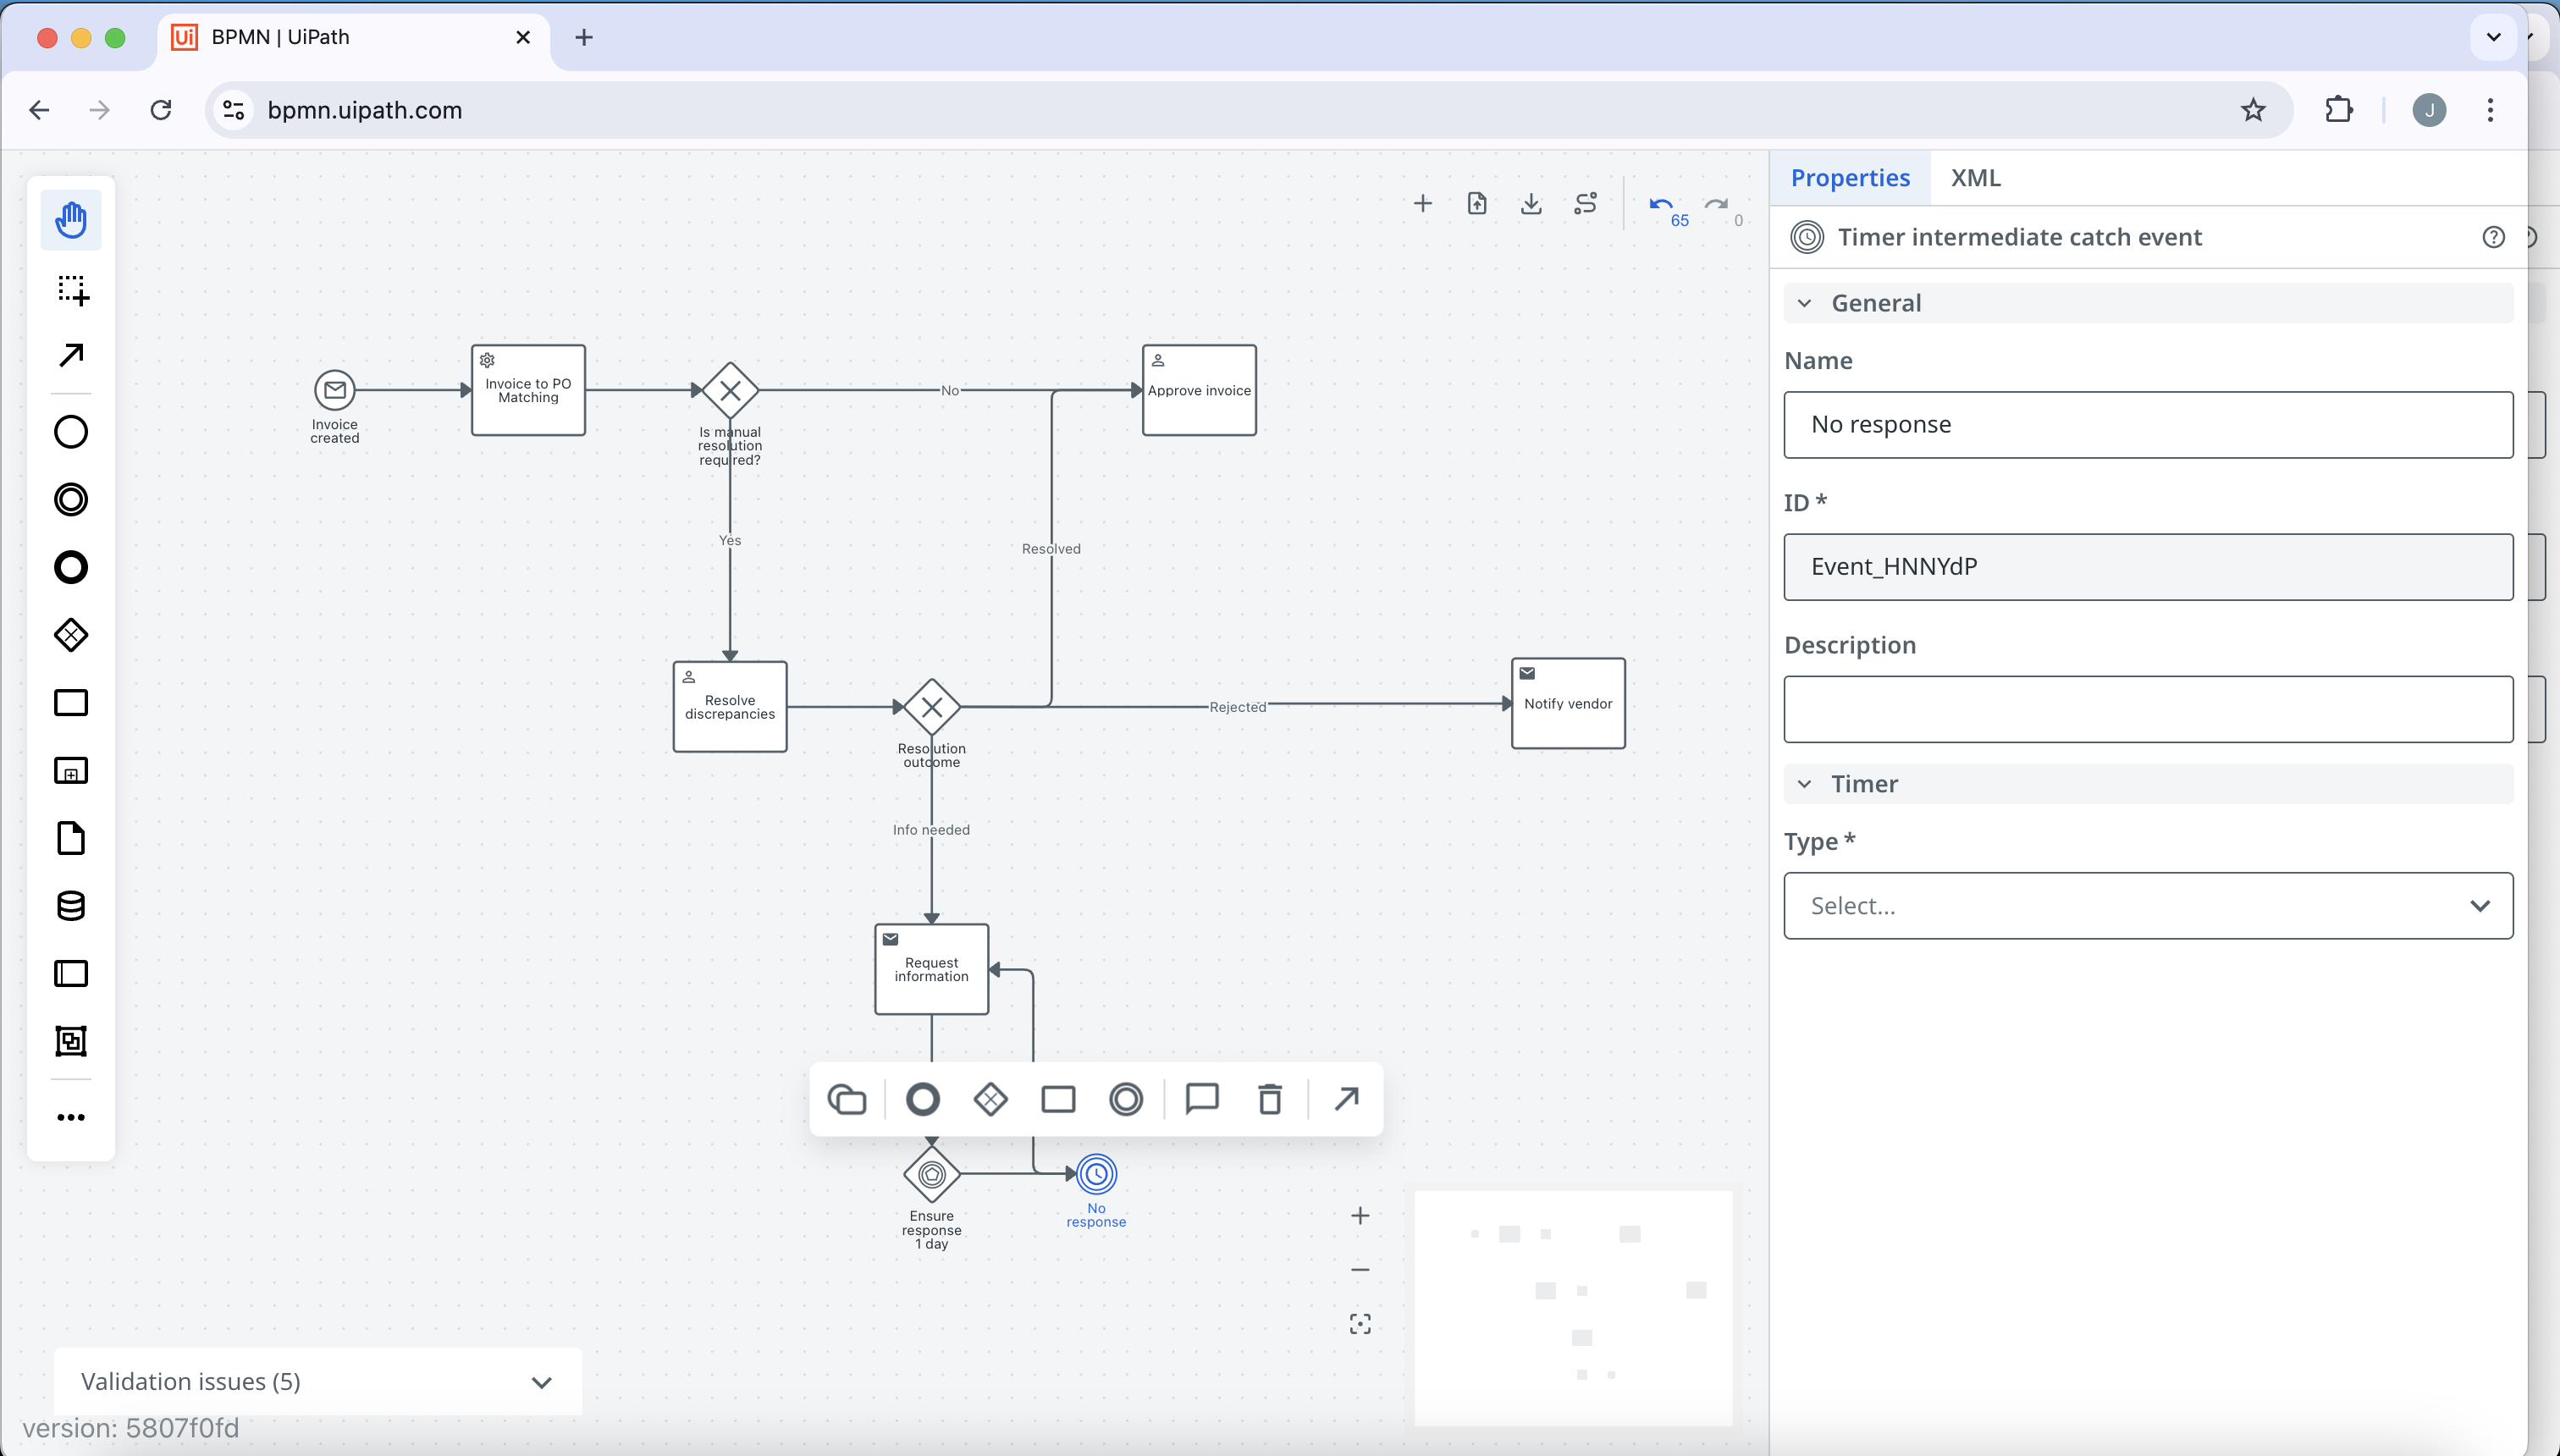
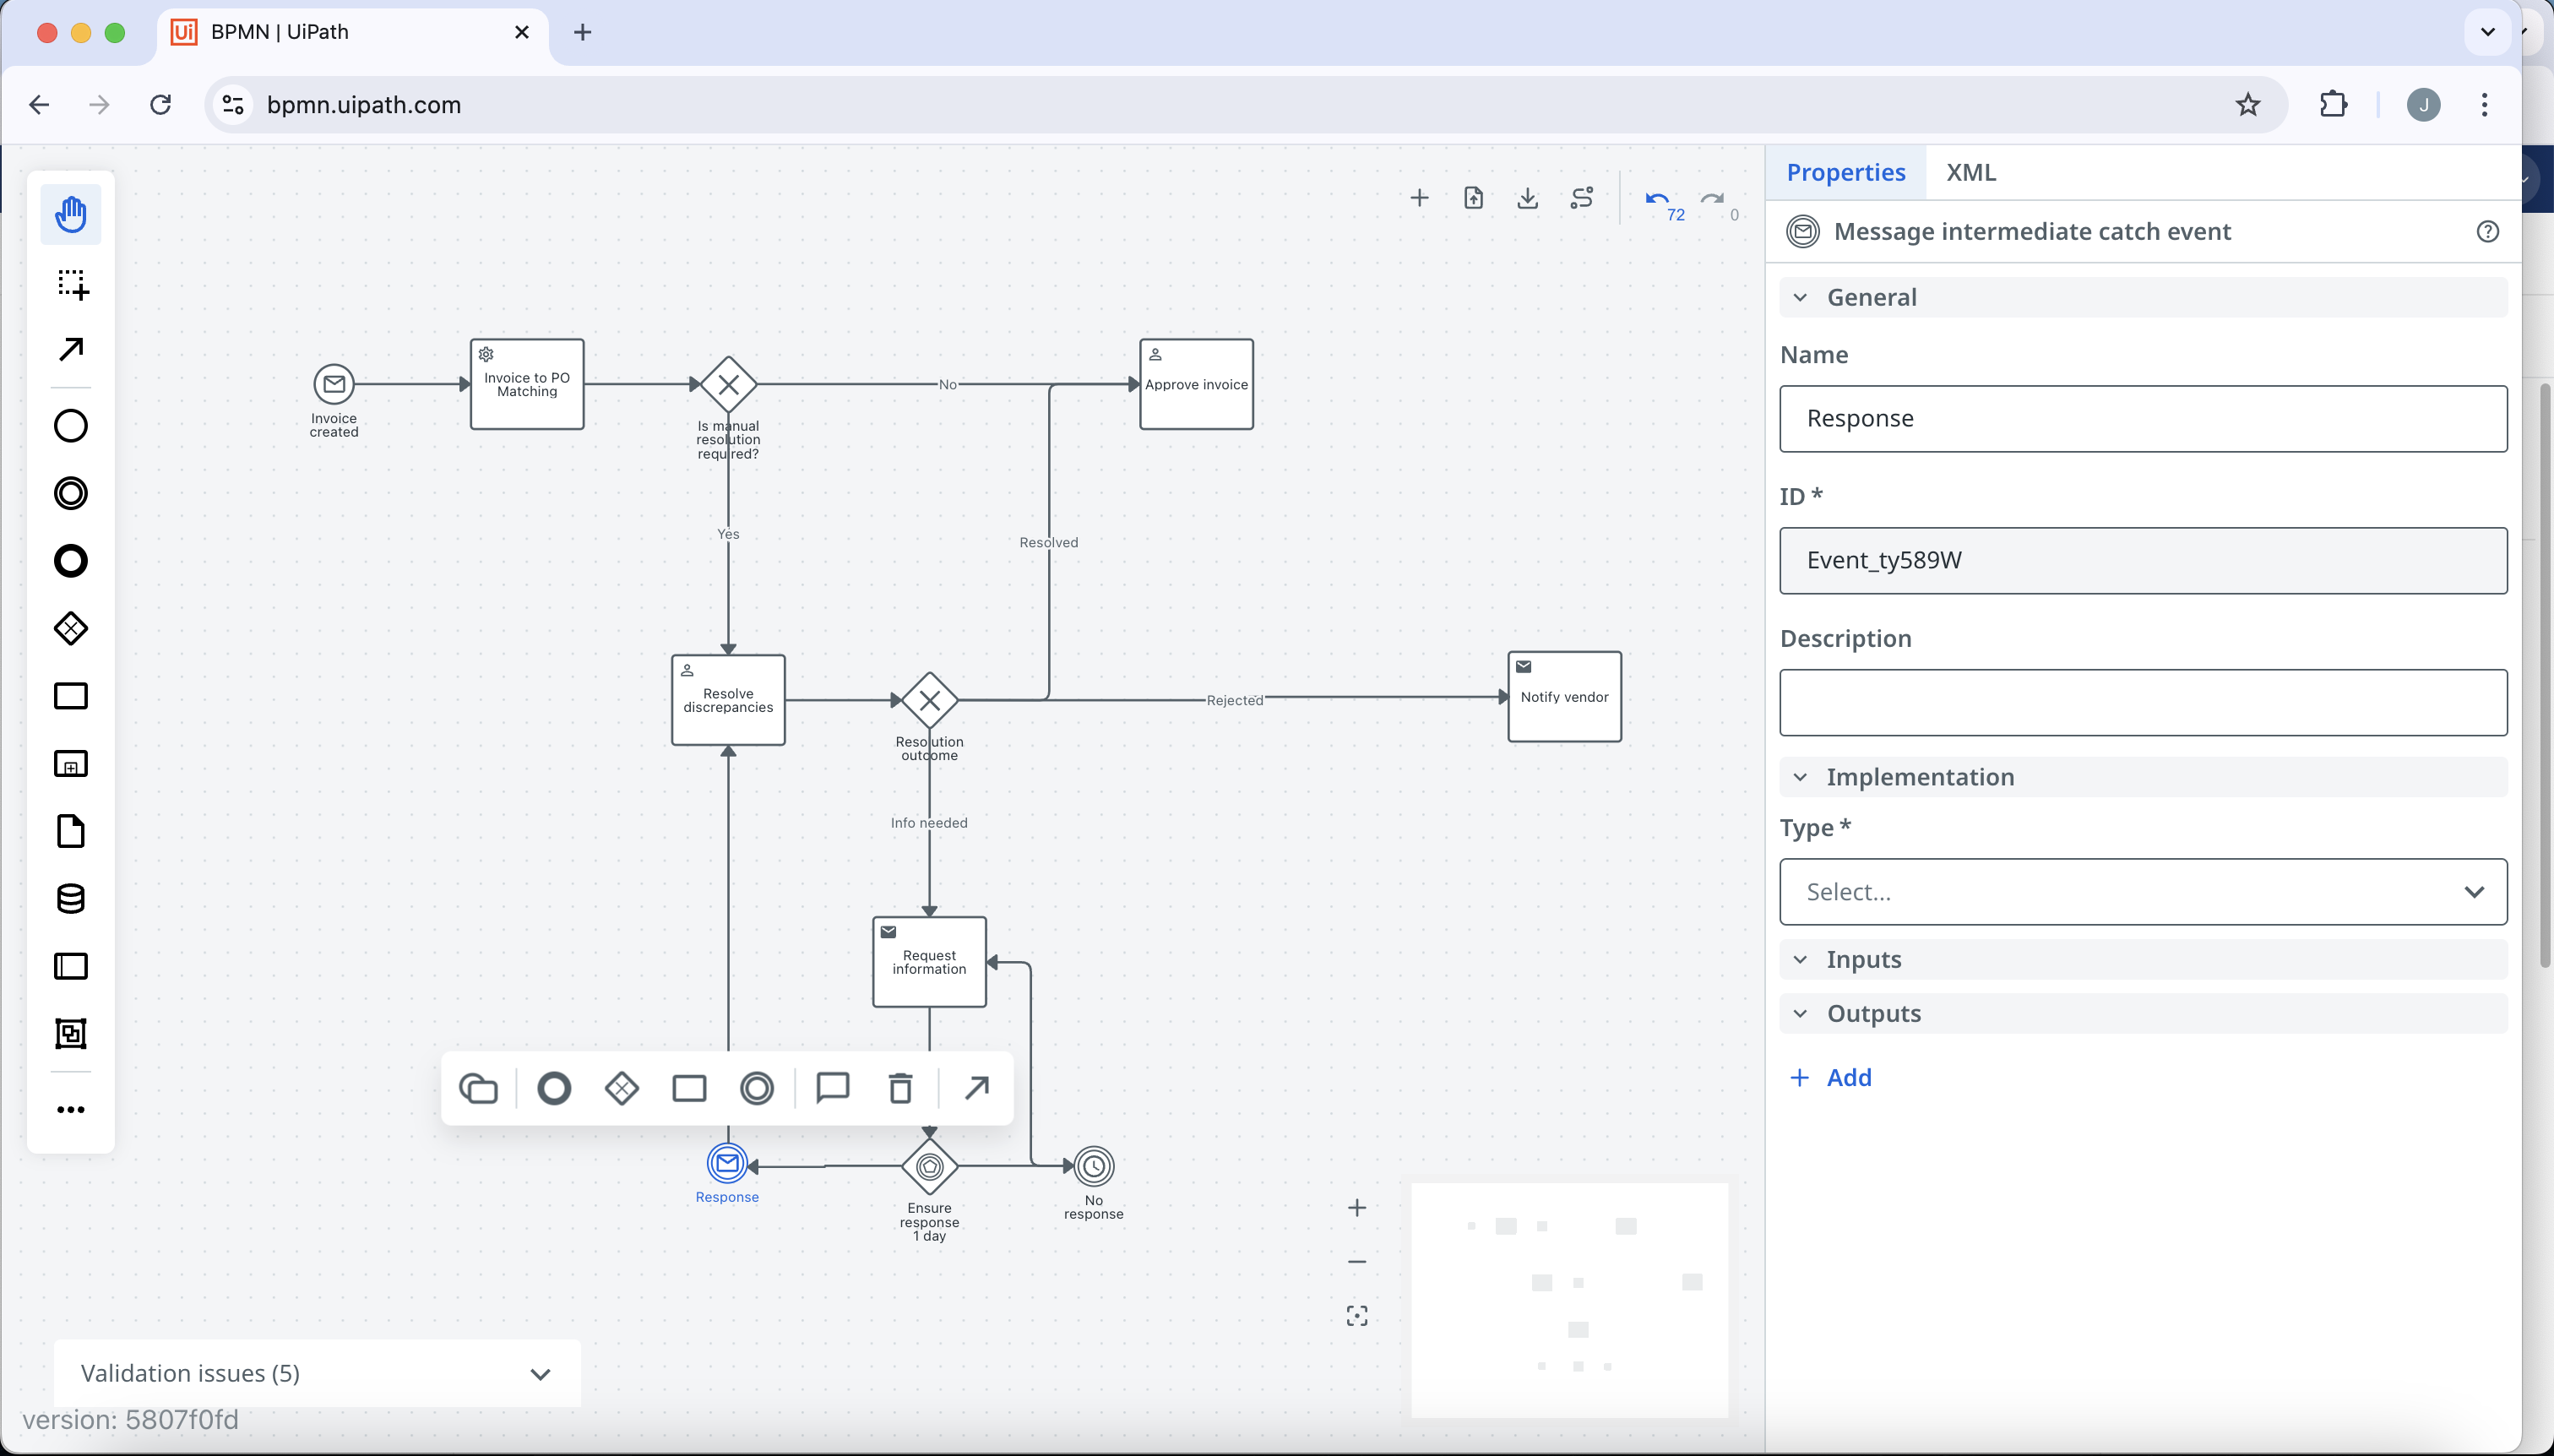
16. Click back on the ensure response 1 day gateway and select Add: message intermediate catch event. Name the message intermediate catch event Response, and connect it to the resolve discrepancies user task.
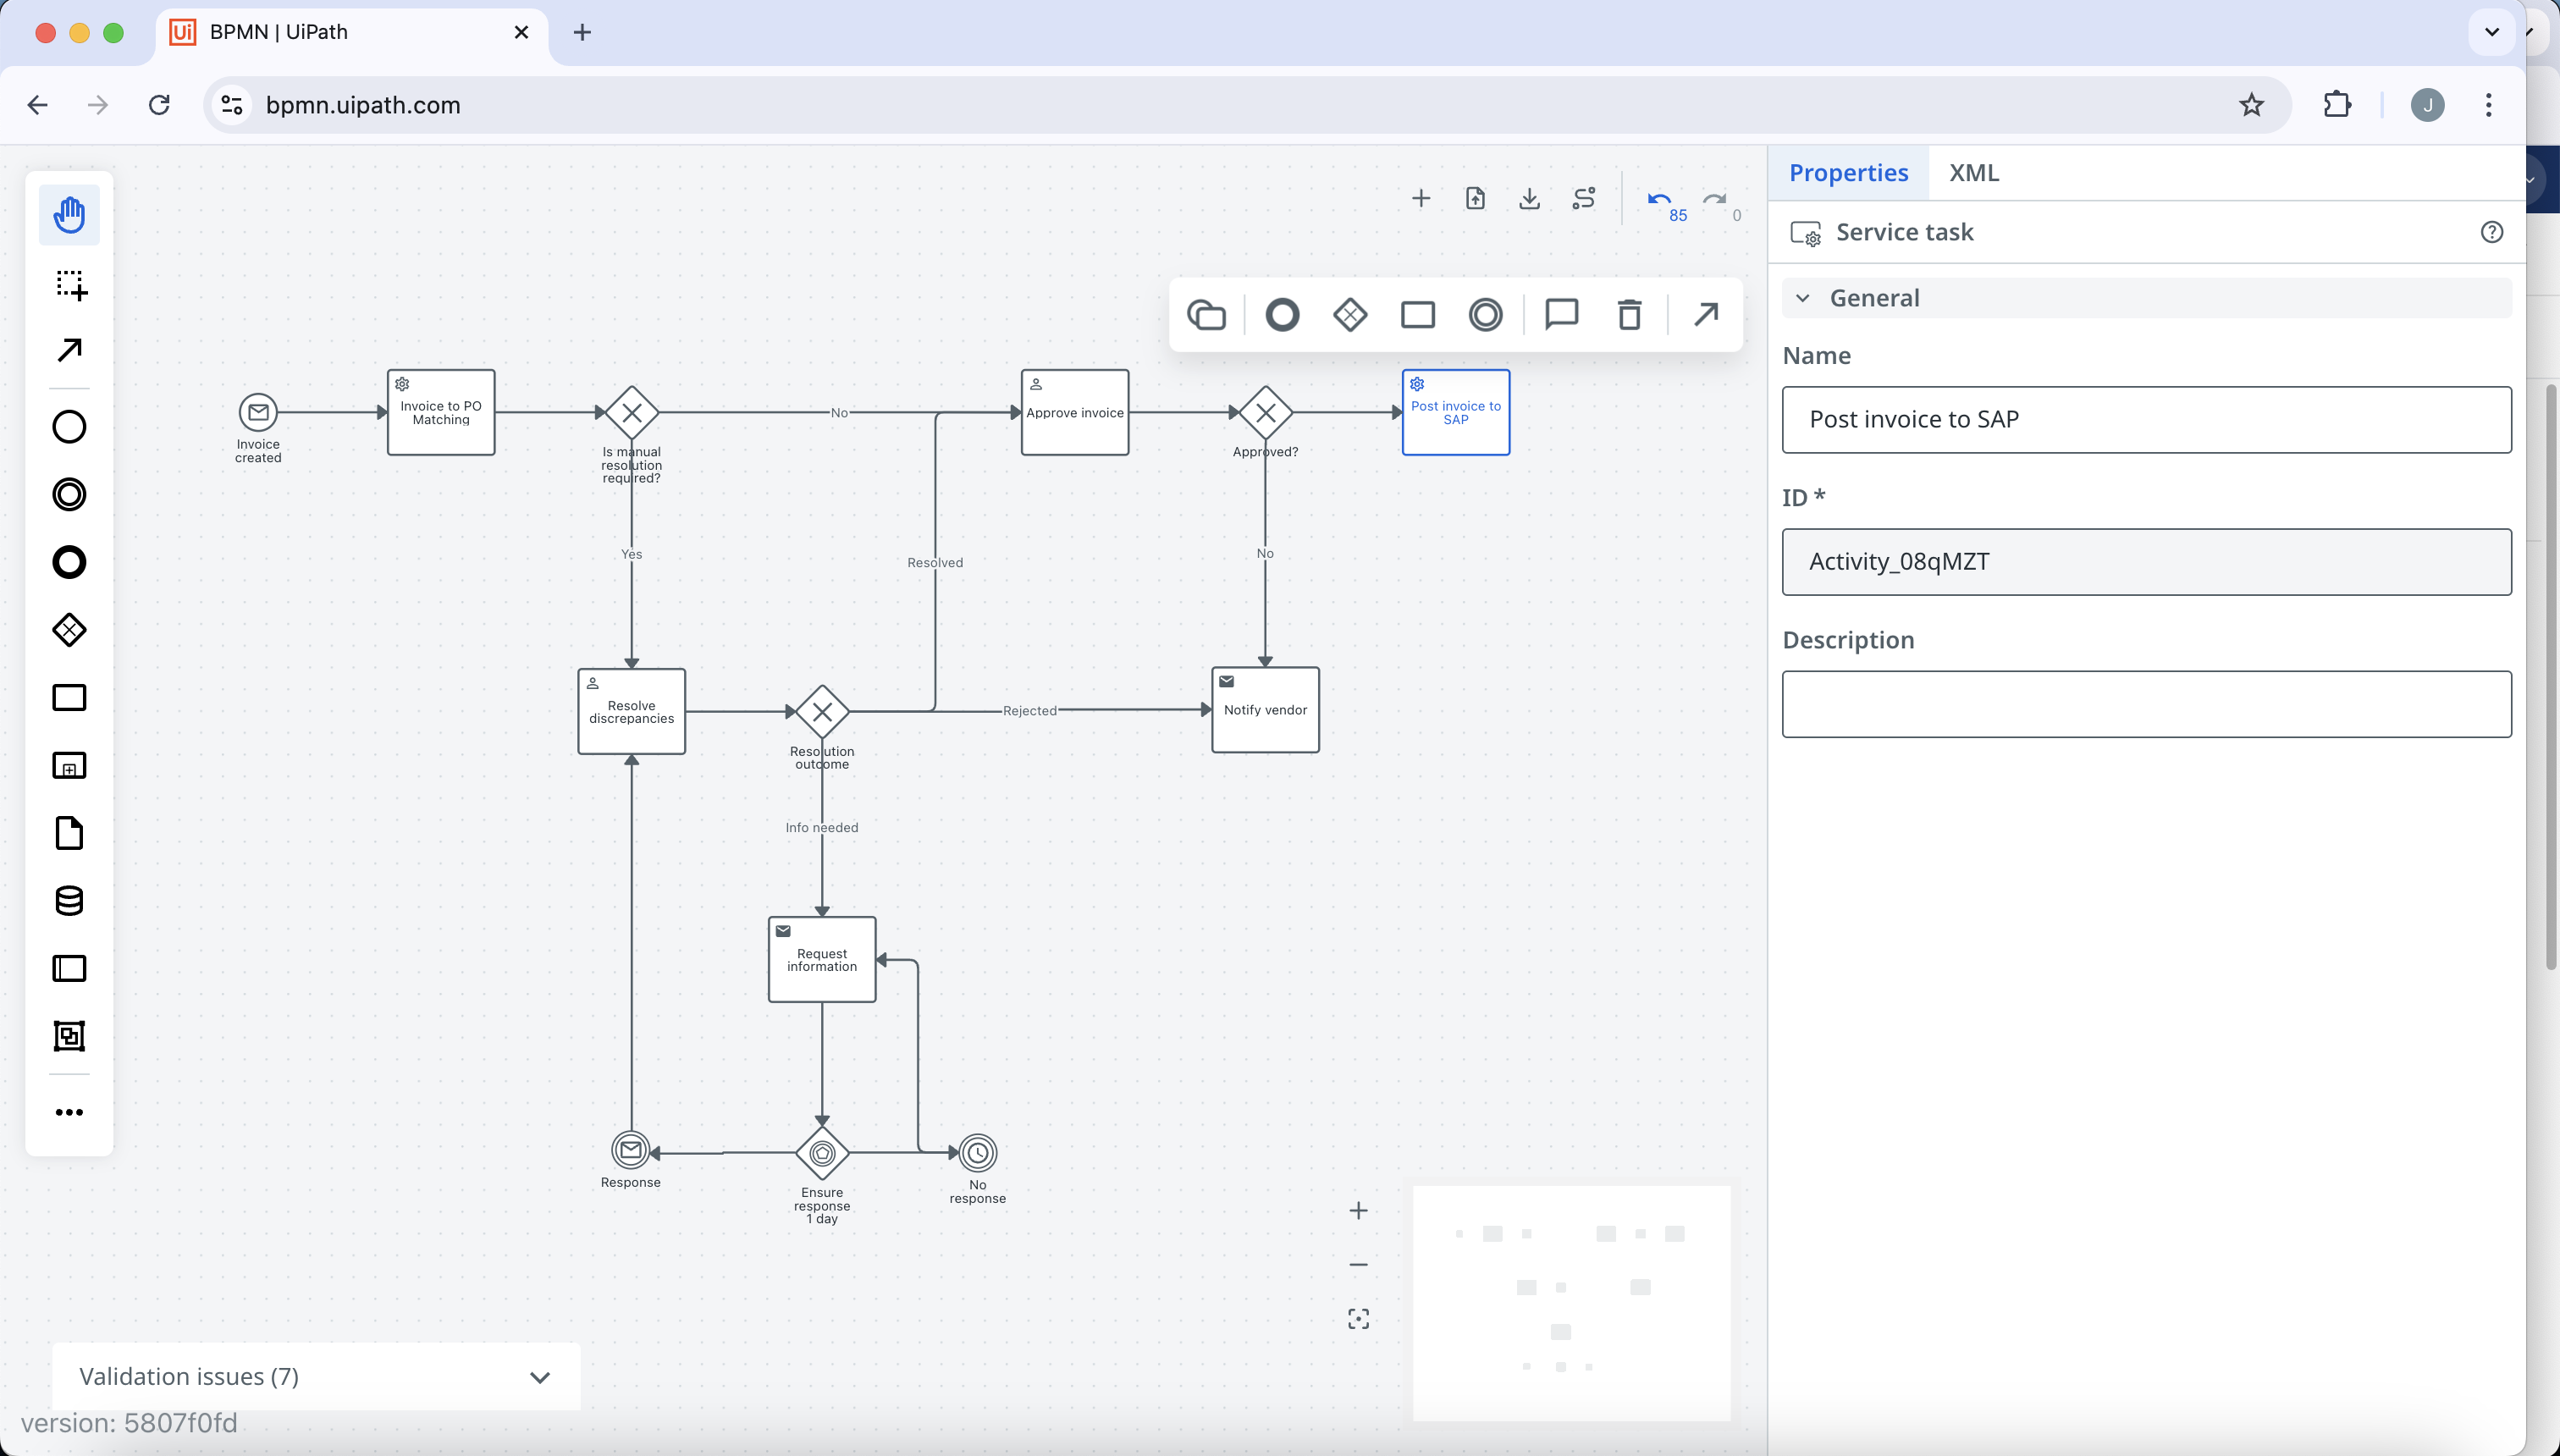
17. Now click on the approve invoice user task and add an exclusive gateway called Approved?. Connect the exclusive gateway with the notify vendor send task with edge name of No. Add a new task to the exclusive gateway called Post invoice to SAP with edge named Yes. Change the post invoice to SAP task to a service task.
18. Click on the post invoice to SAP task and add an end event named End.
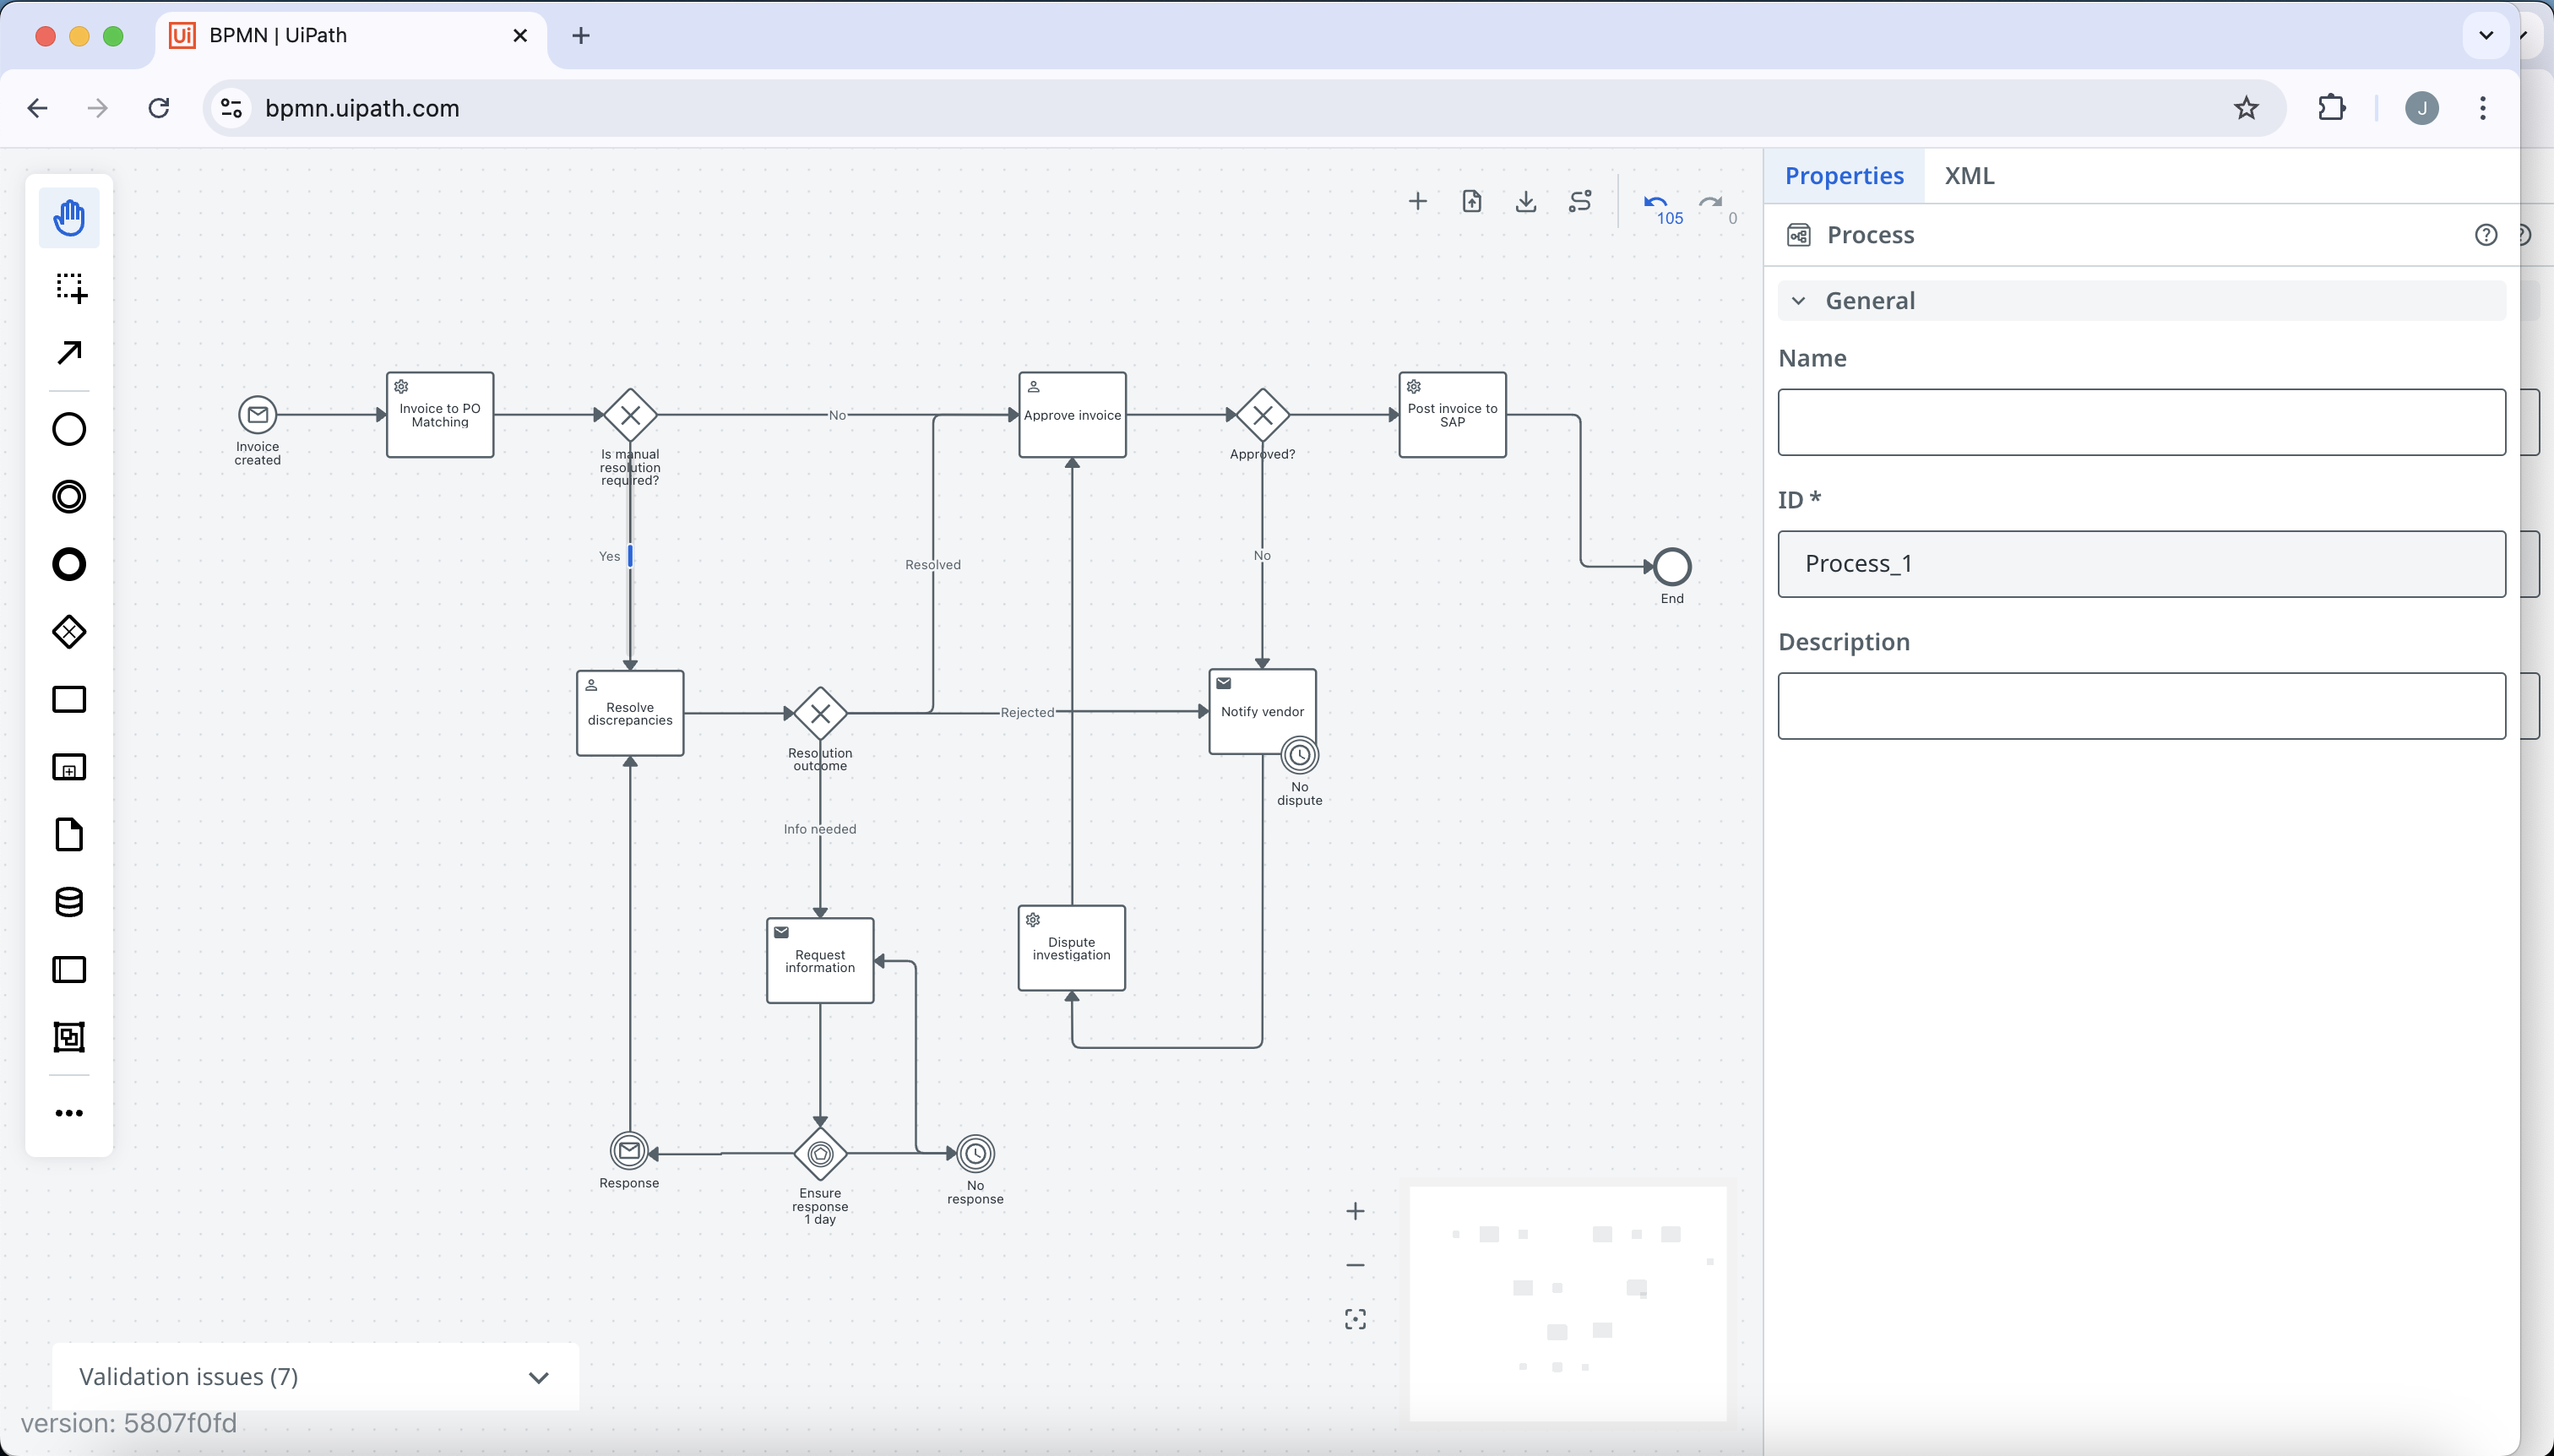
19. Click on the notify vendor send task and add a new task of type service task called Dispute investigation. Connect the dispute investigation service task to the approve invoice user task.
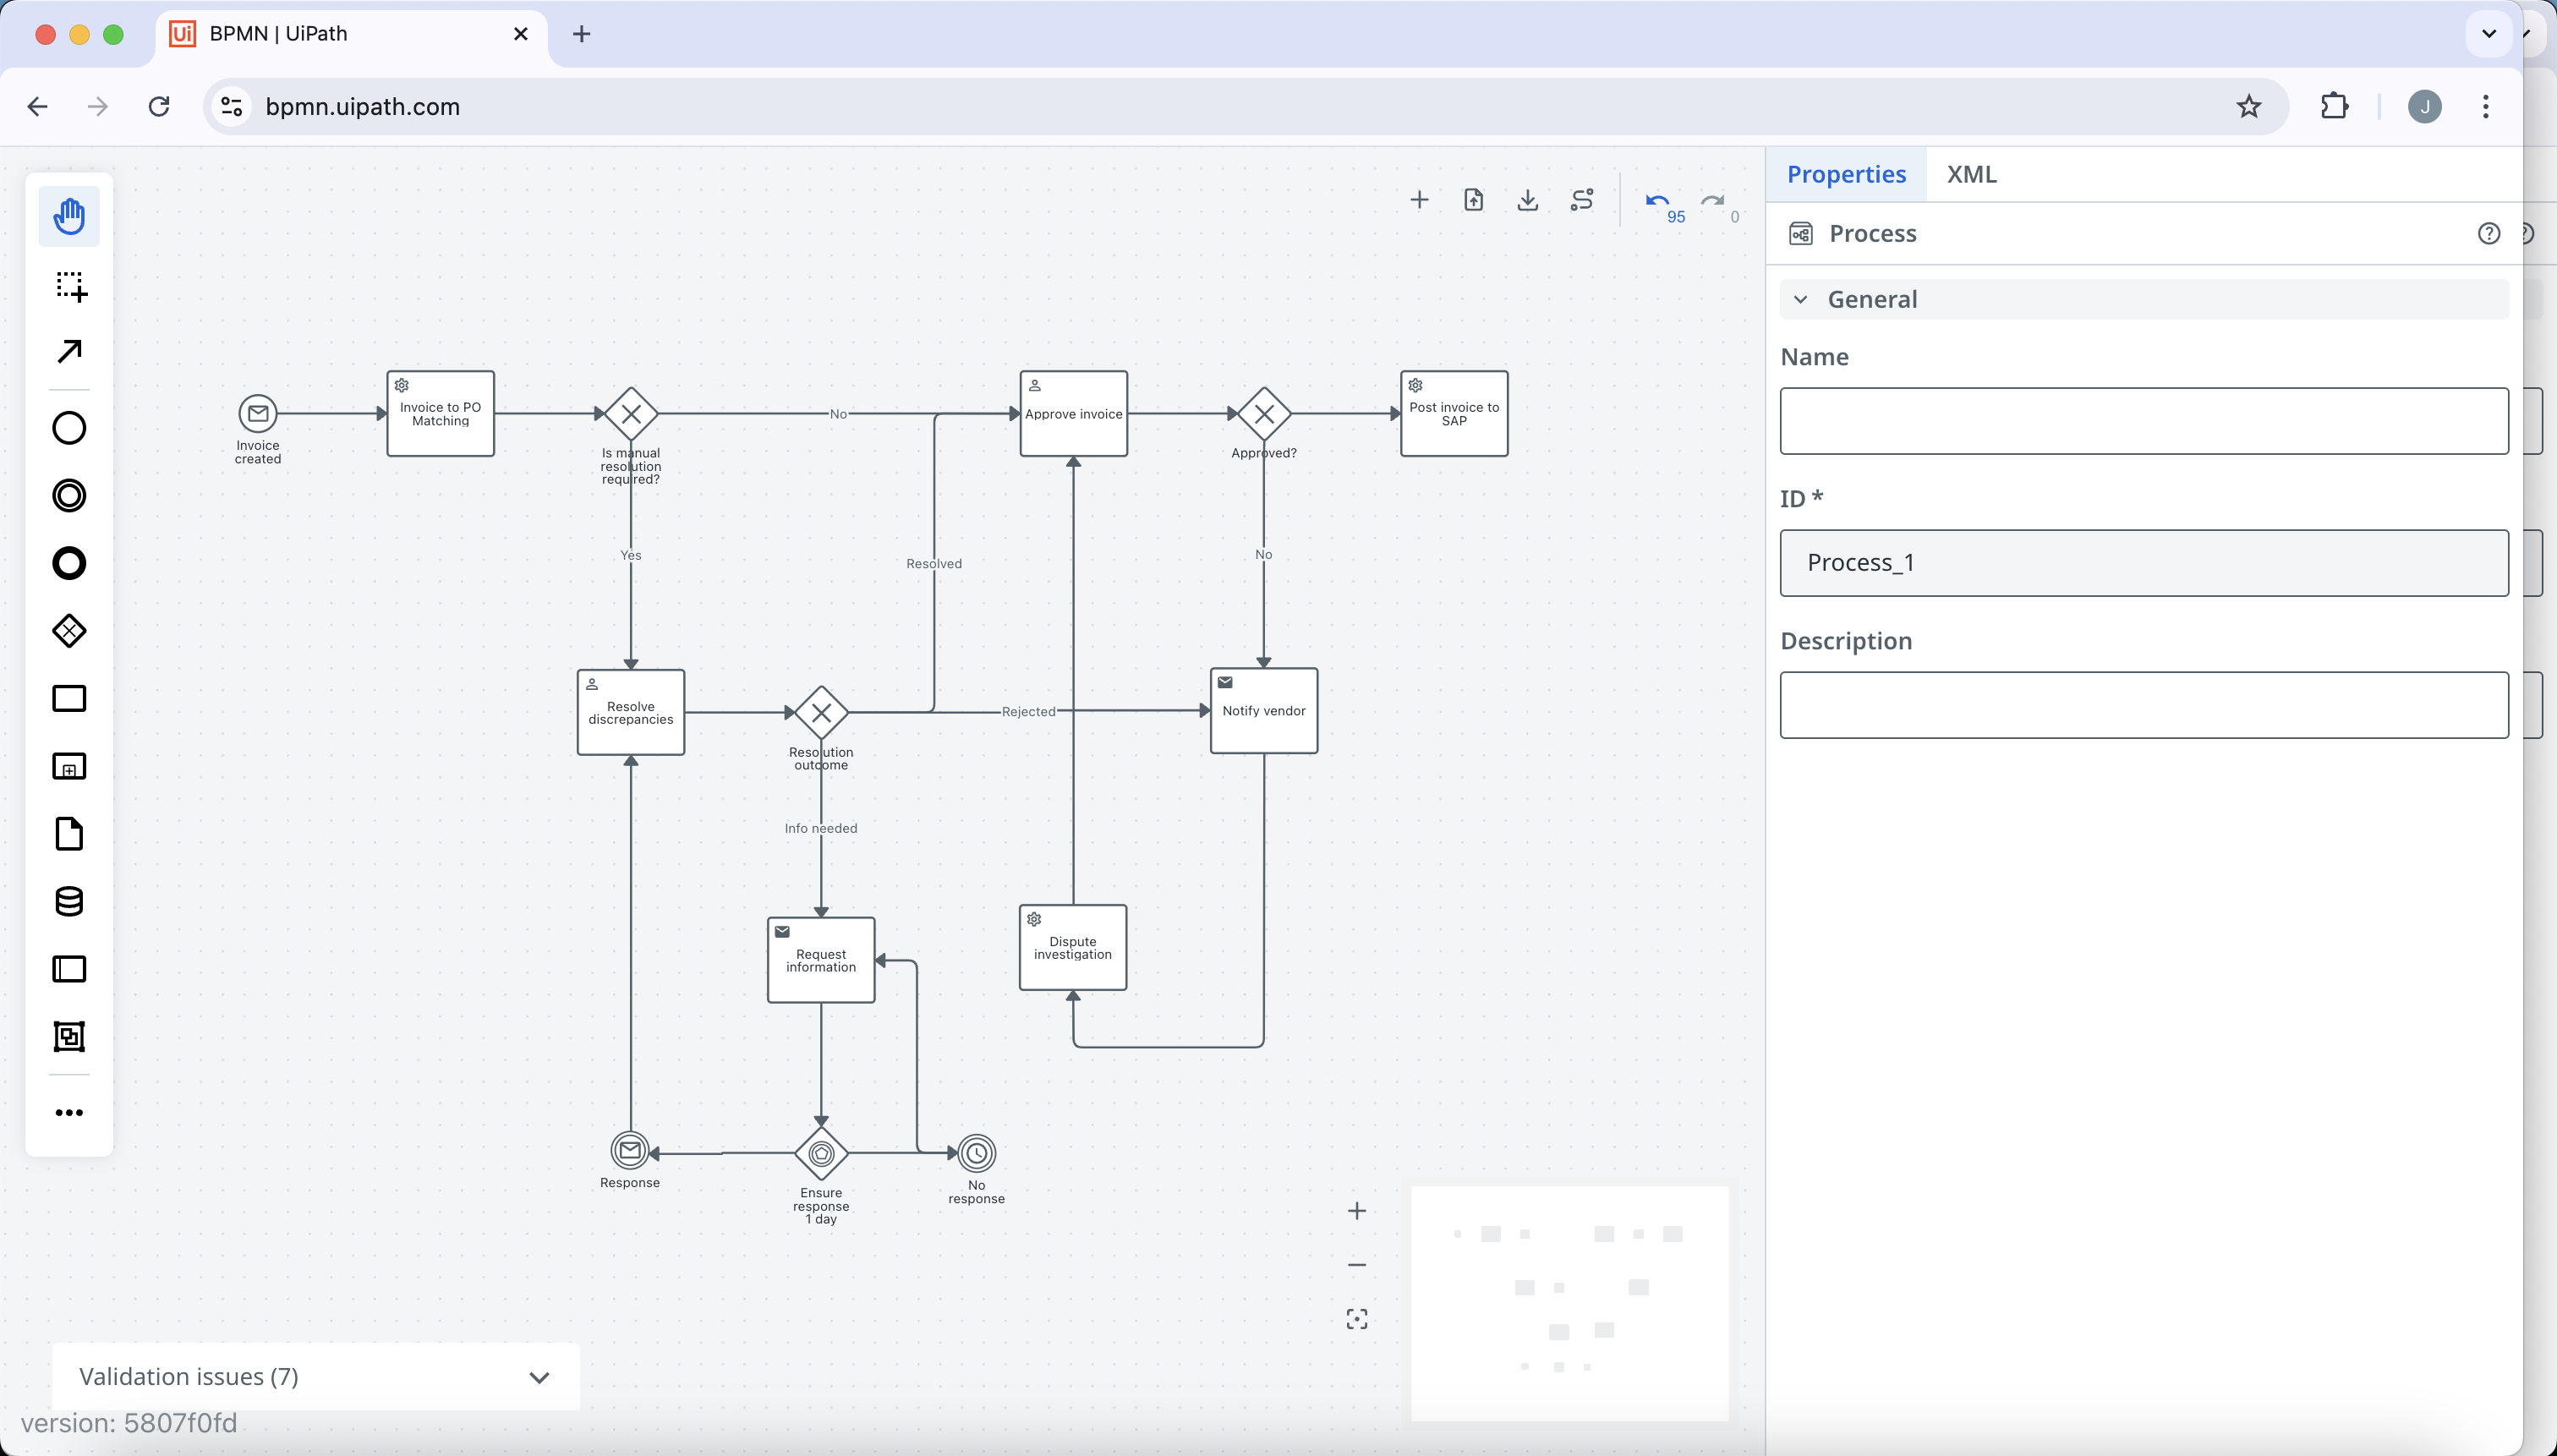
20. Click on notify vendor send task and add a intermediate event called No dispute. Click on the edge connecting the notify vendor send task and no dispute intermediate event, and delete the edge. Drag the no dispute intermediate event onto the notify vendor send task until the task highlights blue, and then release to attach it to the task as a boundary event.
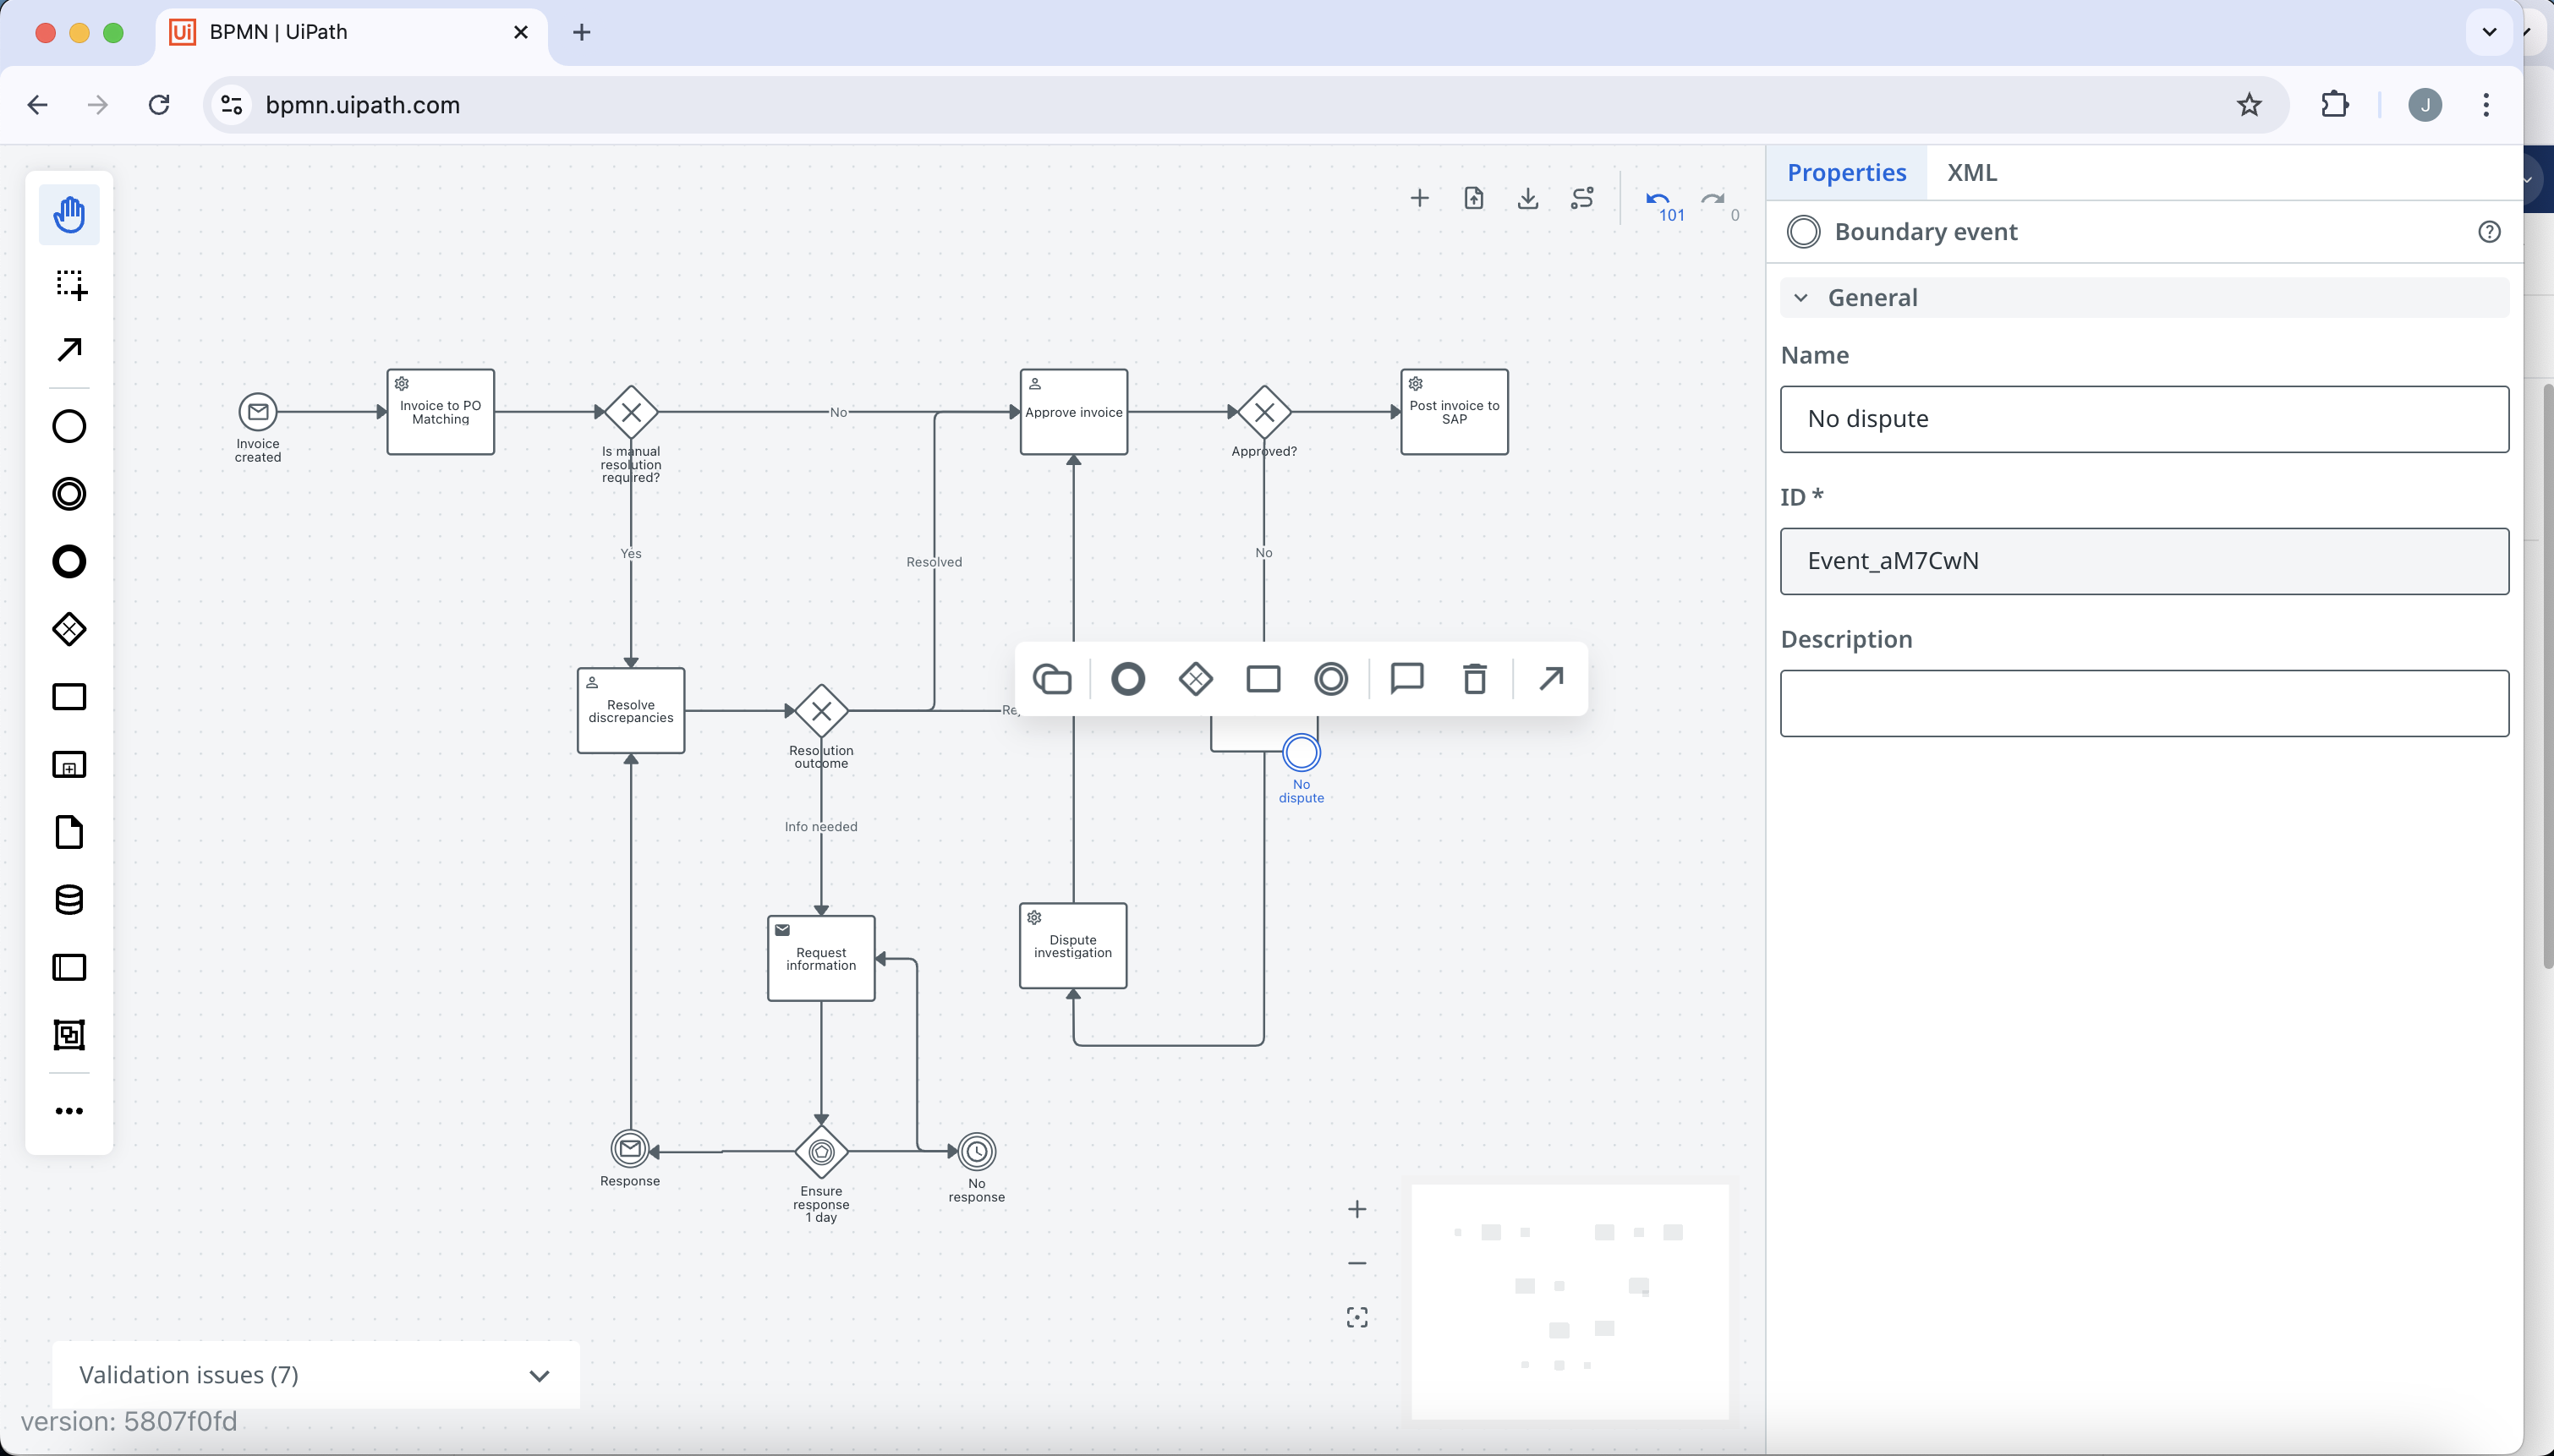
21. Change the no dispute boundary event to a timer boundary event, and connect it to the end event. We have now completed modeling the invoice processing process.
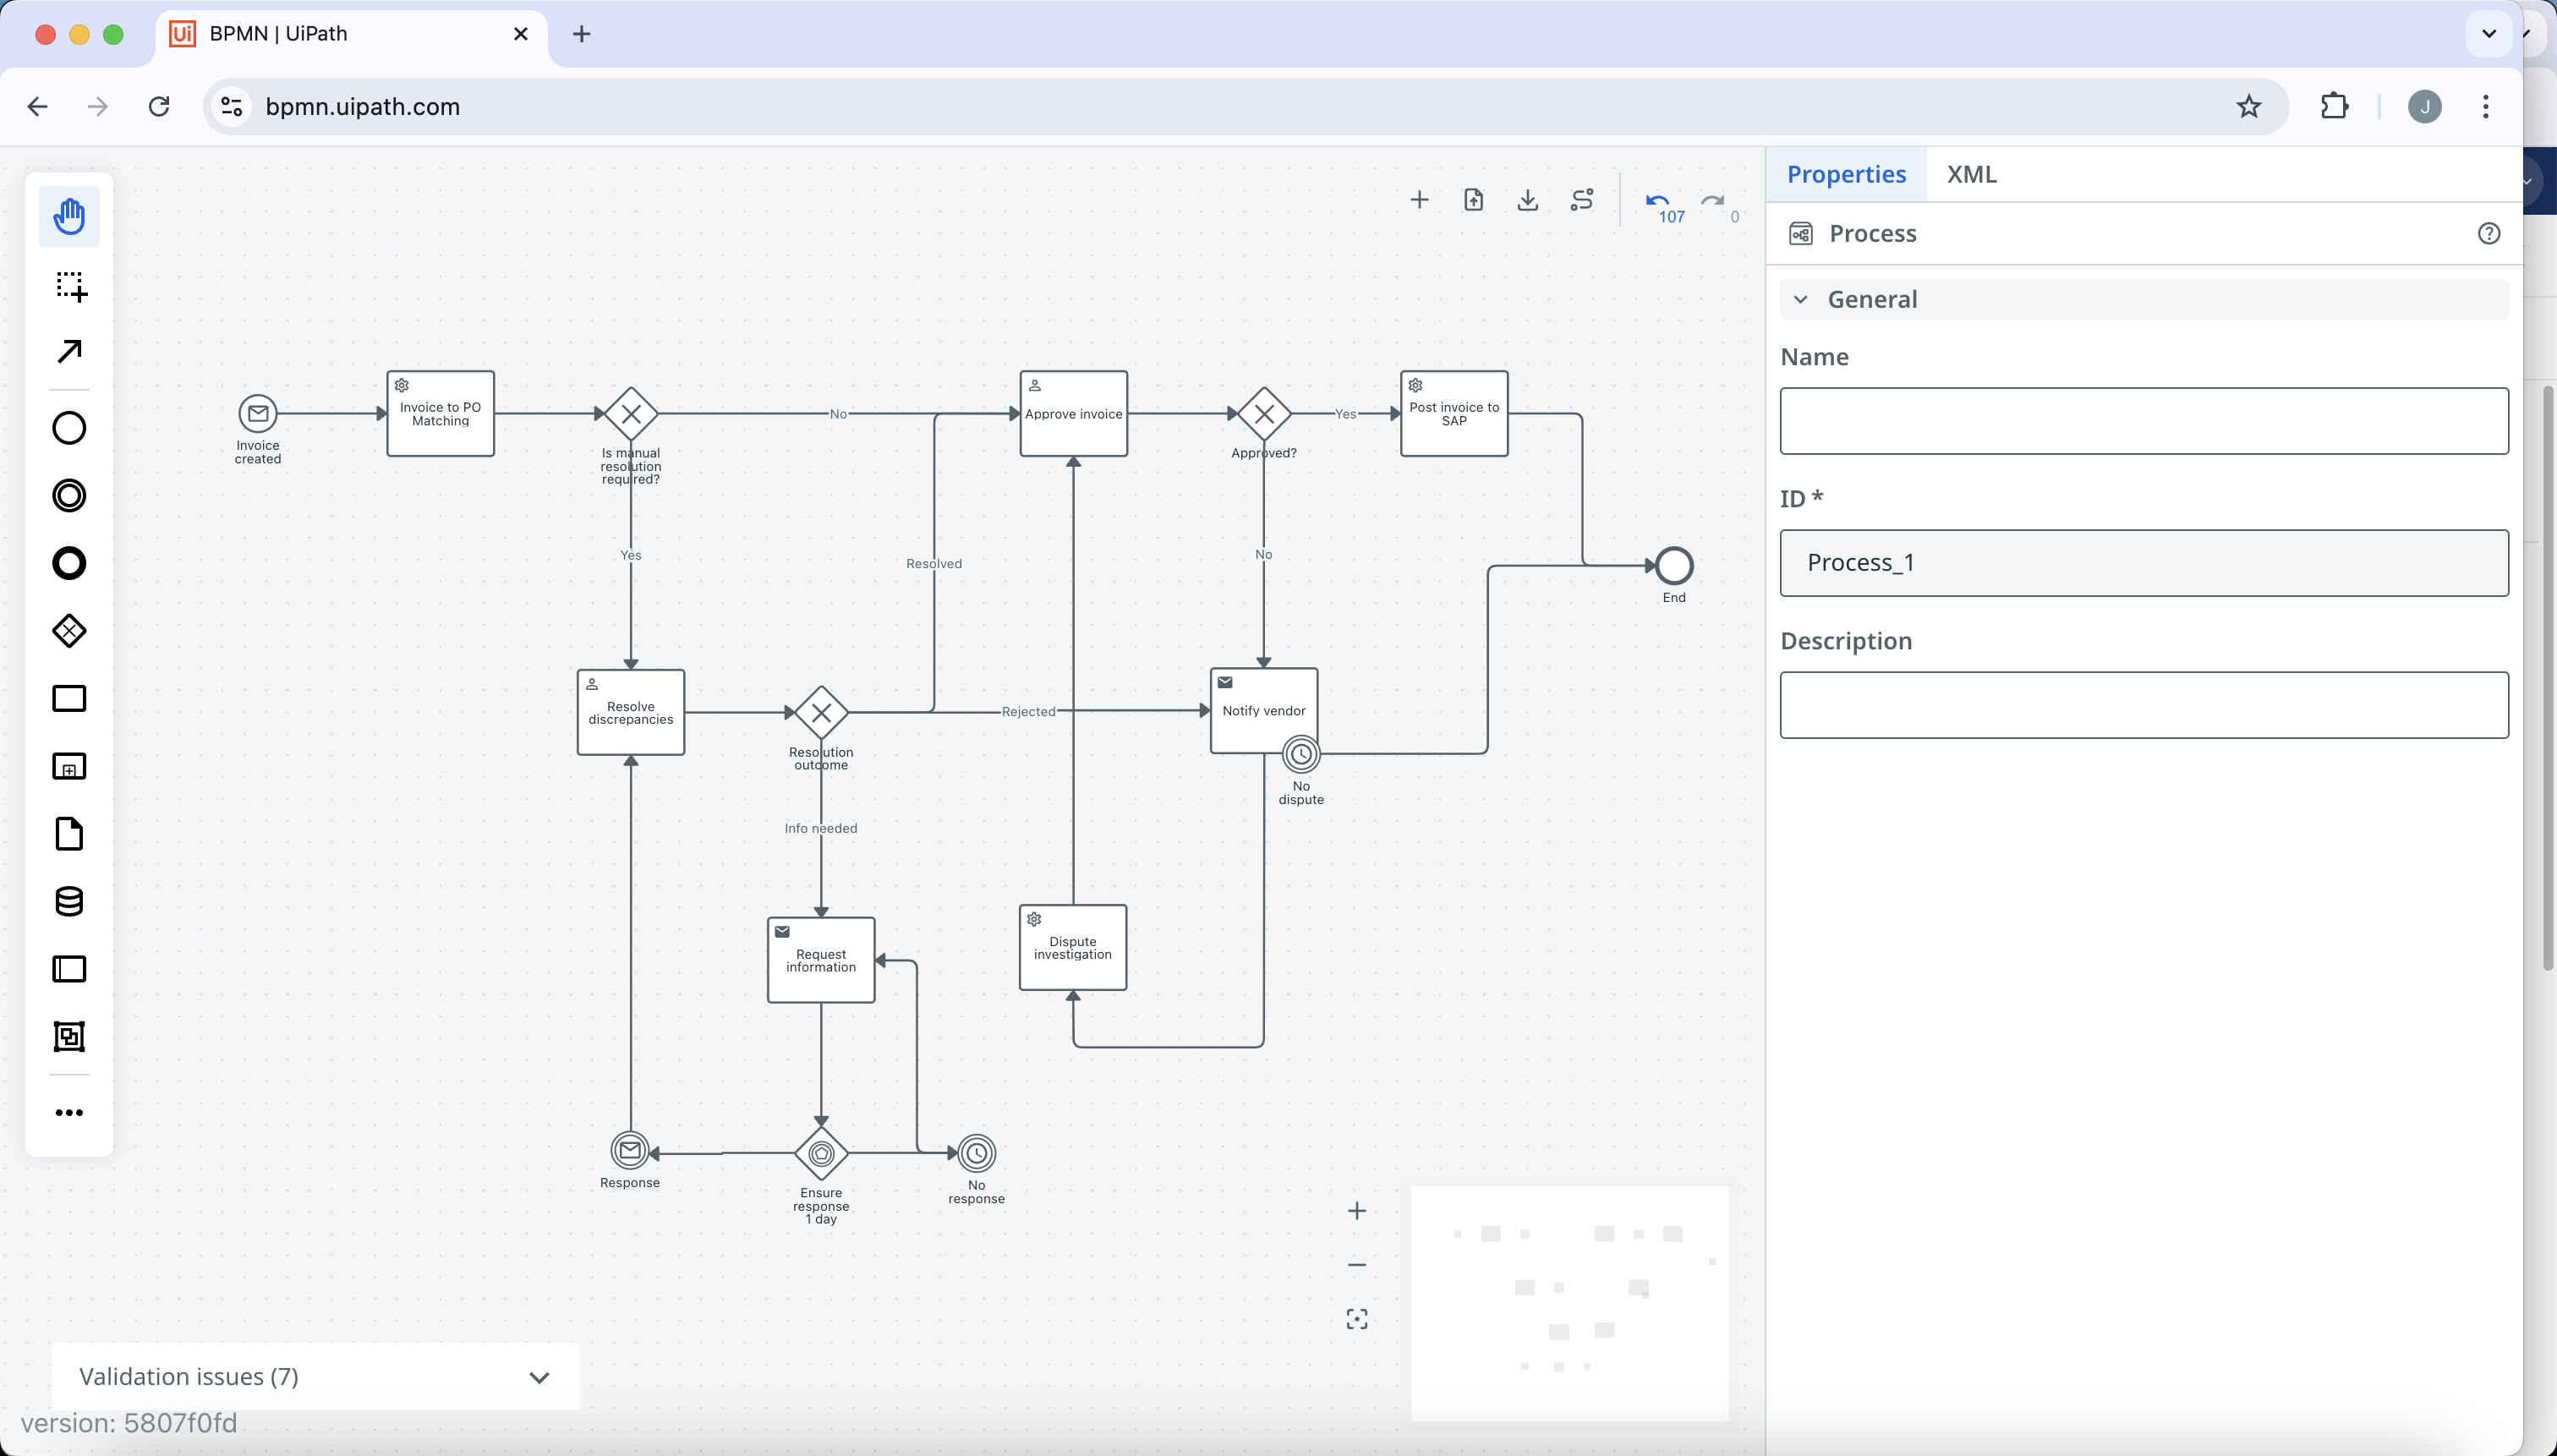
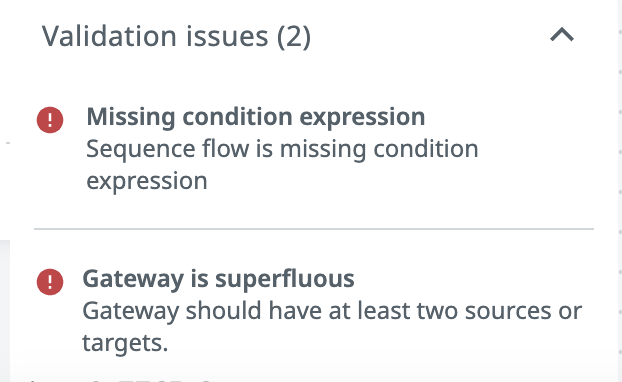
22. Click on the validations panel in the bottom left that says Validation issues (7). Here is where any warnings or errors will be displayed based off of BPMN rules. Clicking on a specific message will automatically pan the canvas to the affected elements. For now, we can ignore these errors as the missing condition expressions are implementation details.
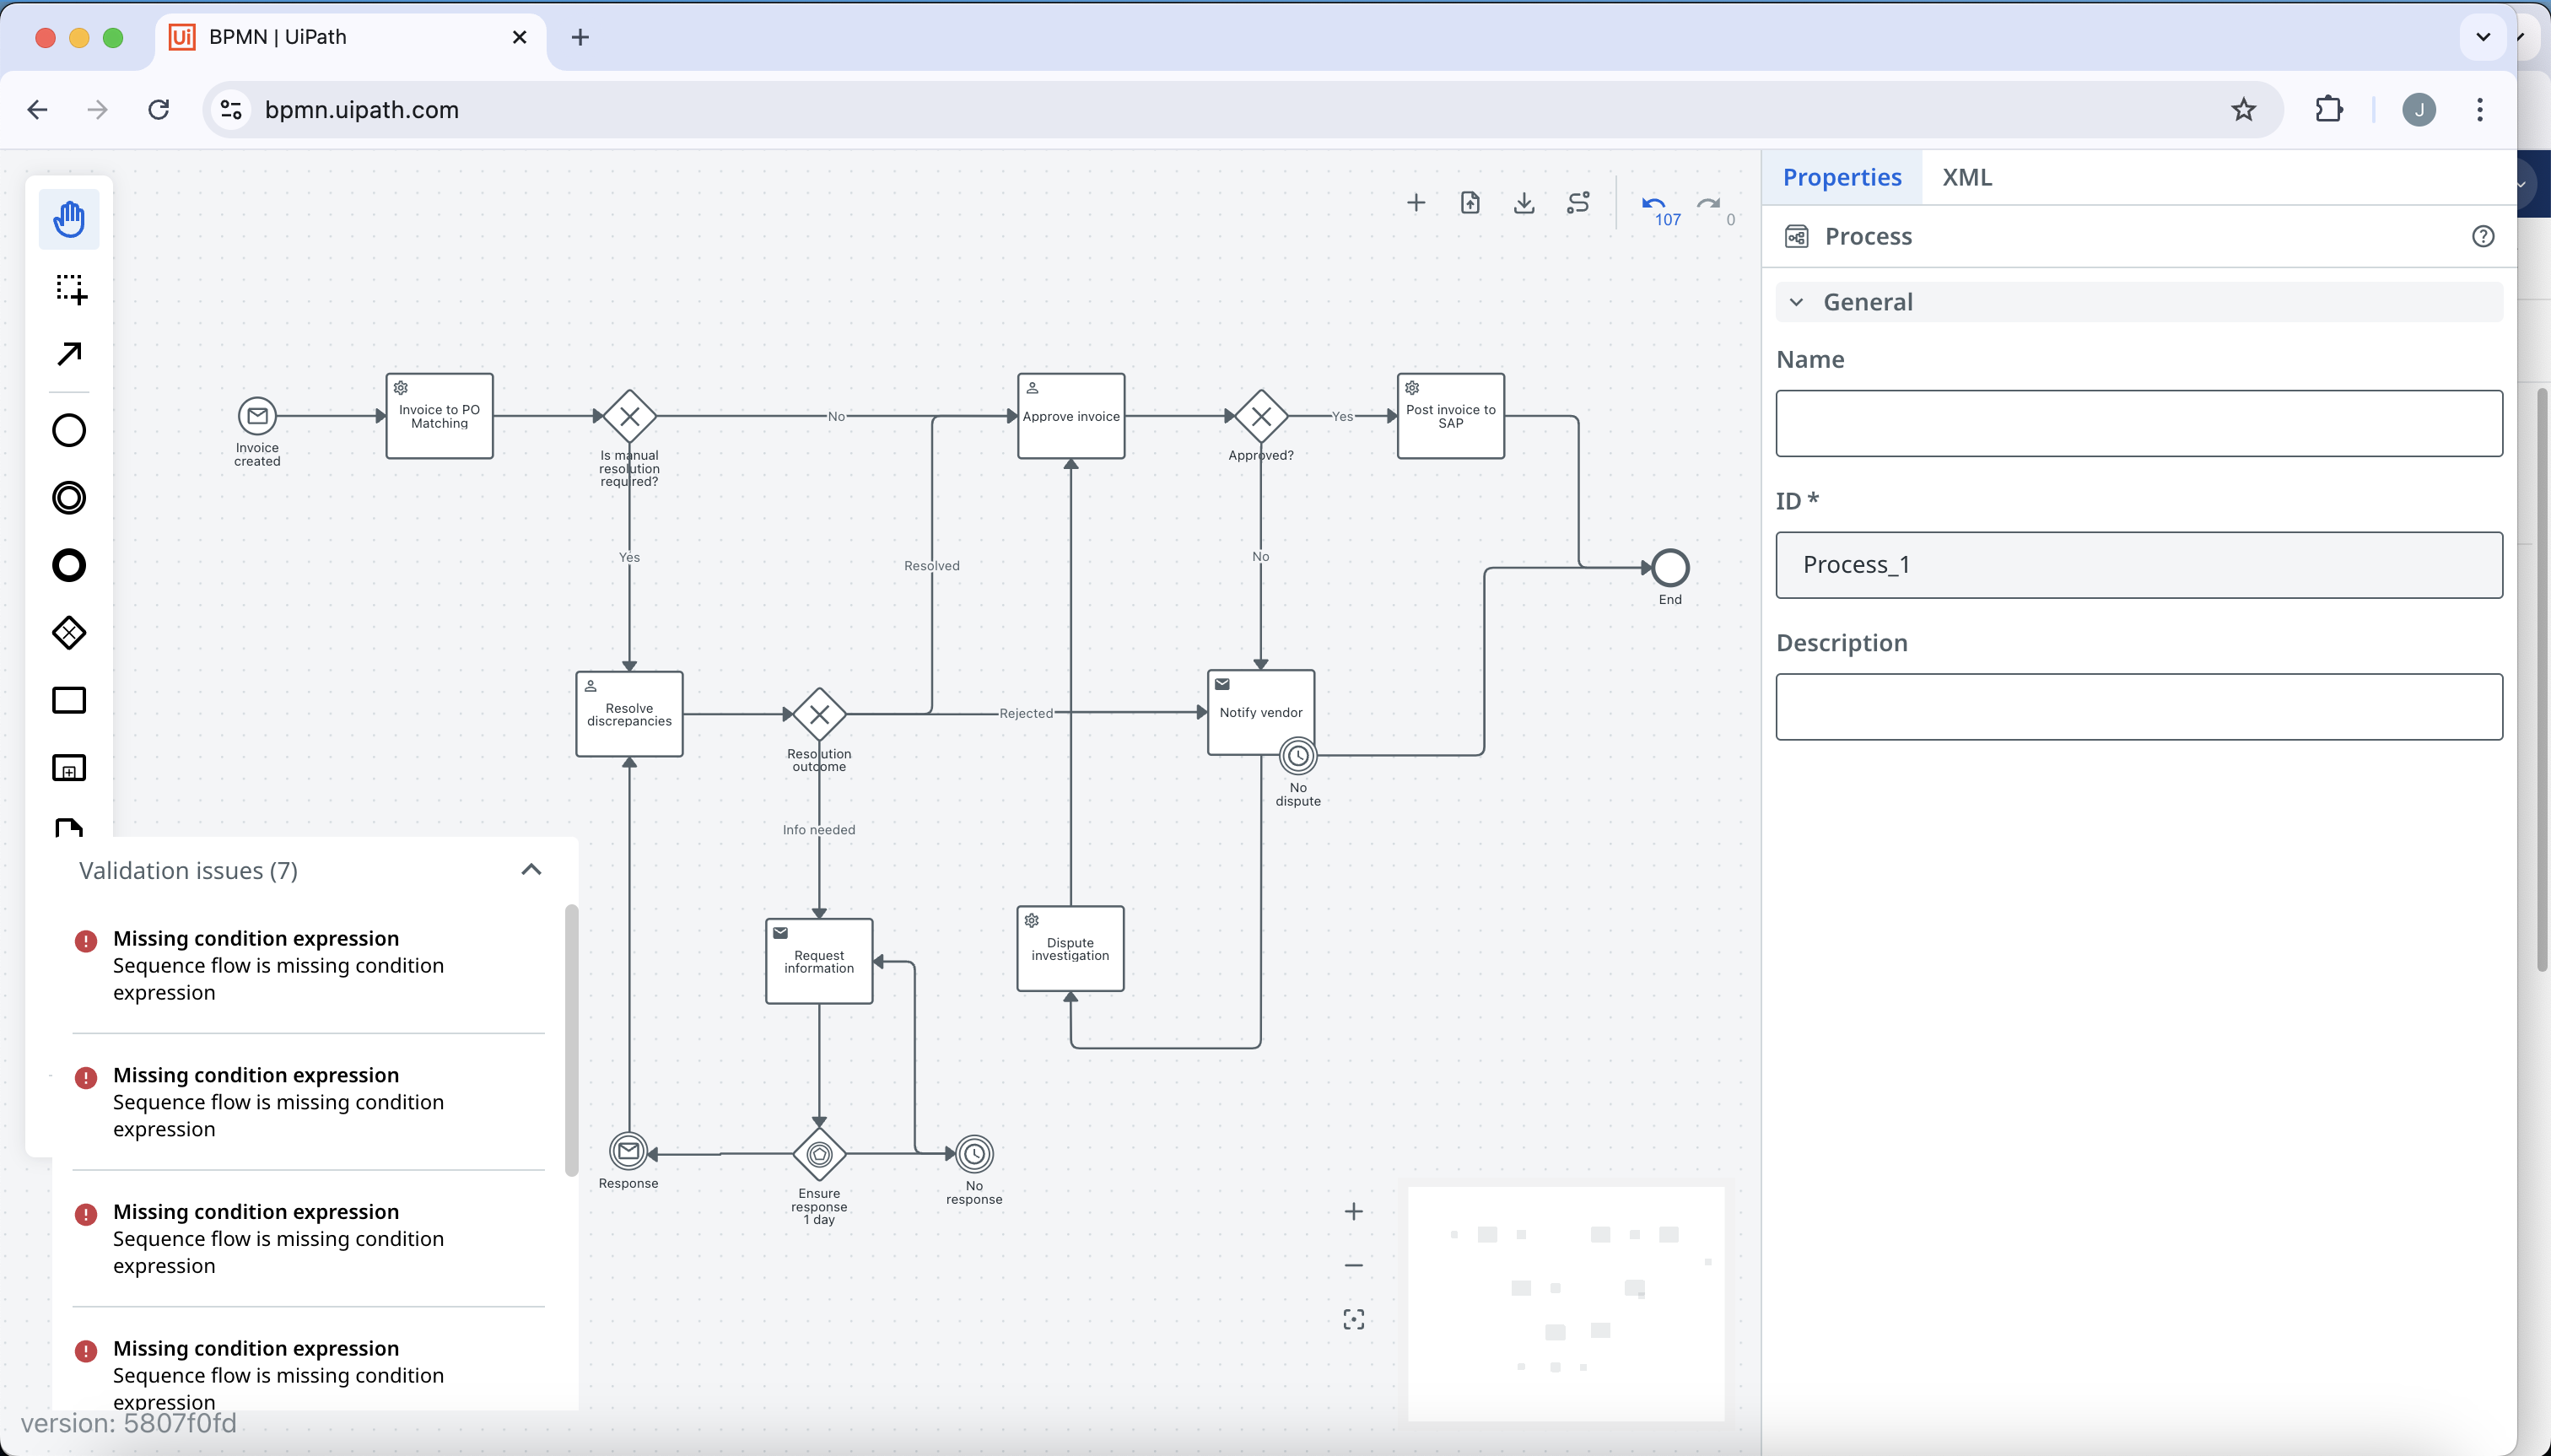
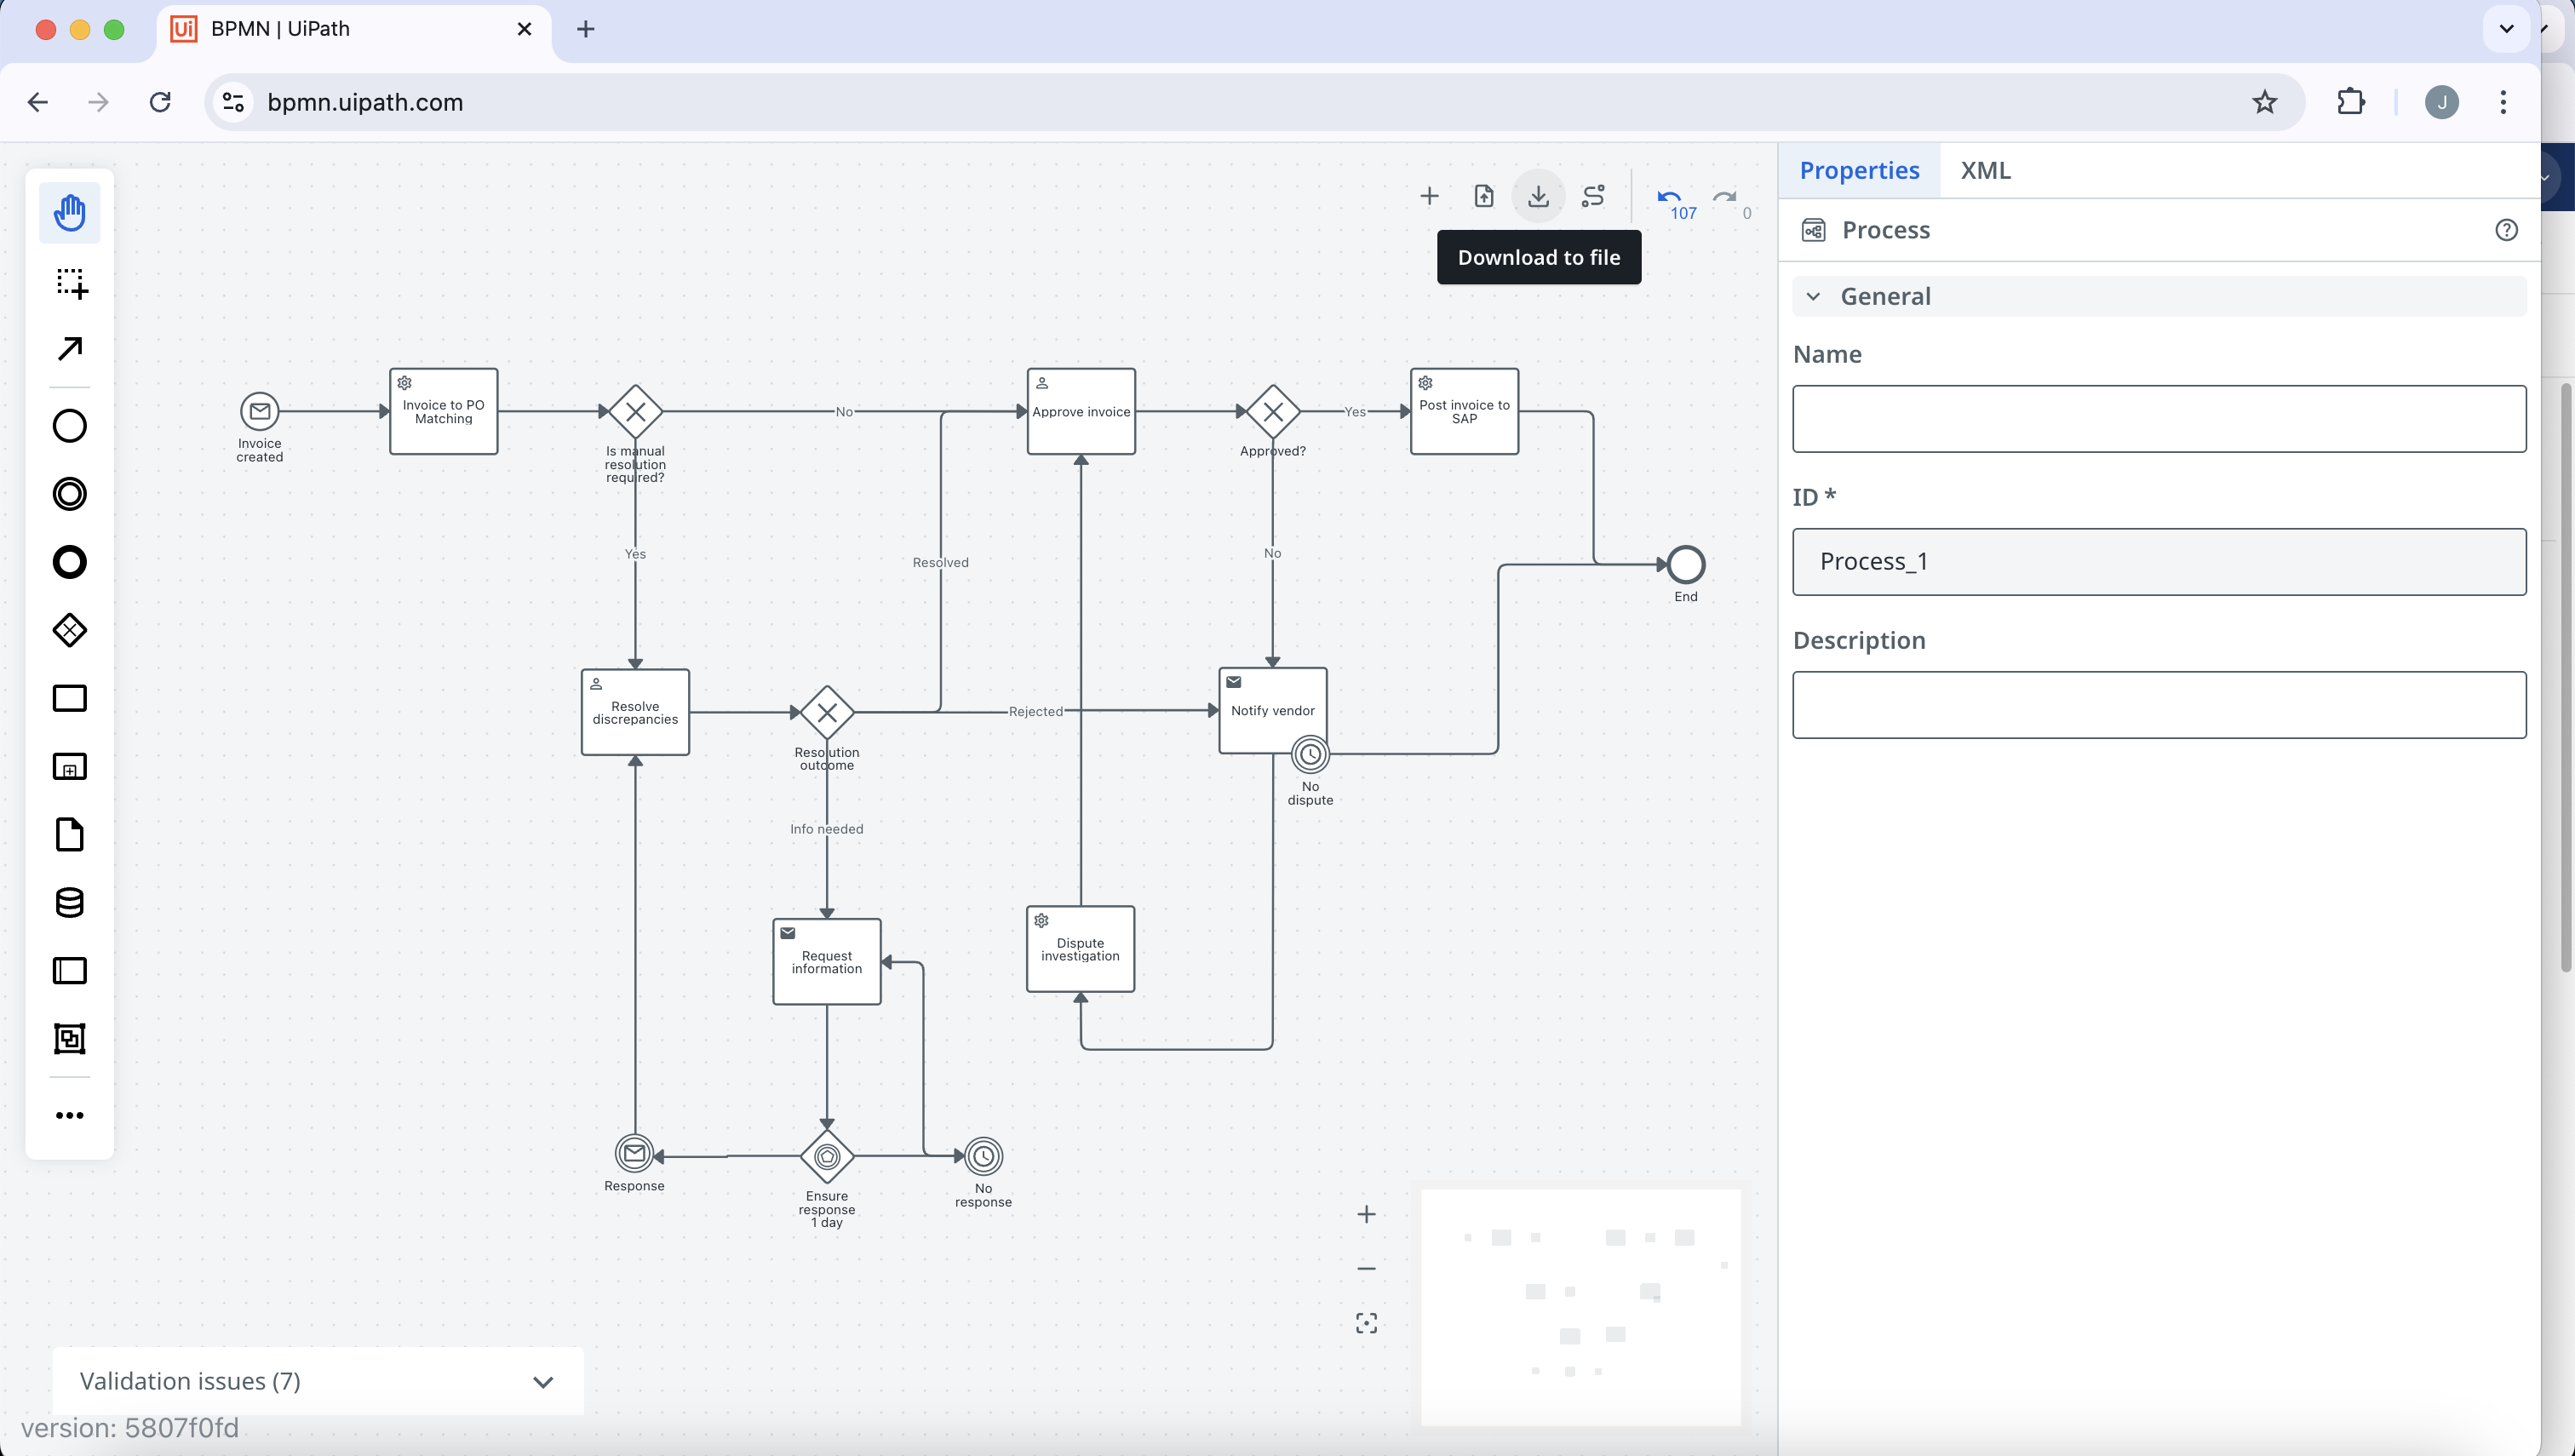
23. Now that we've finished modeling our process, we can export it as a .bpmn file by clicking on the download icon in the upper right.
Executing a Simple Process (Model, Implement, then Operate)
Overview
In this How To, we will implement a fairly simple process that allows us to walk through the core Maeestro features to model, implement, debug, publish, deploy and manage a process. This simple process does not teach how to implement integrations with other UiPath products.
Process
We will build the following simple routing process.
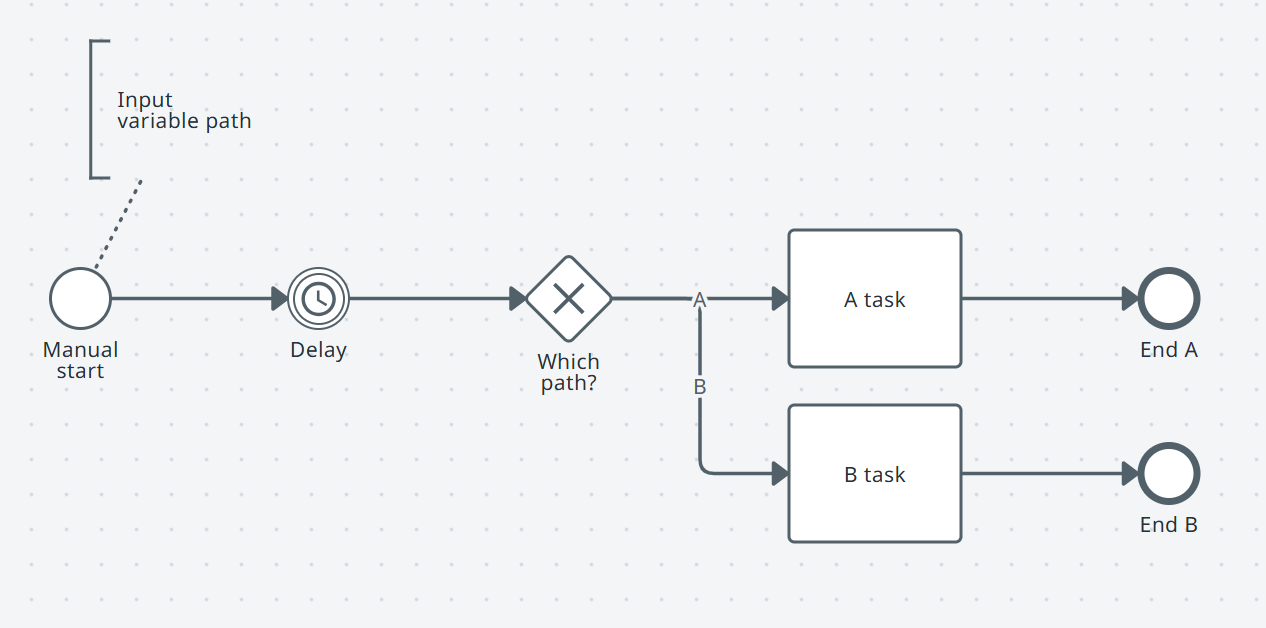
Model a process
We will start by modeling the end-to-end process, then we will come back and configure the components.
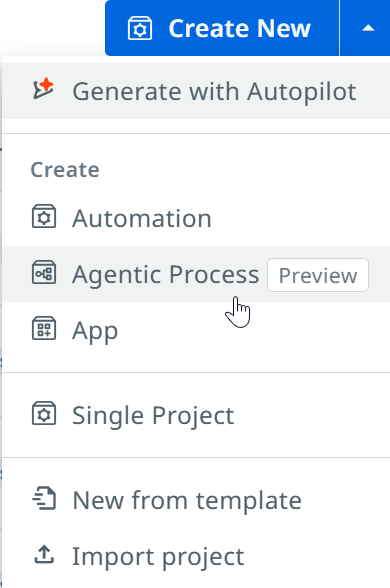
You create an agentic process as a new type of Studio project.
Select Maestro in the left navigation menu

Select Get Started from the Maestro landing page. Your new agentic process opens.
NOTE: You can also get to a new process via Studio in the left navigation and selecting Agentic Process from the Create New dropdown.
Select Process Explorer button on the upper-left side of the designer.
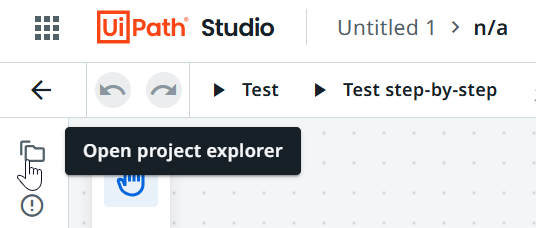
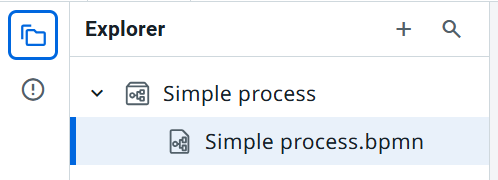
Right-click to rename the project to Simple Process and the process to Simple Process.
Close the Process Explorer.
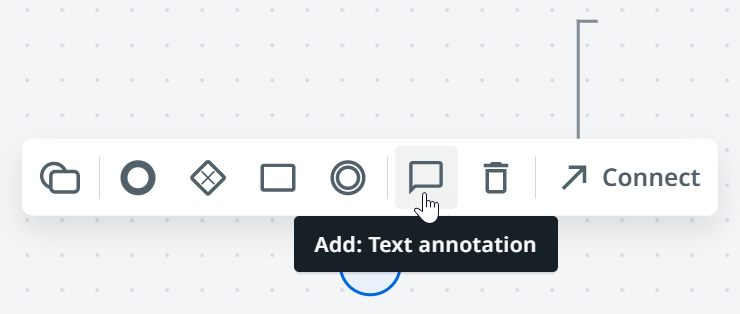
Select the start element and click Add: Text annotation from the toolbox and type Input variable path.
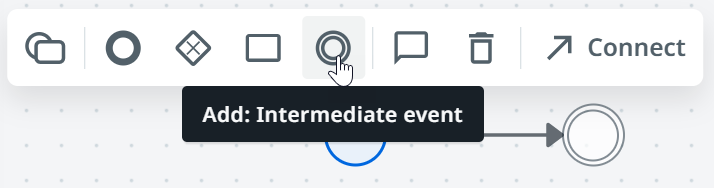
Select the start element and click Add: Intermediate event from the toolbox.
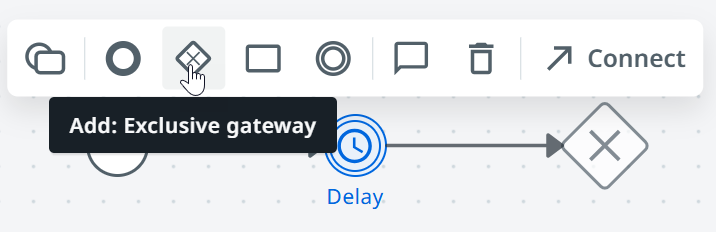
Select Change element from the toolbar and select Timer intermediate catch event and type Delay for the intermediate event name.
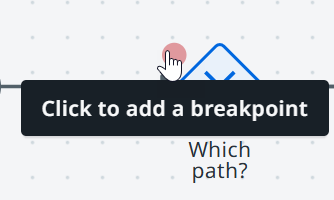
Select the timer element and click Add: Exclusive gateway from the toolbox and type Which path? for the gateway name.
Select the gateway and click Add: Task and type A task for the name.
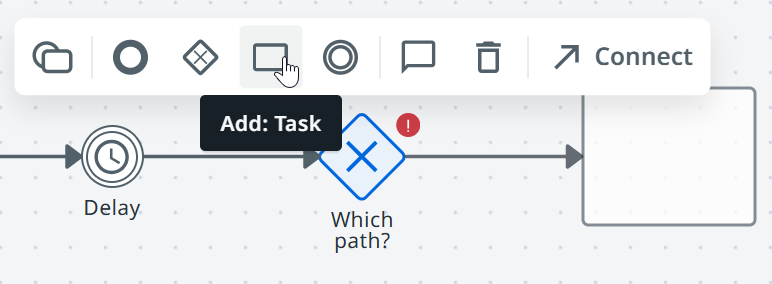
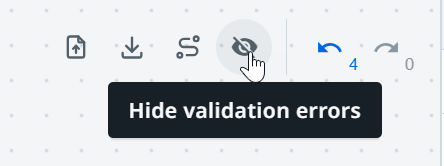
INFORMATION: Validation errors are shown on the canvas as you draw and configure your process. You can decide to optionally hide these visualizations by selecting Hide validation errors from upper-right tools on the canvas.
10. Select the gateway again and click Add: Task and type B task for the name.
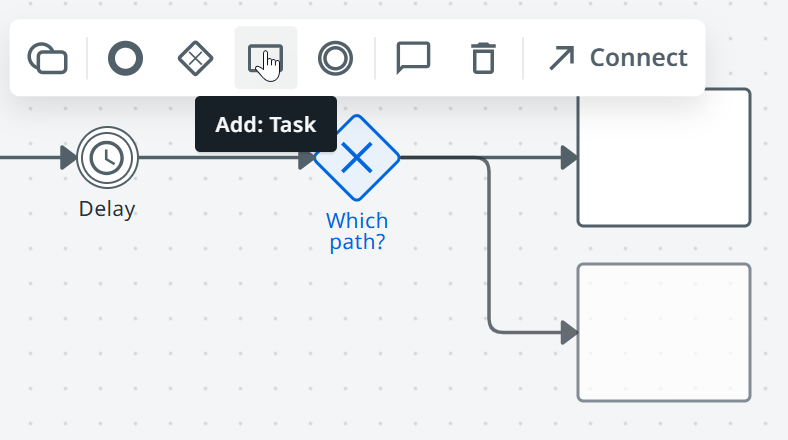
Select the gateway and expand the first condition, it will have a generated name starting with edge_Gateway_{randomcharacters} and type A for the Label. Expand the second condition and type B for the Label.


End events
It is a best practice to create an explicit end to your process. We want the added value of quickly knowing which path our process followed so we will create an explicit end for each one.
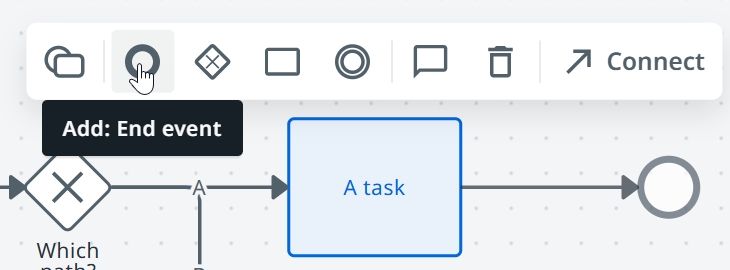
Select the A task and click Add: End event from the toolbox and type End A for the name.
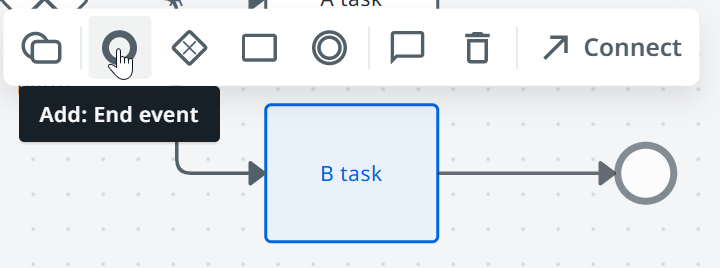
Select the B task and click Add: End event from the toolbox and type End B for the name.
Congratulations! You’ve now created your first BPMN end-to-end process!
Now let’s add some capabilities to the process.
Implement a process
Start event
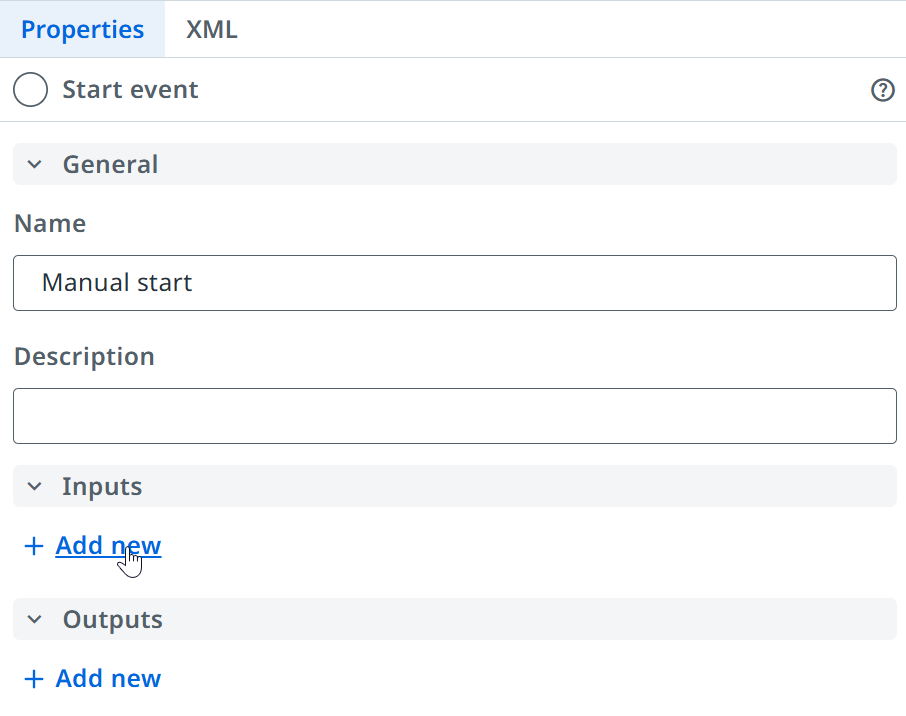
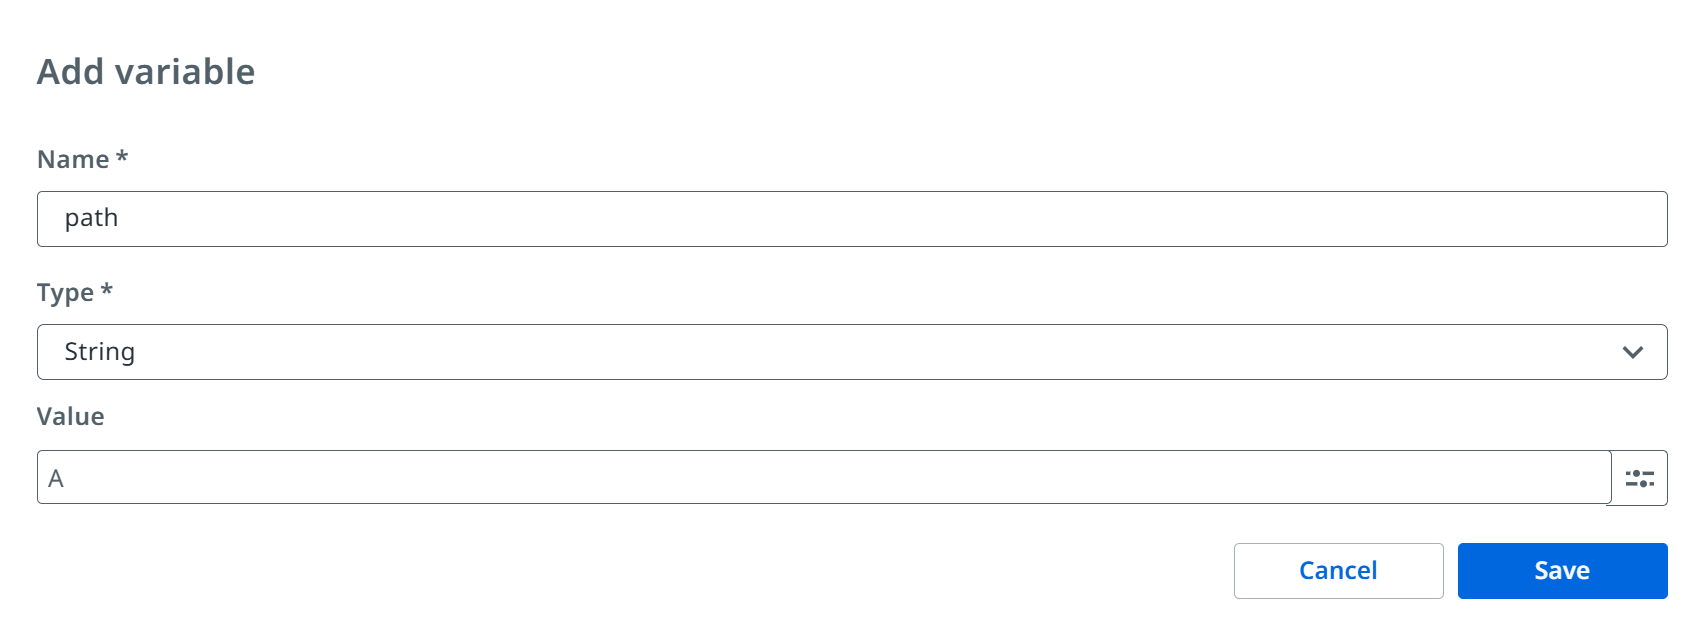
Select the start element and in the Properties panel type Manual start for the Name and click Add new add an Input variable which we can use when we start the process.
Configure the variable with these values and click Save. An output variable will automatically be created for us.
Name: path
Type: String
Value: A
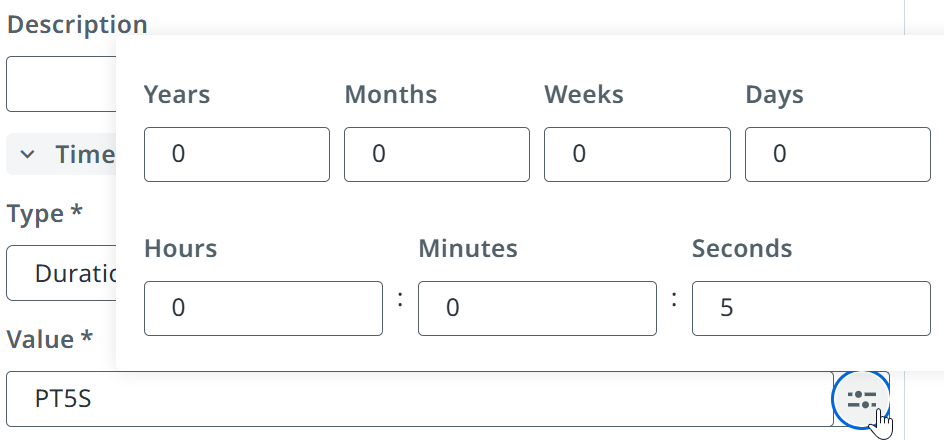
Select the Delay event and open the properties panel and in the Timer section select Type=Duration and 5 seconds in the value configuration.
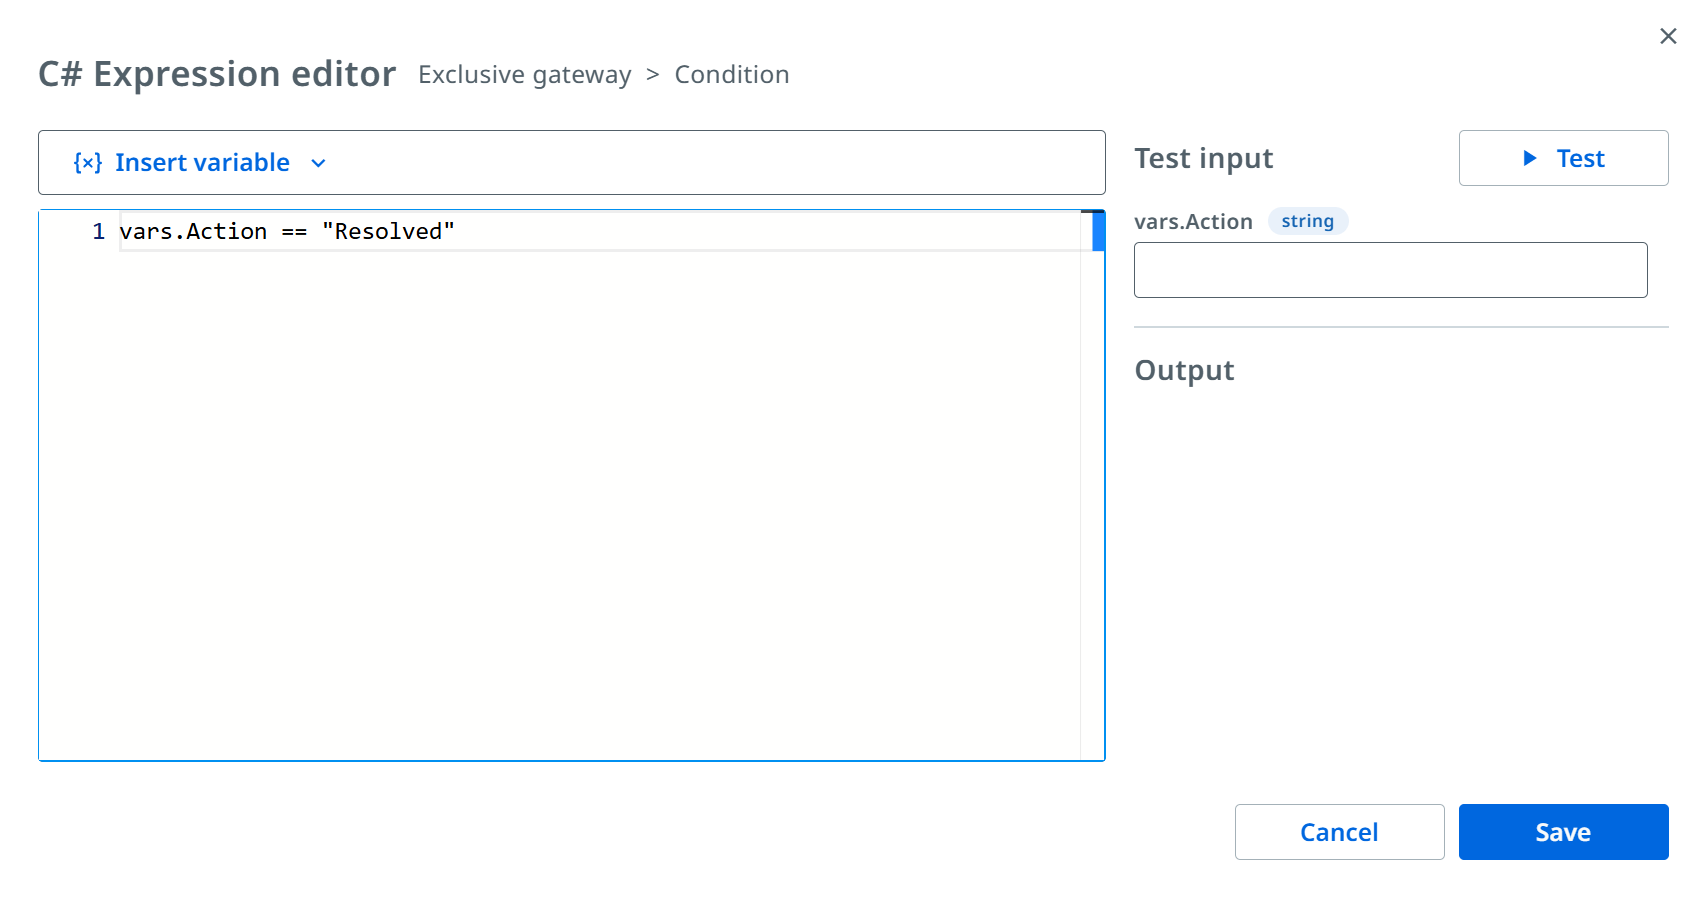
Select the gateway and expand the Conditions to enter the condition for the No and Yes paths and select the text entry picker to Open expression editor to enter the conditions.
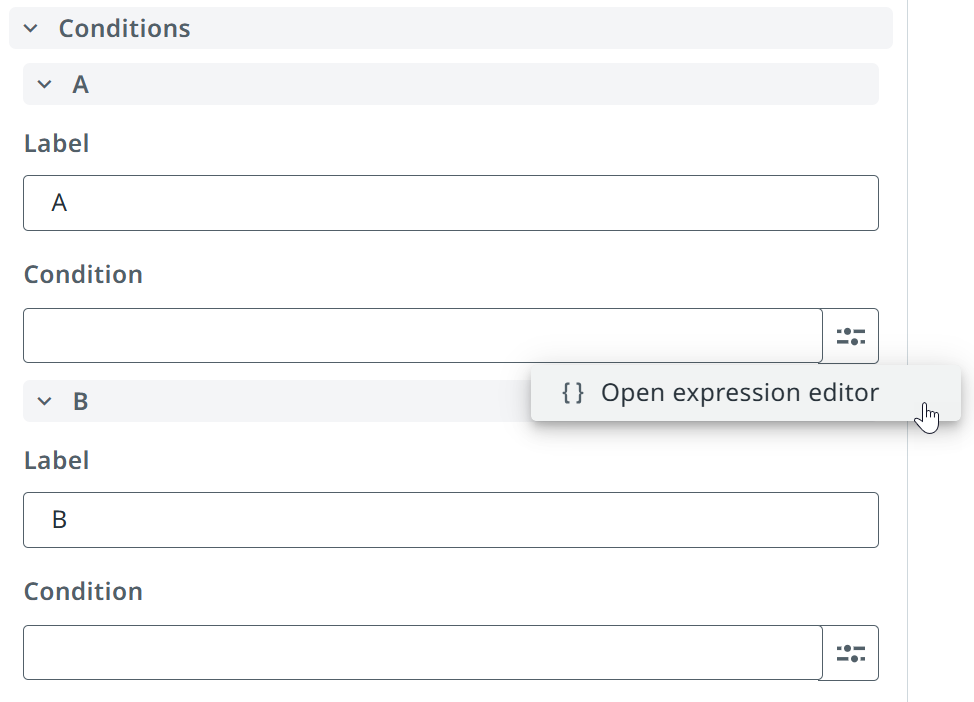
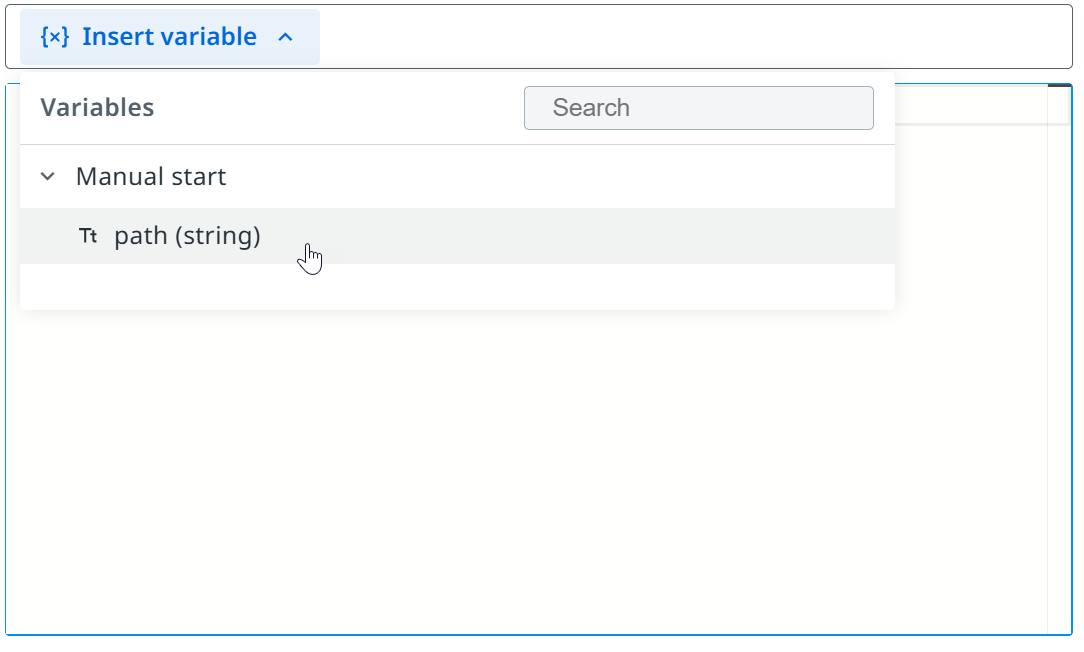
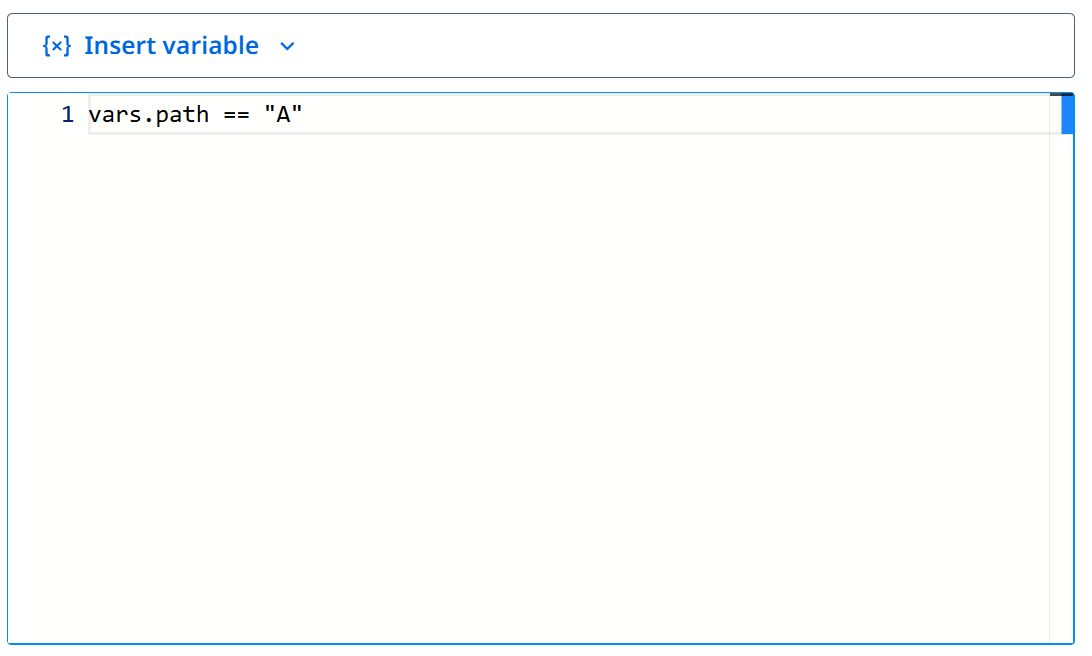
Use Insert variable to find and insert Manual start output variable path and set the value equal to “A” and click Save.
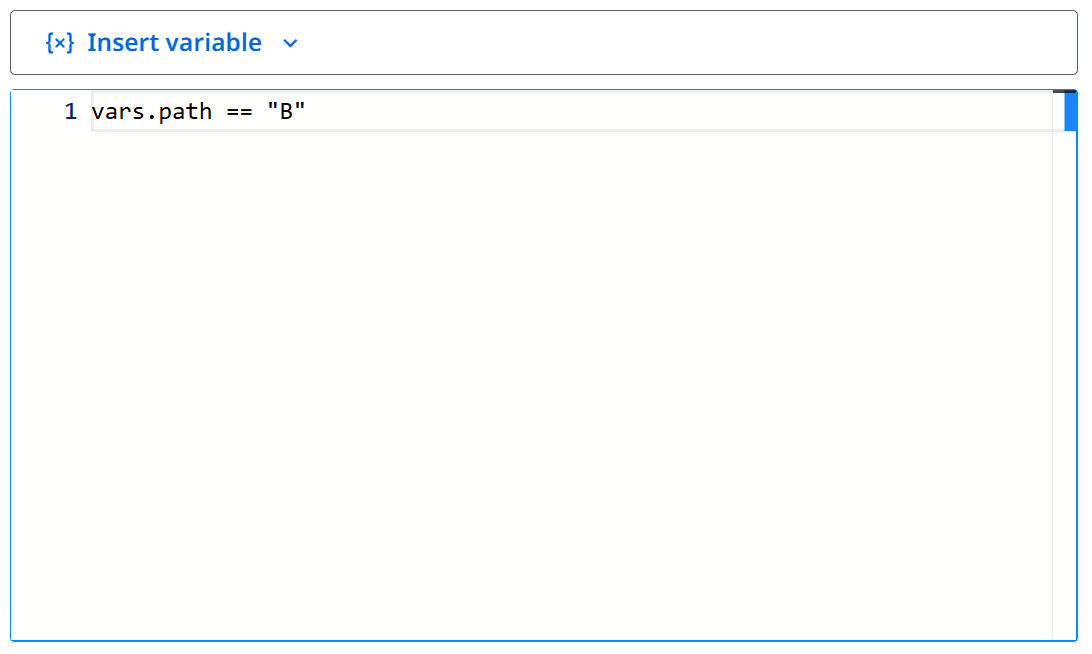
Open expression editor for B condition and insert Manual start output variable path and set the value equal to “B” and click Save.
Alternatively, you can simply copy/paste the expressions below into expression editor.
A
vars.path == "A"B
vars.path == "B"
Congratulations! You’ve now fully configured your first process!
Now let’s do some debugging!
Debug a process
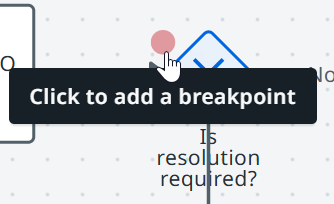
INFORMATION: You can configure breakpoints by hovering over the upper left of an element and selecting Click to add a breakpoint. Currently, breakpoints can only be set once you start debugging a process. However, they will be retained between runs.
Debug straight through
We will first run our process straight through to ensure we’ve configured it correctly. We set the default value for our path variable to A so we should see it flow through to A task and End A.
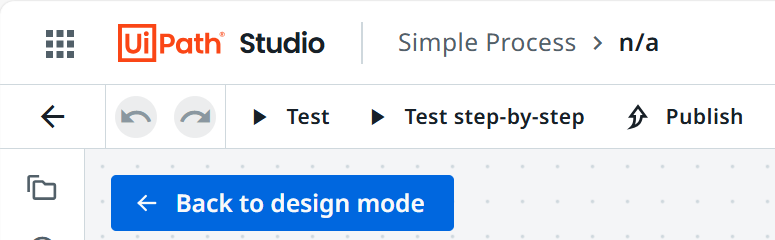
Select Test to debug our process.

You will see it animate as each step is executed. You can interact with the diagram, Execution trail and Global variables to see additional details.
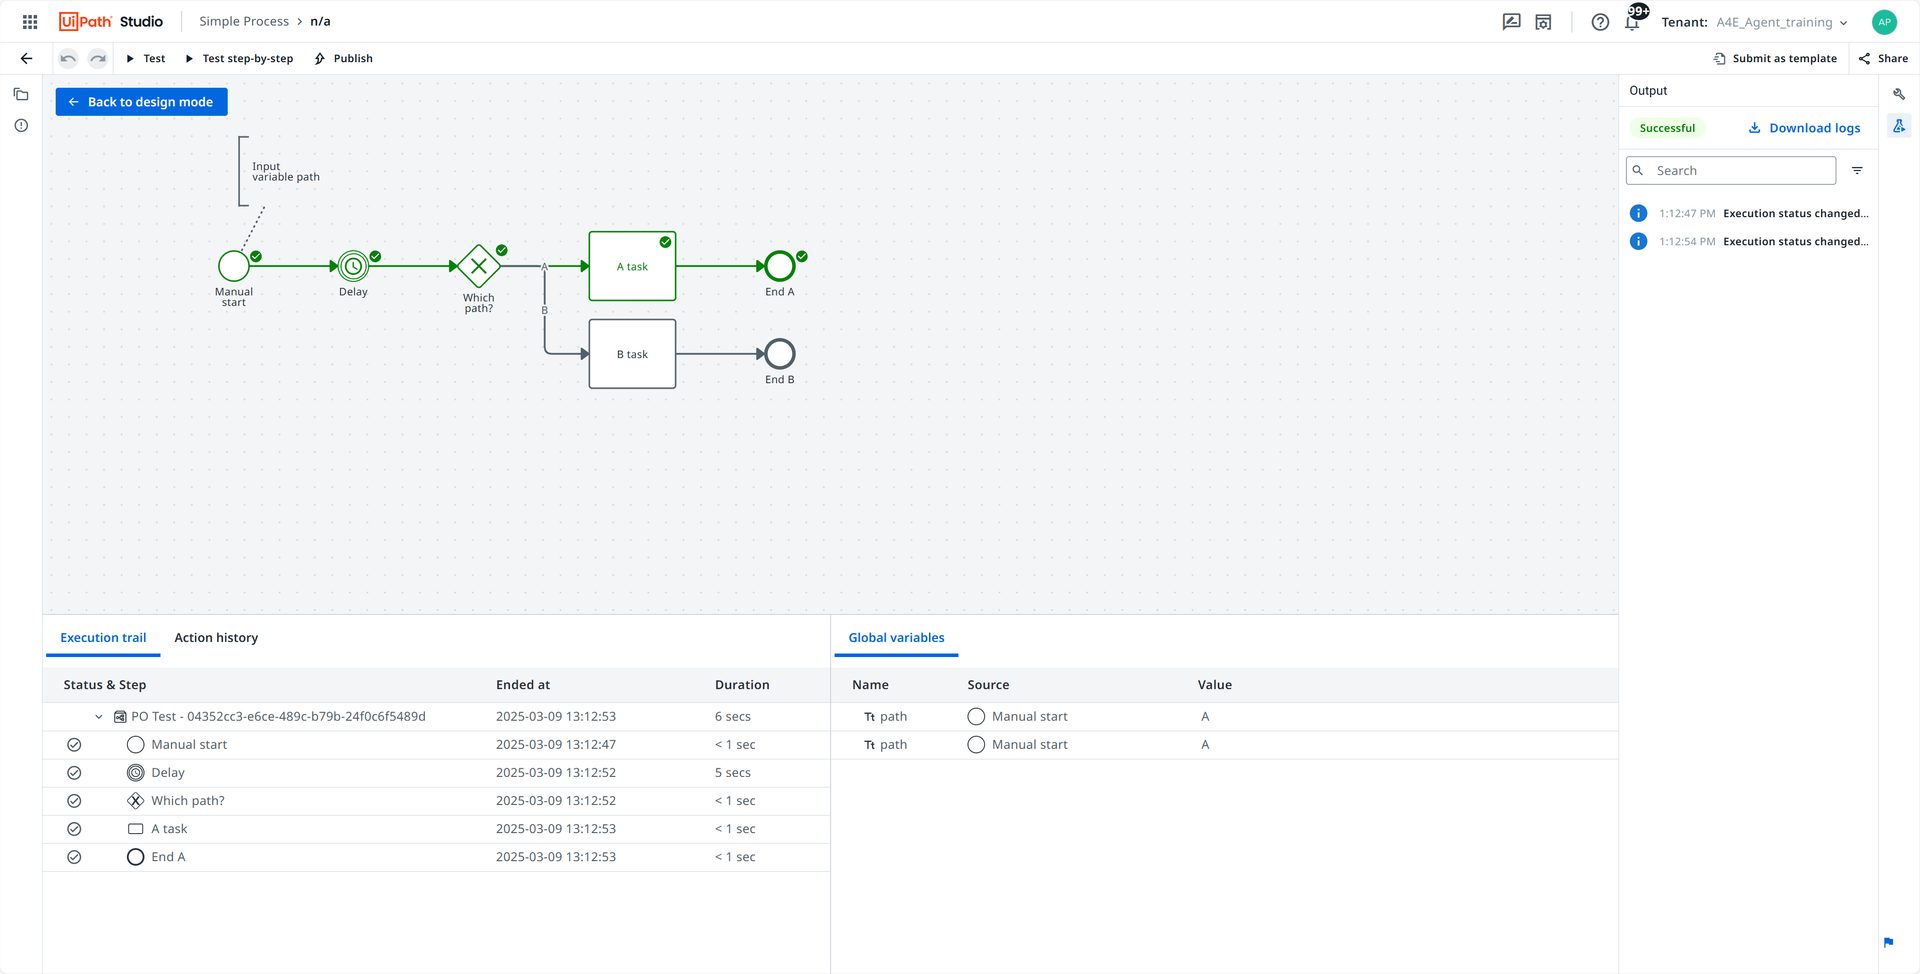
Click Back to design mode to exit debugging.
Debug step-by-step
We will now run our process step-by-step so we can manipulate the path variable to test route B.
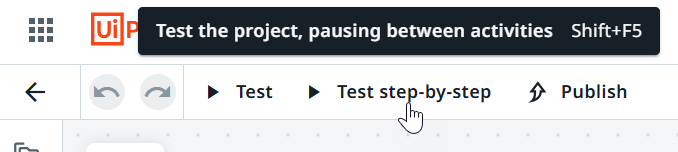
Click Test step-by-step.
Select Next step to move execution to the timer.
Update the path Global variable for the Manual start event source to B. Click enter or tab to commit the change.
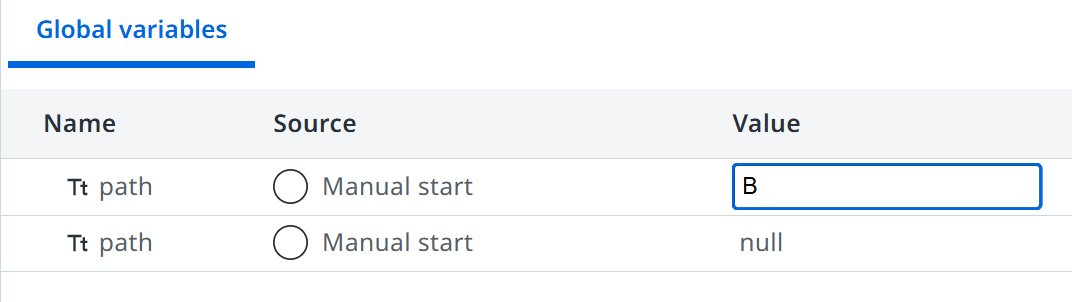
Click Update 1 variables and Update variables in the dialog to commit the changes.
Click Continue to finish execution.
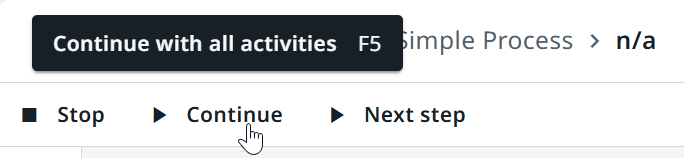
You will see it animate as each step is executed. You can interact with the diagram, Execution trail and Global variables to see additional details. This time following B route.
Click Back to design mode to exit debugging.
Congratulations! You’ve now fully debugged your first process!
Now let’s publish and deploy our process!
Publish, deploy and start a process
Click Publish, select Orchestrator Personal Workspace Feed and click Publish.
Navigate to Orchestrator, Automations tab for My Workspace folder and find Simple.Process in the Processes list.
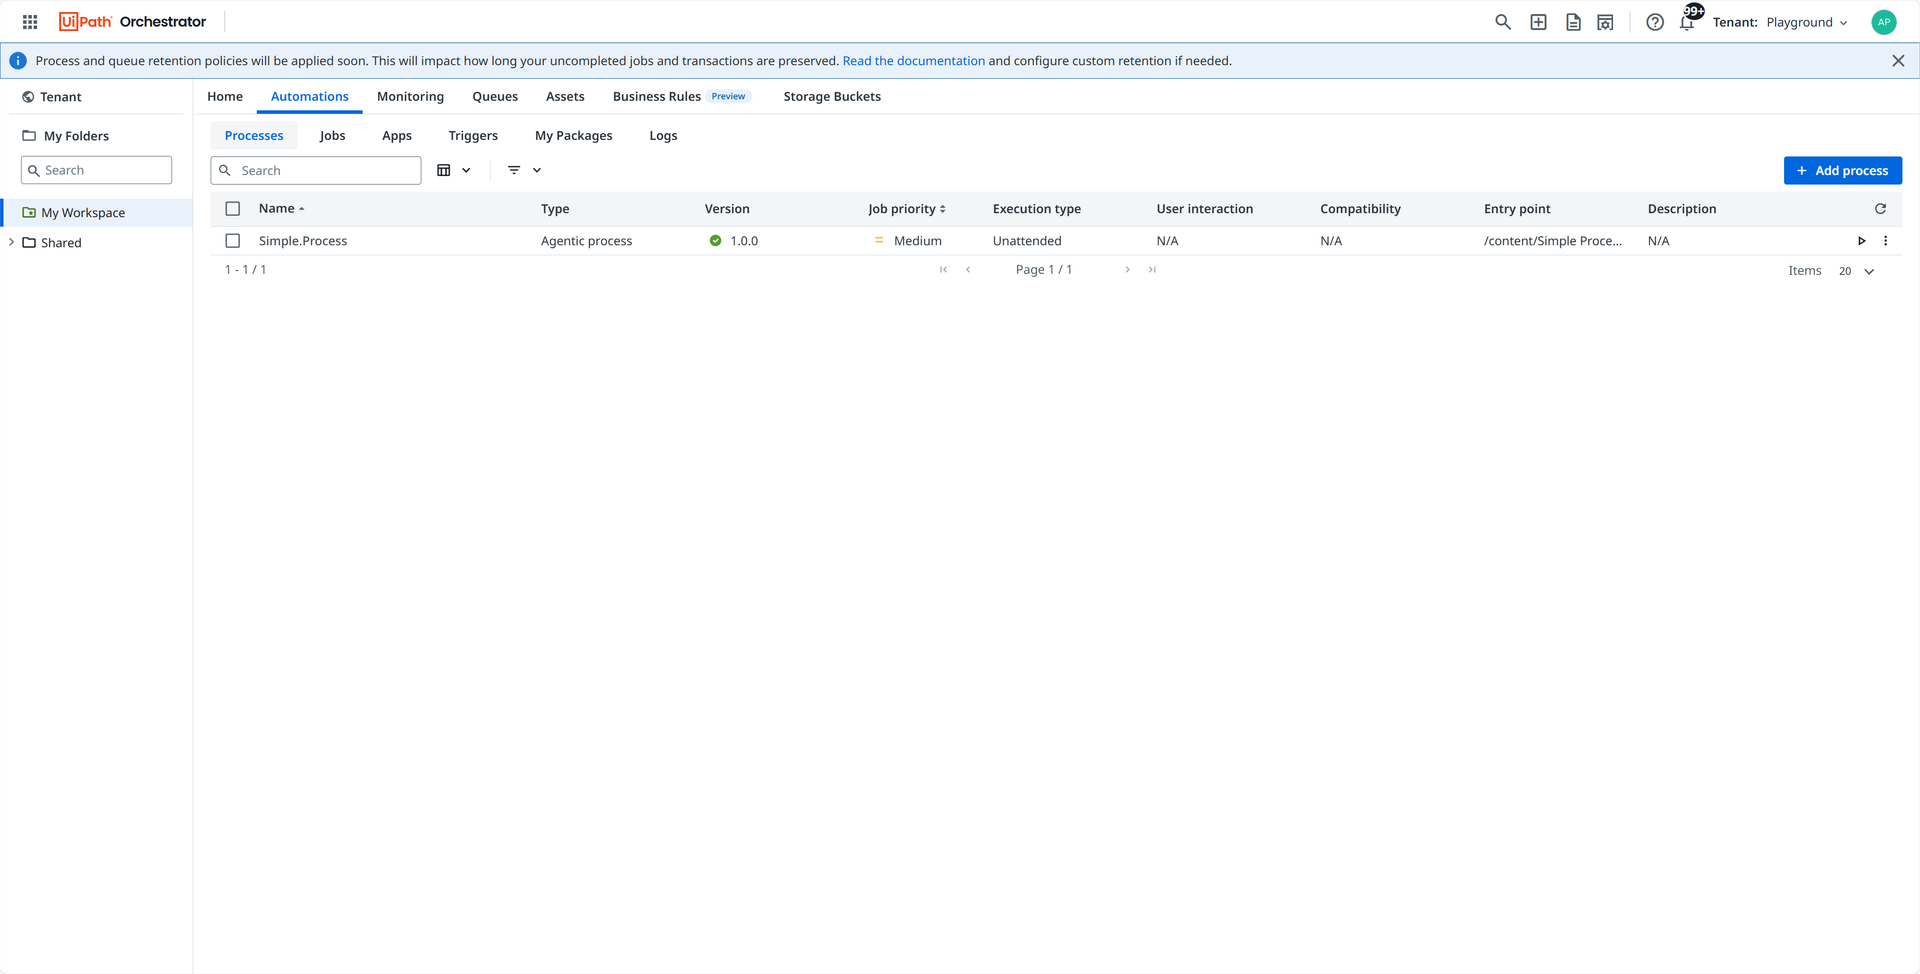
Click Start a Job for the Simple.Process entry and click Start.
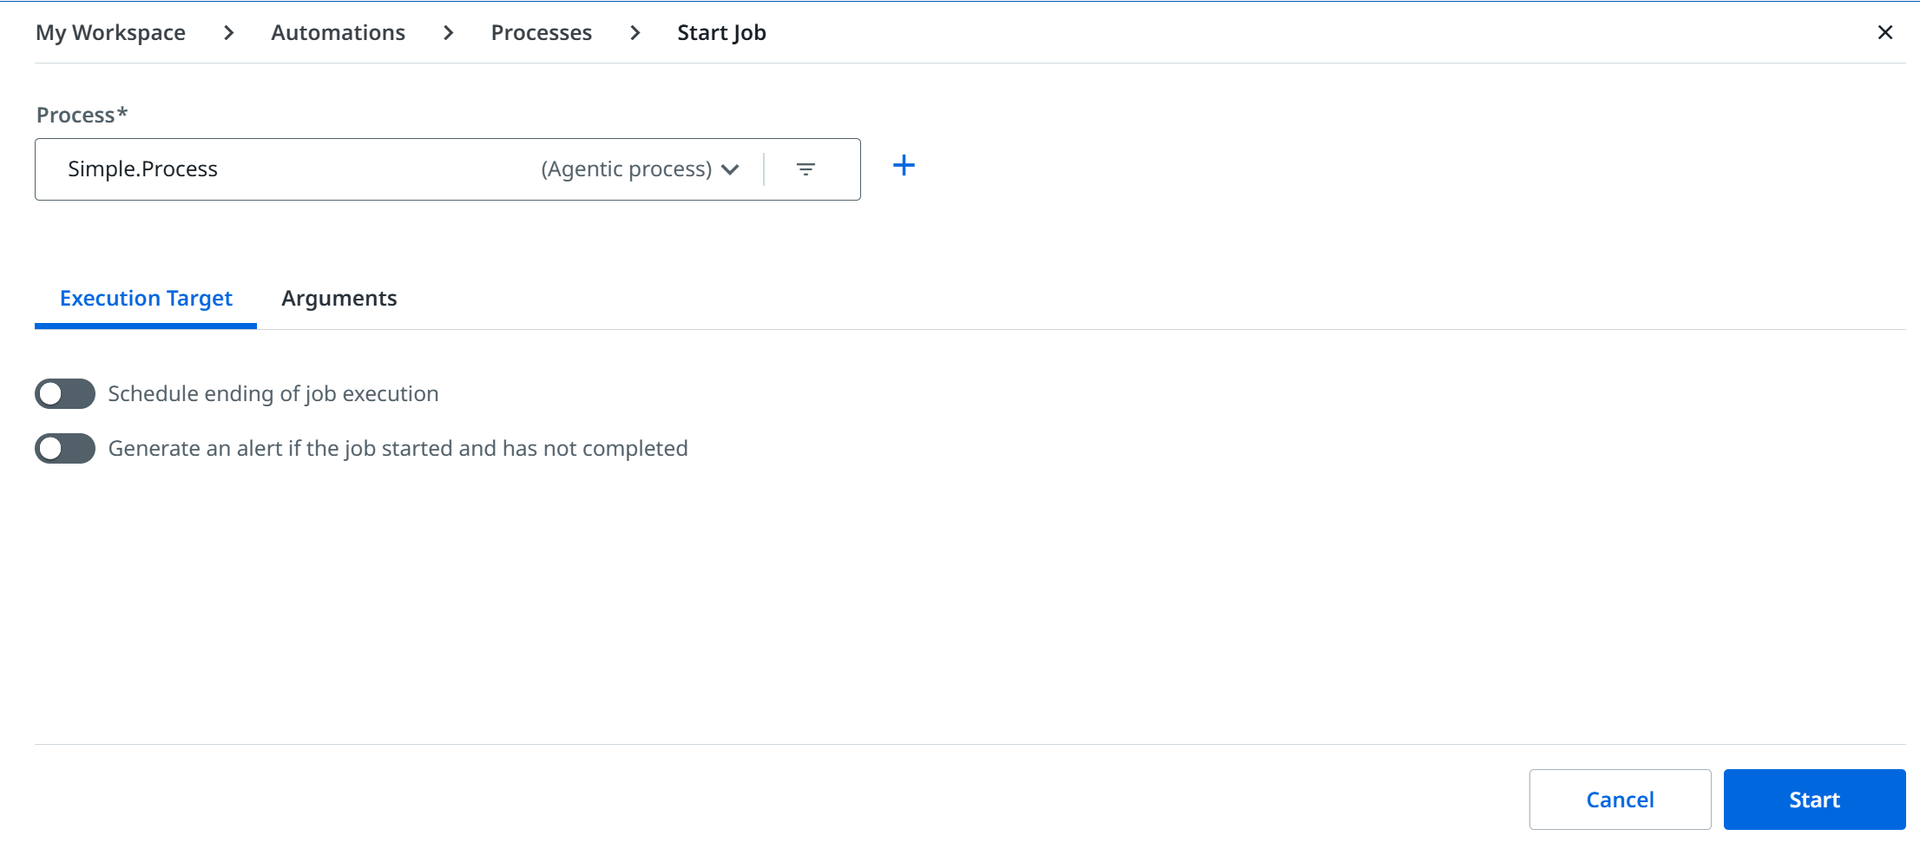
Congratulations! You’ve now fully published, deployed and started your first process!
Now let’s do some runtime instance management!
Manage a business process
Navigate to Maestro in left navigation menu.
Click on Simple Process in the list of Processes to open the All instances view for your process. You can use search to filter the list if needed.

Click on the latest instance to open the instance viewer. You will see the process execute live through each step (assuming the 5 second delay timer is still executing).
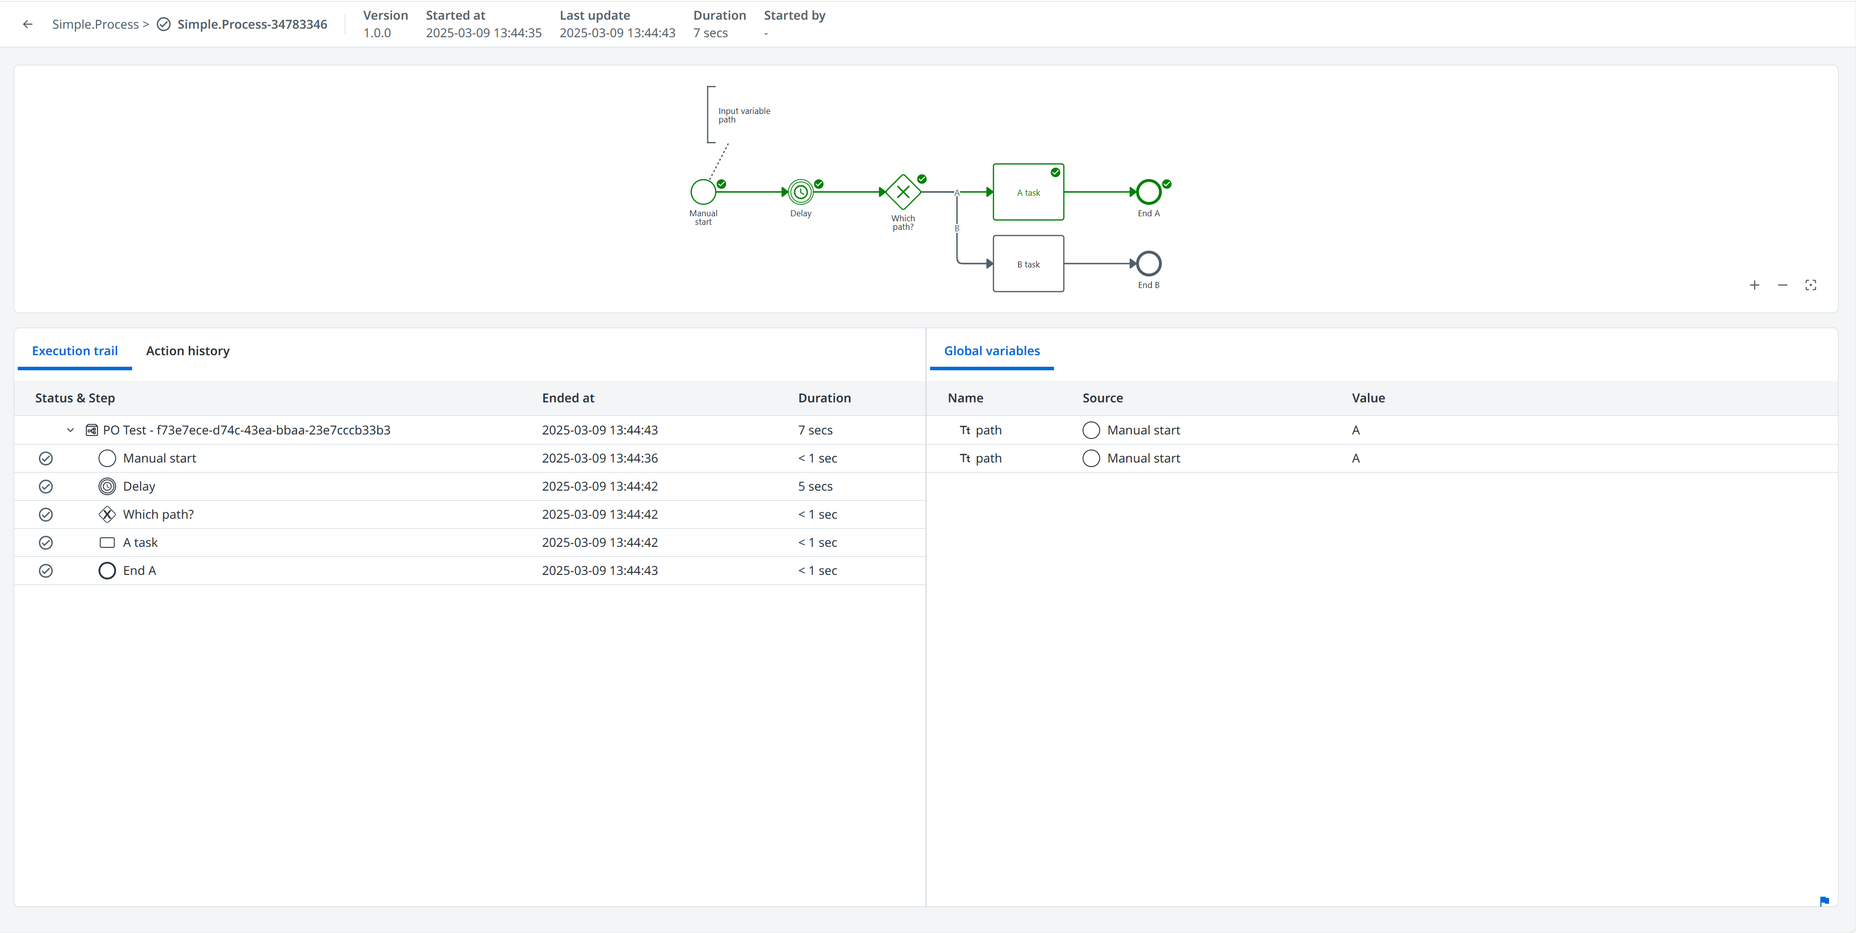
You can click on the model background to see Global variables and Action History as well as the Execution trail. You can click on a node in the model or the Execution trail to inspect Details and Variables for that execution step.
Congratulations! You’ve now fully managed your first process!
Now let’s break our process so we can fix it!
Break and Fix a process
Let’s cause a failure in execution so we can use our instance management to recover.
Navigate to Orchestrator, Automations tab for My Workspace folder and find Simple.Process in the Processes list. Click Start a Job for the Simple.Process entry but this time we will edit the Arguments before starting to so we can break it.
Click on Arguments tab and edit the path variable. Set the value to C and click Save.
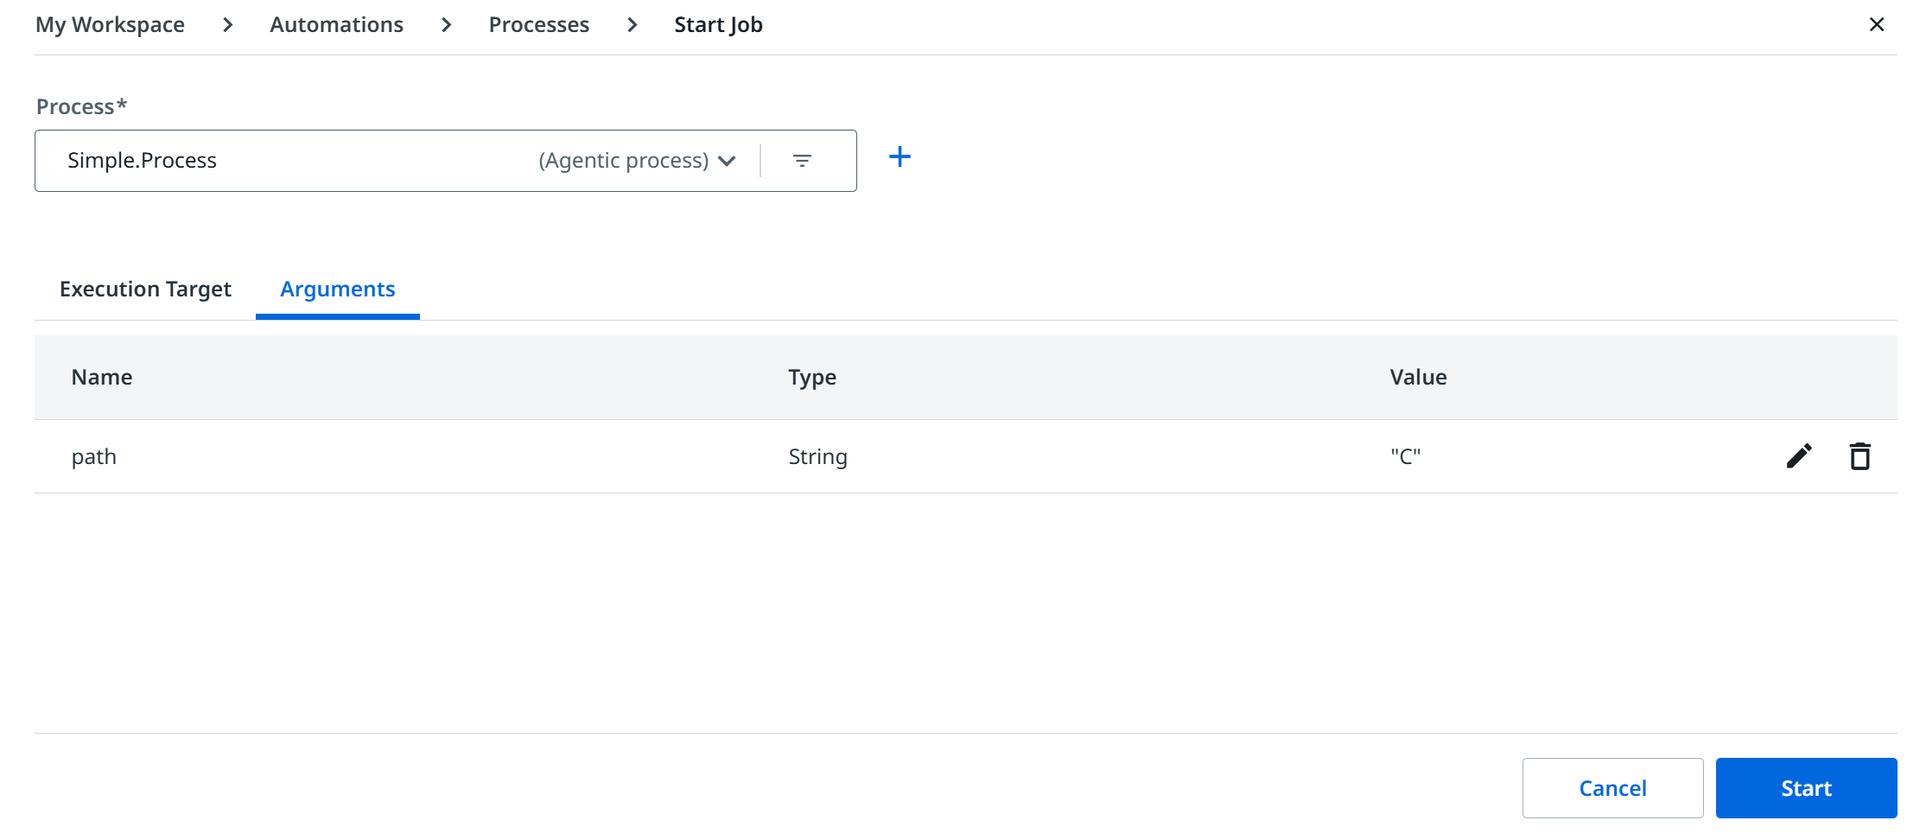
Click Start.
Navigate to Maestro and click on Simple Process in the list of Processes to open the All instances view for your process.
Click on the latest instance to open the instance viewer. You will see the process is in a failed state at the Which path? gateway. NOTE: You might need to click refresh button for the list to see the latest instance.

Select the Which path? gateway step to see the No outgoing flow for gateway error which is to be expected since we have no configuration for path==”C”.

Click on the first step container or the model background to view the Global variables.
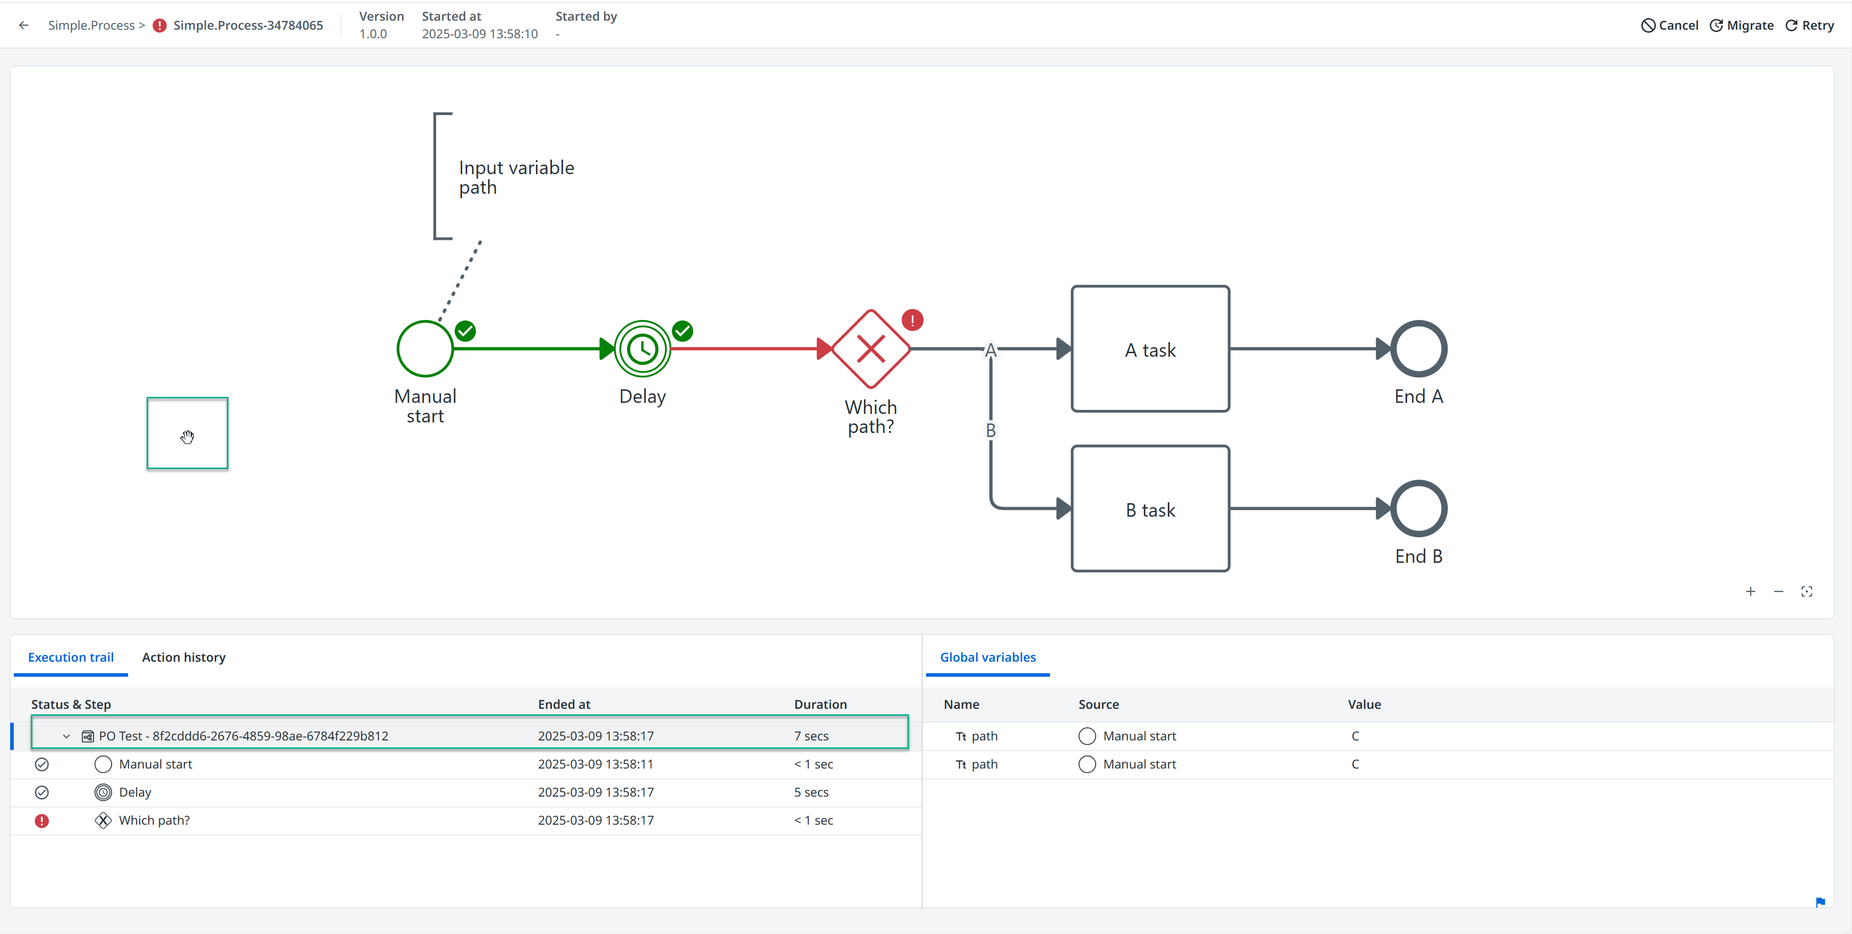
We will ensure the flow will follow a configured condition by updating the path variable for Manual start output (the second one) to A.

Click Update 1 variable to update the variable and add a Comment for audit purposes.
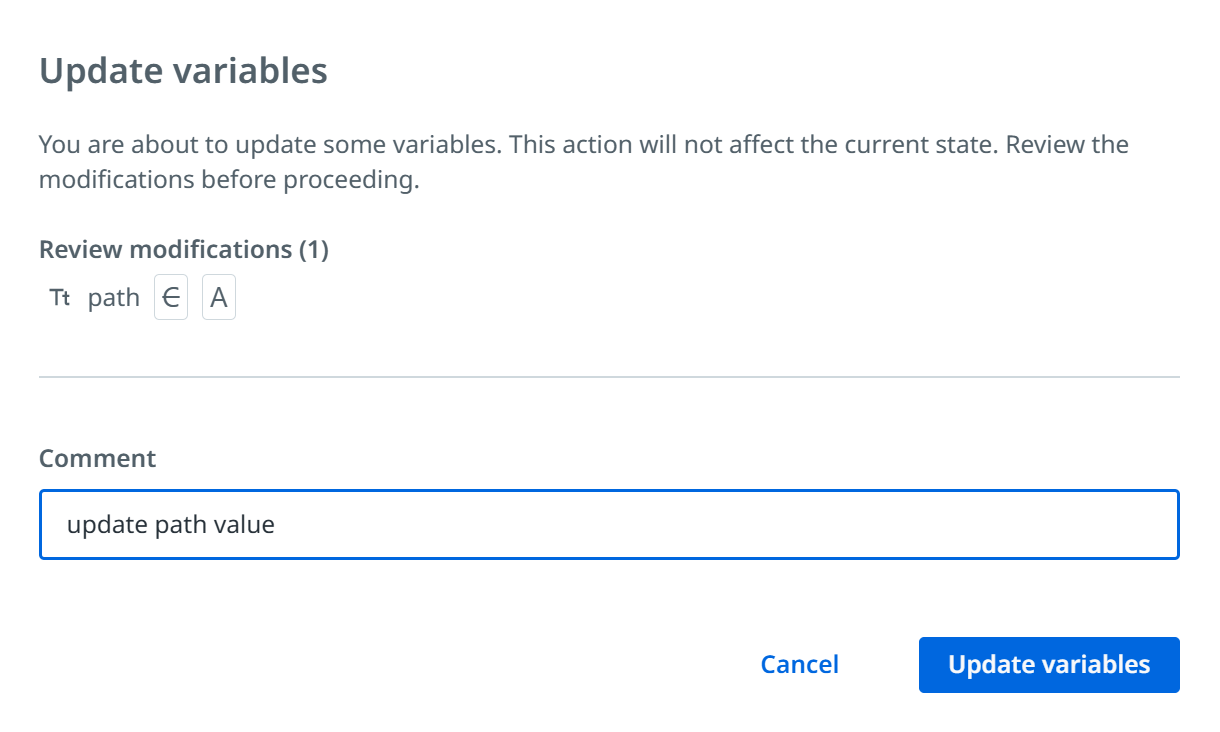
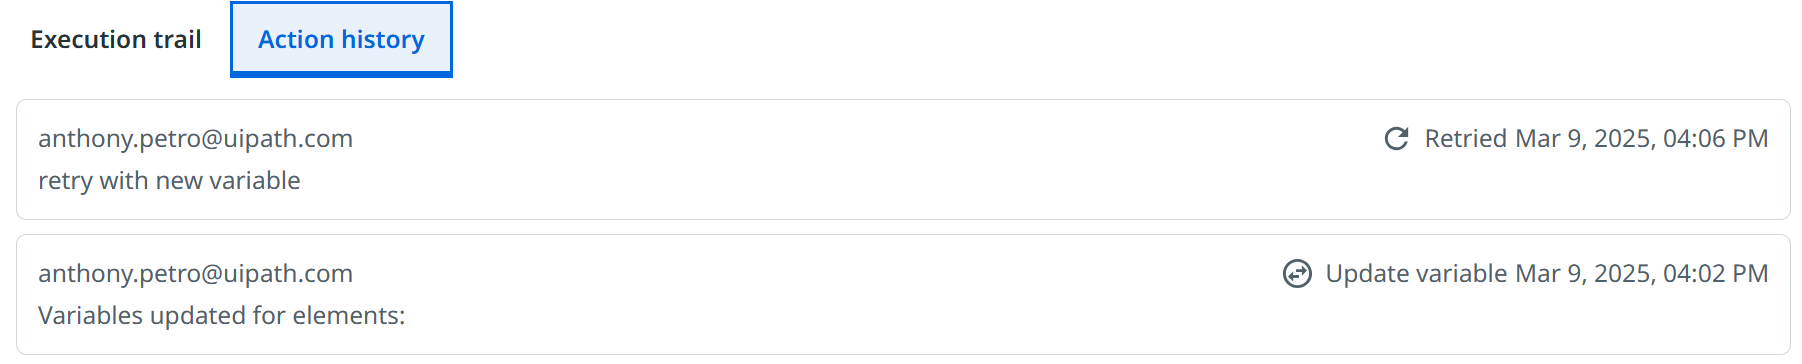
Click Retry, add a comment and click Retry instance to retry the step with the new variable and watch the instance complete. NOTE: You might need to refresh the page to see the instance complete.


Look at the Action History to see the audit trail for our changes.
Congratulations! You successfully fixed a broken instance!
Migrate between versions of a process
Our process flow logic is not robust enough to handle all path scenarios so let’s fix that and publish a new process version that we can use for both new process instances as well as to fix existing broken instances. We will change the B route to a Not A route to handle all scenarios where path does not equal A.
Let’s get another instance into a failed state so we can fix it with our new version.
Navigate to Orchestrator, Automations tab for My Workspace folder and find Simple.Process in the Processes list.
Click Start a Job for the Simple.Process entry and click Start.
Navigate to Orchestrator, Automations tab for My Workspace folder and find Simple.Process in the Processes list. Click Start a Job for the Simple.Process entry and edit the Arguments to break it.
Click on Arguments tab and edit the path variable. Set the value to C and click Save and click Start.
Let’s go fix our process so we can migrate this broken instance.
Open your Simple Process in Studio.
Select the Which path? gateway and open the properties panel.
Change B label to Not A and change the condition to vars.path != A
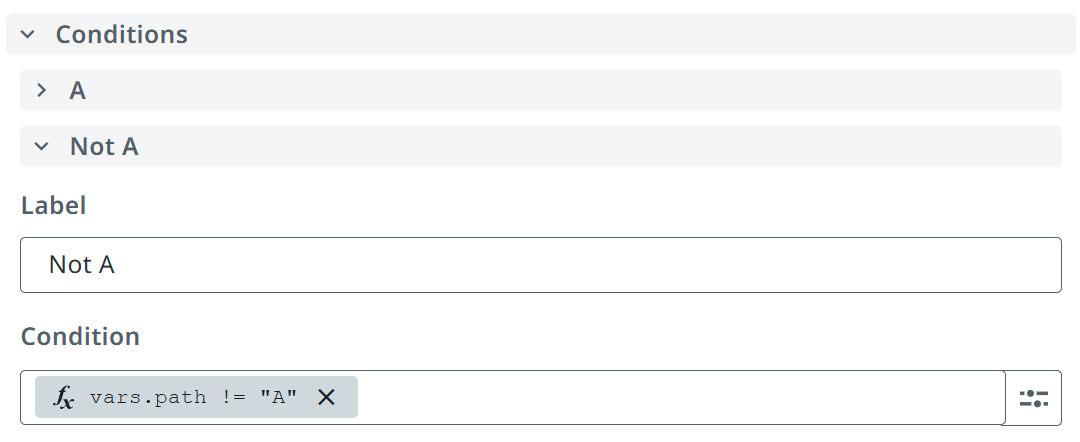
Change the task B task name to Not A task.
Change the end event End B name to End Not A.
Click Publish, select Orchestrator Personal Workspace Feed and click Publish.
Let’s migrate our broken instance to the new version.
Navigate to Maestro and click on Simple Process in the list of Processes to open the All instances view for your process.
Click on the latest instance to open the instance viewer. You will see the process is in a failed state at the Which path? gateway. NOTE: You might need to click refresh button for the list to see the latest instance.
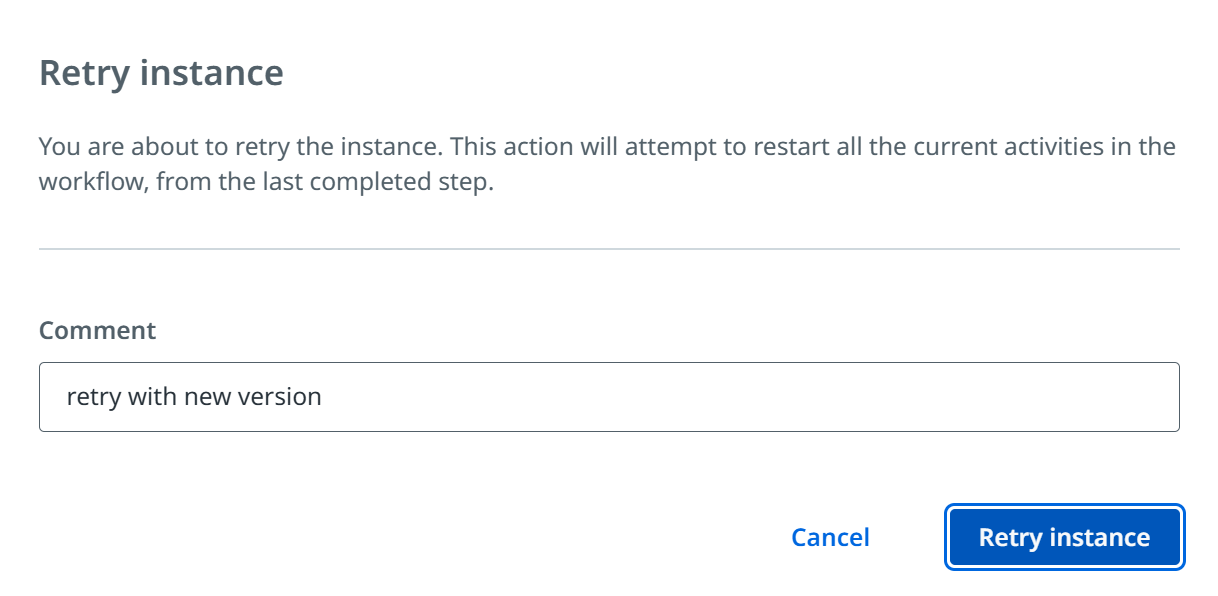
Click on Migrate, select the Target version for the process you just published (it should be 1.0.1 but might be different for you), provide a comment and click Migrate instance.

Click Retry, add a comment and click Retry instance to retry the step with the new variable and watch the instance complete. NOTE: You might need to refresh the page to see the instance complete.
Look at the Action History to see the audit trail for our changes.
Congratulations! You successfully migrated a broken instance to a new version of the process!
Final Process

Process Templates
Process Templates
Invoice processing:
Loan processing:
Supplier onboarding: